Setting up Google Ads campaigns in CPV Lab
The campaign setup process for Google Ads is a little bit different because Google Ads doesn’t allow extra redirects before your landing page.
This requirement is called Parallel Tracking, and you need to link from your ads directly to your landing page domain, without other intermediate redirects or hops.
This also means that you will not be able to do direct linking on Google Ads because they will not allow extra redirects through the affiliate link.
Parallel model
| Parallel Model | |
|---|---|
| Google SERP | ➡️ landing page |
| ➡️ tracking URL |
![]()
What if you want to use the Tracking Template?
Even if you want to use the Tracking Template field from Google Ads to perform an extra redirect through the affiliate link, you will need to make sure that the affiliate link domain is a Google certified domain. This is something that affiliate network usually don’t provide, so it will be a real struggle to try direct linking on those affiliate links.
The solution is simple, and it involves using a landing page in your campaign and setting up a custom tracking subdomain using the same root domain as your landing page.
This drastically reduces the chances of getting ads disapproved and tracking will work very well because first party data and first party cookies will be used in the campaign.
We will describe below all steps needed in order to setup a landing page campaign for Google Ads and how to track it correctly in CPV Lab (self-hosted ad tracker) or CPV One (cloud-hostted ad tracker).
- How to setup a custom tracking domain
- Setup the right traffic source
- Select your affiliate network (optional) - not needed if you have your own offers
- Define the landing page
- Define the Offers
- Setup the campaign in the tracker
- Add the tracking code to your landing page
- Setup the campaign in Google Ads
- Send conversions back to Google Ads from the tracker
Video on how to Setup a Google Ads campaign and track it with CPV Lab
1. Setup the custom tracking domain
The best option for such a campaign would be to define a custom tracking subdomain based on the domain of your landing page.
So if your landing page is placed on landing-page-domain.com, then you can define a subdomain such as go.landing-page-domain.com for tracking.
The advantages or using a custom tracking subdomain for Google Ads campaigns are:
- the tracker will use first party data and first party cookies which are accepted across all browsers (including mobile devices)
- visitors will see a much nicer redirect link from the landing page to the offer
- Google will see the redirect from the landing page being made to the same root domain
TIP
You could also use the default tracker domain for a Google Ads campaign, but tracking will not be 100% accurate, especially for mobile devices.
How to setup the custom tracking domain
In order to setup the custom tracking domain, you will need to configure a DNS record in the DNS setting of the landing page domain and to add the subdomain in the Custom Domains page from your tracker.
Depending if you are using the self-hosted tracker or the cloud-hosted one, complete details about setting up custom tracking domains can be found here:
2. Traffic Source selection
Before using any traffic source in your campaigns, you should check that it is imported into your tracker.
Access the Traffic Sources page under the Sources menu and look at the list from the bottom of the page.
- If you don’t have Google Ads in there, then import it from the Catalog (use the “Import from Catalog” button).

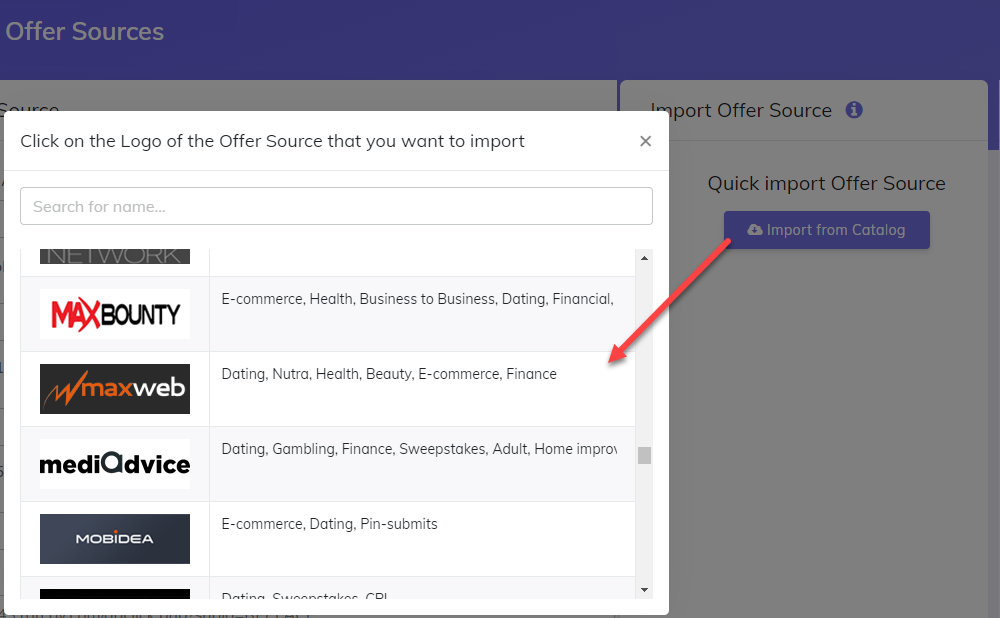
3. Offer Source selection (only for affiliate offers)
- Same as for the Traffic Source, you will need to import the affiliate network declaration into your tracker.
- Access the Offer Sources page under the Sources menu and look at the list from the bottom of the page. If your affiliate network isn’t in the list, then import it from the Catalog (the “Import from Catalog” button).
- If you want to use an affiliate network that we don’t have yet in the Catalog, then send us a message and we will add it quickly.
- If running your own offers or e-commerce store, you will use In-house as the Offer Source, so you can skip this step.
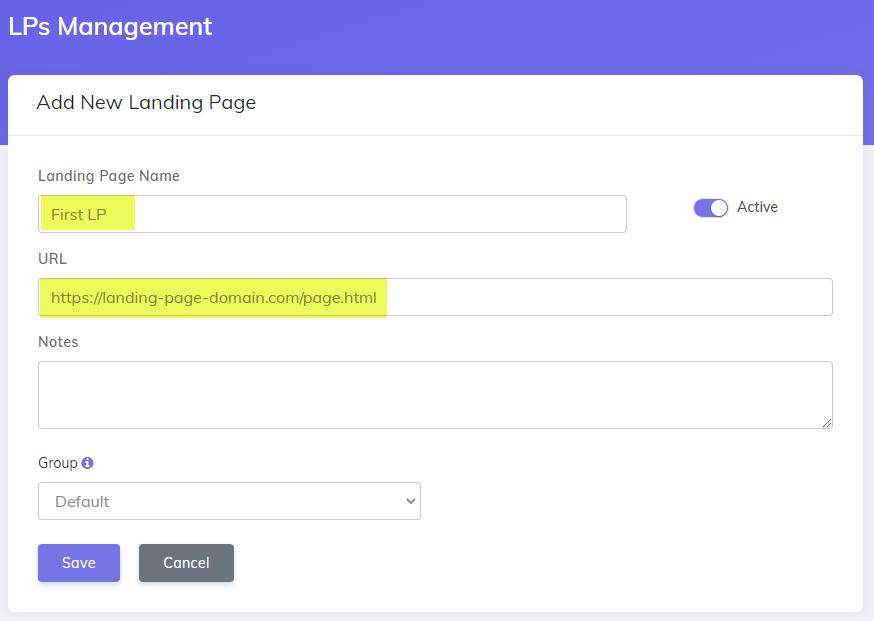
4. Define the Landing Page
Access the LPs Management page under the “LPs & Offers” menu and define the landing page details here.
You will need to provide the following required information:
- Landing Page Name
- Landing Page URL
Optionally, you can also assign the landing page to a group in order to keep pages more organized. This is especially useful when you have many pages added in the tracker or pages from multiple websites.
Once saved, the landing page will appear in the data table from the bottom of the LPs Management page.
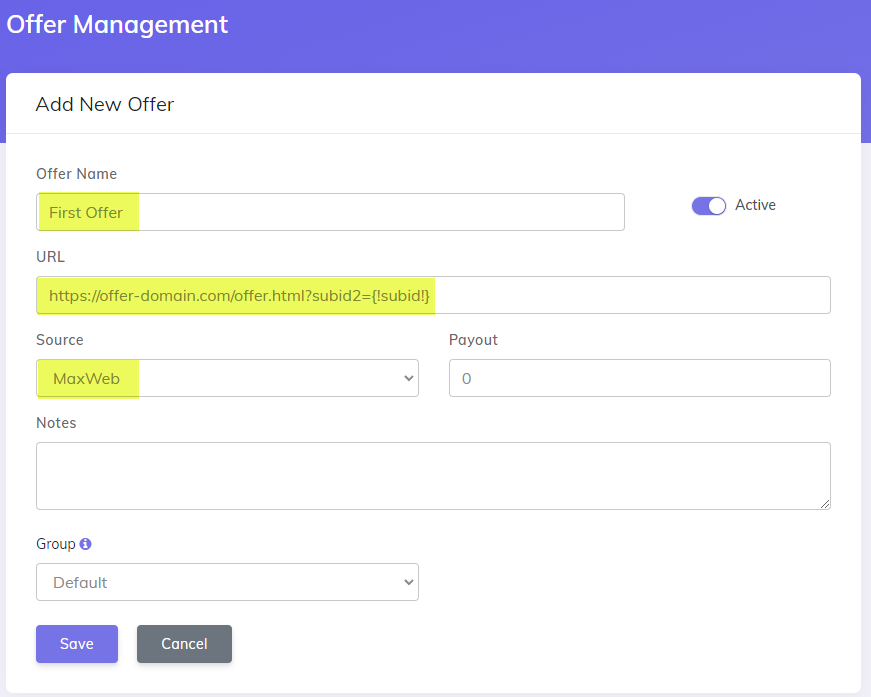
5. Define the Offer Page
- Access the Offer Management page under the “LPs & Offers” menu and define the offer page details here.
- You will need to provide the following required information:
- Offer Name
- Offer URL adjusted with the ending specific to your affiliate network
- Source / Network
- Optional information include:
- Payout – if the actual payout isn’t passed from the affiliate network, then you can define a default revenue here
- Notes – information that you want to add for this offer; this won’t be displayed anywhere else except in the tracker
- Group – used to organize offers, useful when having many offers defined
- Once saved, the offer page will appear in the data table from the bottom of the Offer Management page.
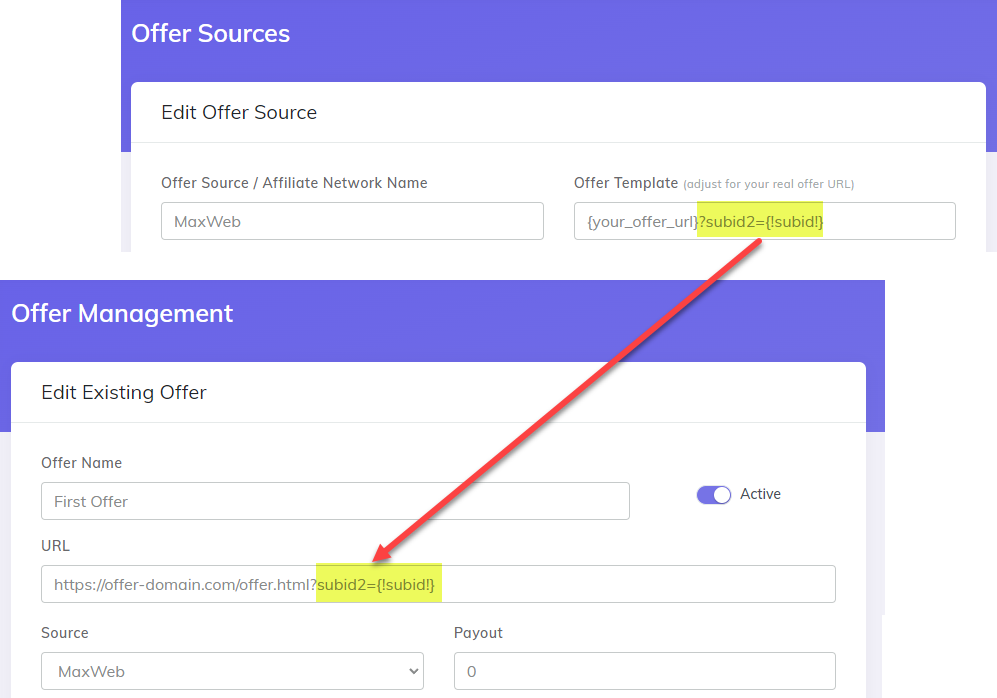
TIP
It is very important to end the Offer URL entered in this page as shown in the Offer Template field (in the Offer Sources page) for your affiliate network.
This is needed in order to pass the subID (unique click ID for each visitor to the affiliate network). When a visitor converts on the affiliate network side, they will pass back the converting subID (click ID) to the tracker through the Postback URL call.
Example:
- if you have a MaxWeb offer, then the Offer Template field for MaxWeb in the Offer Sources page would be:
{your_offer_url}?subid2={!subid!} - This means that your offer URL would be ended with
subid2={!subid!}, so it will look like: https://offer-domain.com/offer.html?subid2={!subid!}
6. Setup the campaign in CPV Lab
Now you are ready to setup the campaign inside the tracker. The setup is the same for CPV Lab self-hosted ad tracker (opens new window) and for CPV One cloud-hosted tracker (opens new window).
Choose “Add New Campaign”, then select Direct Link & Landing Page as the type.
- The advanced campaign setup page has many configurable options, but most of them can be left to the default values.
You need to enter:
- Campaign Name
- Tracking Domain – choose the custom tracking subdomain that you defined above
- Data Options – the metrics that you want to capture internally in the tracker. The most popular choices are Geo Data, Mobile Data, Computer Data, User Agent, Referrers
- Redirect Type – use Double Meta Refresh if the offer comes from an affiliate network and choose Direct Redirect if having your own offer
- Campaign Type – choose Landing Page

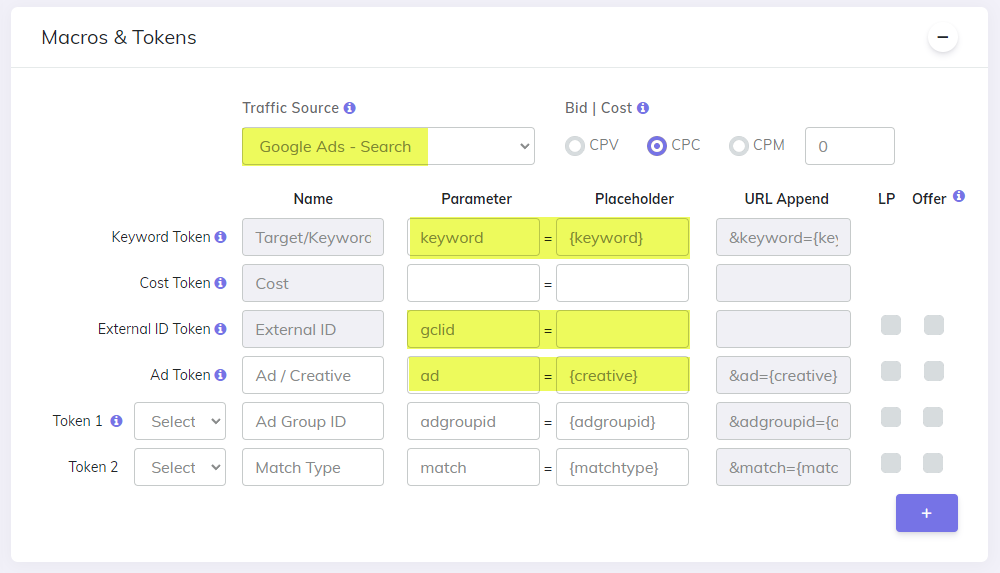
- Next you will choose Google Ads as the traffic source.
- For Search campaigns choose Google Ads – Search
- For Display campaigns choose Google Ads – Display.
- The most important tokens will be already prefilled in the Keyword Token, External ID Token and Ad Token fields.
- More tokens can be captured in the Extra Token fields and you can select to capture the Ad Group ID for example.
- Moving forward, you will have the Landing Pages section.
- Here is where you will select the page defined at Step 4 above and it will automatically populate in the textboxes.
- Set its share to 100% in order to receive all visitors.
- More landing pages can be added here if you want to send traffic from Google Ads to more than one page.

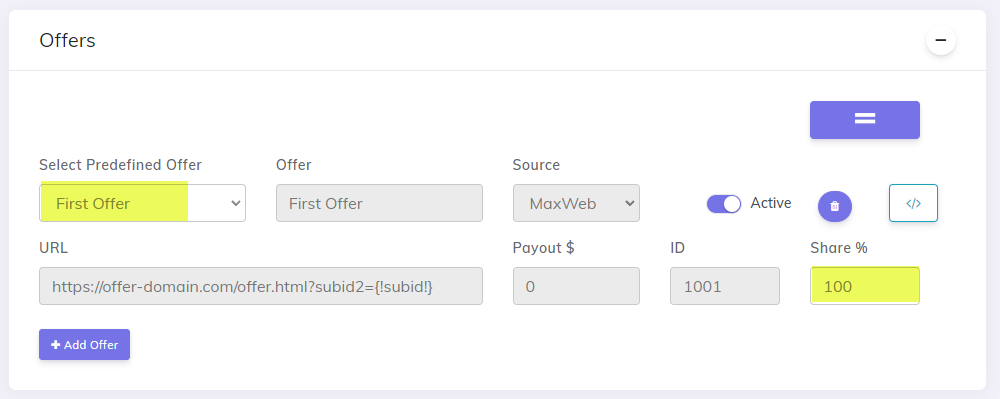
- Now you have the Offers section where you will select the offer page defined at Step 5 above.
- All details will be prefilled, including the correct Offer URL adjusted with the Offer ending specific to the affiliate network.
- You only need to set the share to 100% in order to receive all visitors.
- If you want to split-test multiple offers, then you will define all of them in the Offers section and set the share percentages to control how many visitors will be sent to each page.
7. Tracking code
In order to perform visitor tracking, you need to place the tracking code in your landing page.
- All the necessary code is provided in the campaign setup page and all you need to do is copy-paste the code in your landing page HTML.
WARNING
If using a landing page builder tool, then you will add the tracking code in the “Footer” section of the page.
Steps to start tracking
- Add tracking code to your landing page
- Change links to the offers with tracking links
- Track conversions (from affiliate network with S2S Postback URL or from your own offers with a tracking pixel)
Step 1: Add the tracking code in the landing page
- Place the code from Links & Pixels -> Step 2 in your website:
- the are only 3 lines of code from Step 2 in the campaign setup page -> "Links & Pixels section"
Step 2: Add the Direct Traffic code to the landing page
- Add the JavaScript version of the Direct Traffic code (take this from the
</>button next to your landing page.
Step3: Change the links to the offers with tracking links
- Then change all links from the landing page that you want to redirect to the offer with the tracking link provided at Step 1 in the campaign setup page.
- This will be the
base2.phptracking link and it will redirect visitors to the offer URL entered in the Offers section (or rotate offers if more than one is entered).
- This will be the
![]()
Step 4: Track conversions with the Postback URL at the affiliate network
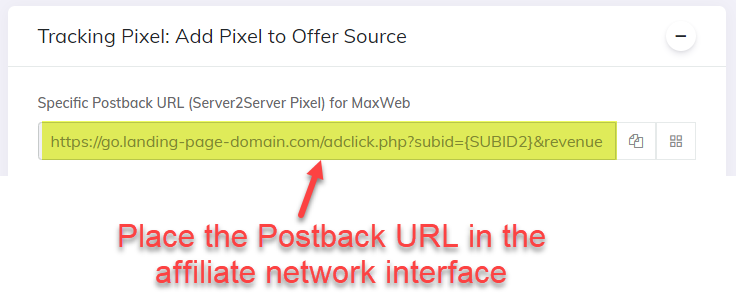
Last thing would be to setup the Postback URL in the affiliate network interface.
- The Postback URL will be used to receive conversions automatically in the tracker from the affiliate network.
- This will be set as a Global Postback URL in the affiliate network.
You will find the exact Postback URL that you need to use on the right column, look for the textbox labeled “Specific Postback URL for your affiliate network”.
- In our example, we have “Specific Postback URL for MaxWeb".
Step 4.1 : Track conversions for your own offers
- If you are using your own offer pages, then you will place the image version of the Tracking Pixel in the Thank You page (the page visitors are redirected to after a purchase).
8. Setup the campaign in Google Ads
Now you have the configuration complete in CPV Lab, in the landing page and also in the affiliate network. The last thing would be to setup the campaign in Google Ads.
- Go to your Google Ads account
- Choose any type of campaign and audience that would work for you, make the campaign settings in Google and define the ad groups.
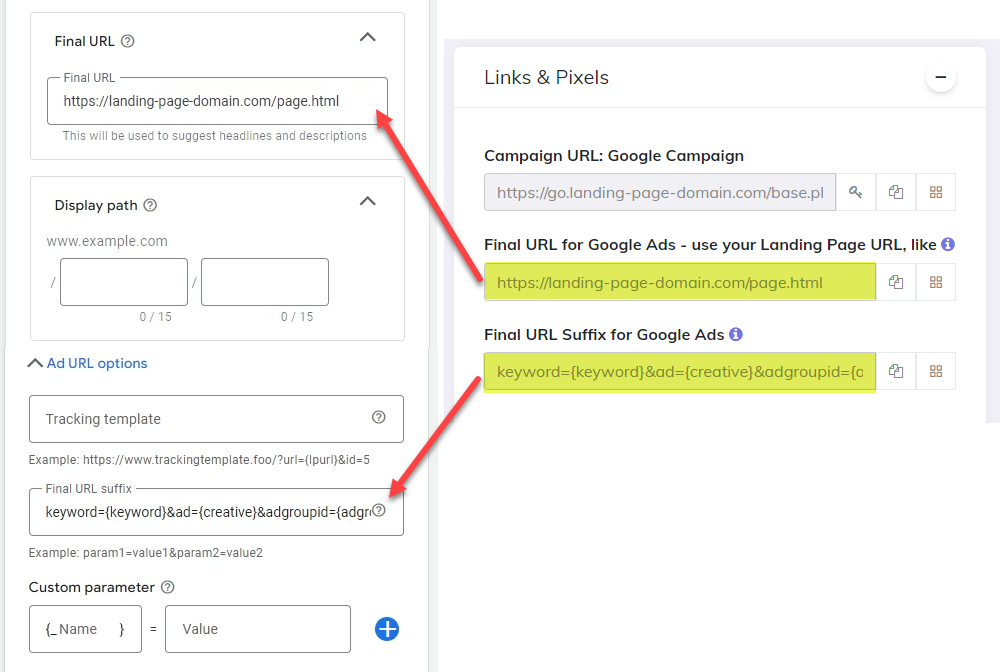
- When you configure your ads in Google Ads, you need to pay attention to 3 fields for tracking:
- Final URL – this will be your landing page URL
- Tracking Template – this will remain blank, you don’t enter anything here
- Final URL Suffix – this part will contain the parameters specific to Google Ads
- Both the Final URL and Final URL Suffix values are provided in the campaign setup page, in the Links & Pixels section.
- You just need to copy and paste the values from CPV Lab into the Google Ads setup page.
9. Pass conversions to Google Ads automatically (optional)
This step is optional, but it is highly recommended in order to optimize your audiences in Google Ads and to receive better quality of traffic.
With the Google Ads integration from CPV Lab, you will be able to pass conversions automatically to Google Ads and by doing so Google will know which visitors convert and optimize the audience to send more visitors that are likely to convert.
The Google Ads integration needs to be performed only once for each Google Ads account that you use.
What if I want to rotate traffic between 2 or more landing pages?
- Since you are direct linking to the landing page instead of using the Campaign URL in your Google Ads campaign, you cannot have the landing pages rotated directly and you need an alternative approach.
Solution 1: rotate traffic between landing pages with different ads
One solution is to create different ads in Google Ads for different landing pages.
- This means you will create your campaign in CPV Lab and add the landing pages in the Landing Pages section
- In Google Ads you will create an ad for each landing page
- You will track everything and compare the results
Solution 2: rotate traffic between landing pages with the Rotator
- Another solution that will actually allow you to split-test the same ad is to use the MV Lab tool which offers a Landing Page Rotator option.
- MV Lab will generate the code to create a redirect page that will be uploaded in the same server location as the landing pages.
- Then in your ad defined in Google Ads you will use the URL of the redirect page instead of the URL of the landing page.
- Visitors come from Google to the redirect page first, then they are sent to one of the landing pages based on the share% defined in your campaign setup page.
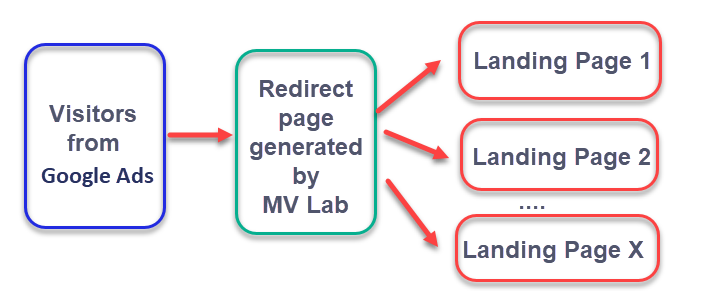
- MV Lab is a multivariate testing tool which integrates with CPV Lab Pro and can also act as a Landing Page Rotator for your CPV Lab Pro campaigns.