CPV Lab - Setting Up Custom Tracking Domains
CPV Lab Pro (opens new window) can track an unlimited number of pages and offers using a single instance (installation) and by default all the tracking links (base pages) use the instance domain as the base of the URL.
The Custom Tracking Domains feature allows you to attach different domains to your CPV Lab Pro instance and use these domains in the tracking links, on a per-campaign basis.
- This is achieved by editing the DNS A Records or DNS CNAME Records for the custom tracking domains at your Domain Name Registrar/Provider. You can find the entire process described in detail below.
If you have CPV Lab Pro (opens new window) installed at
https://cpvlabpro-domain.com, then by default all the tracking links (base.php, base2.php, base3.php) and pixels (adclick.php) use the cpvlabpro-domain.com domain and they look like this:https://cpvlabpro-domain.com/base.php?c=1&key=qwewqewqewqehttps://cpvlabpro-domain.com/base2.phphttps://cpvlabpro-domain.com/adclick.php
But what if you want to have a different domain in the tracking links of a campaign or group of campaigns?
- Then you need to define a Custom Tracking Domain!
- Check your plan to see how many custom domains you have included. You can get any number of custom domains with the special ad-on. Contact support here (opens new window) in case you want a package with multiple custom tracking domains included.
TIP
Note: The CPV Lab Pro interface (Campaigns, Stats, Trends pages) will always be accessed using your main domain (cpvlabpro-domain.com), the custom tracking domains can only be used in tracking links and pixels.
Advantages of using a custom tracking domains
Keep your original CPV Lab Pro domain private and secure as your campaigns would use tracking links from the Custom Tracking domains
Easily change your Campaign URL and Tracking Links from a campaign by selecting a new Custom Tracking Domain in the Campaign Setup page
You can have the Campaign URL using the same domain as your Landing Page. This may be required by some Traffic Sources (like Google Ads) and will improve your campaign appearance.
- Example:
- if you promote weight loss offers and your Landing Page is placed at:
https://lose-weight-today.com/top-methods.html
- Your initial Campaign URL would look like:
https://cpvlabpro-domain.com/base.php?c=1&key=qwewqewqewqe
- But you can add a Custom Tracking Domain for the
start.lose-weight-today.comsubdomain and use it in your campaign. This means that the Campaign URL that you submit to your Traffic Source would become:https://start.lose-weight-today.com/base.php?c=1&key=qwewqewqewqe
- if you promote weight loss offers and your Landing Page is placed at:
- Example:
You can have the Tracking Links using the same domain as your Landing Pages in order to hide the fact that you are redirecting to a different domain.
- Example:
- if you promote weight loss offers and your Landing Page is placed at:
https://lose-weight-today.com/top-methods.html
- Your initial Tracking Link placed in the above Landing Page in order to redirect to the Offer Page would be:
https://cpvlabpro-domain.com/base2.php
- But you can add a Custom Tracking Domain for the
start.lose-weight-today.comsubdomain and use it in your campaign. This means that the Tracking Link placed in the Landing Page would become:https://start.lose-weight-today.com/base2.php
- if you promote weight loss offers and your Landing Page is placed at:
- Example:
Steps to Setup a Custom Tracking Domain
Step 1. Get the domain
- If you don’t own the domain that you want to use as custom tracking domain, then you need to purchase the domain first.
- There are many domain registrars out there, we recommend namecheap.com (opens new window), namesilo.com (opens new window) or dynadot.com (opens new window) as they are very reliable.
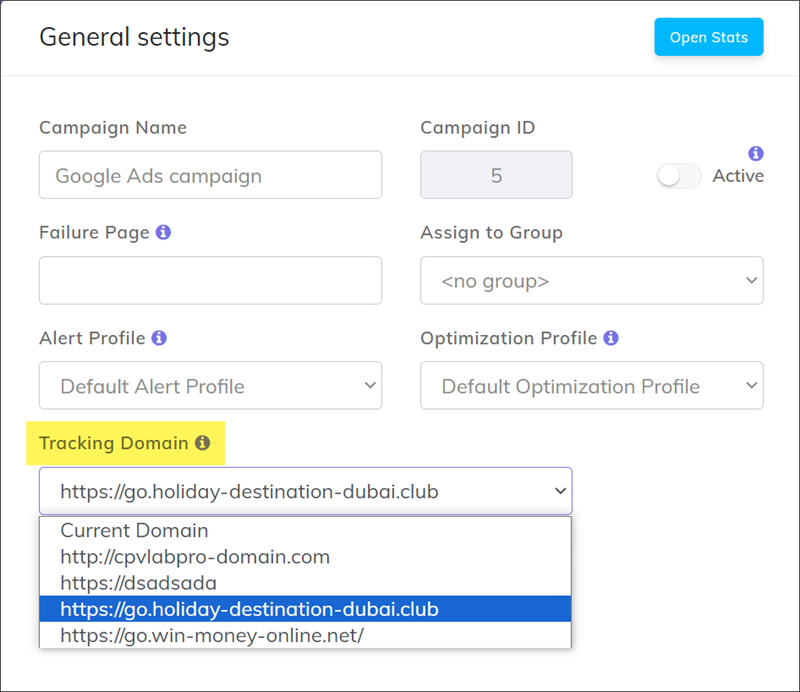
Step 2. Define the Custom Tracking Domain in CPV Lab Pro
You need to follow these steps:
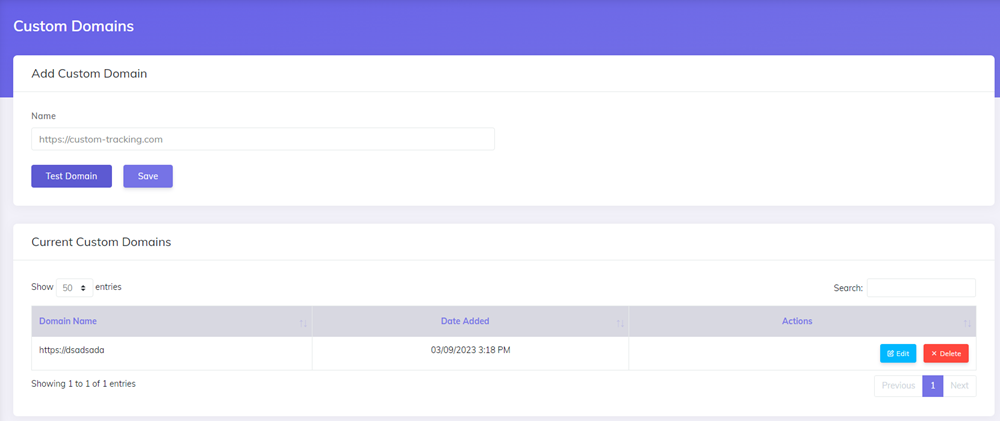
- Login to your CPV Lab or CPV One tracker
- Navigate to: Settings ➡️ Custom Domains
- Enter your newly created custom tracking domain starting with
https:// - Click Test Domain ( to check if Arecord or CName are setup and if it has SSL) - optional
- Click Save
Step 3. Edit DNS Settings at Domain Registrar/Provider
- Access the domain registrar interface. In case you don’t know who your domain registrar is, you can find it by looking at the whois of your domain (https://www.whois.com).
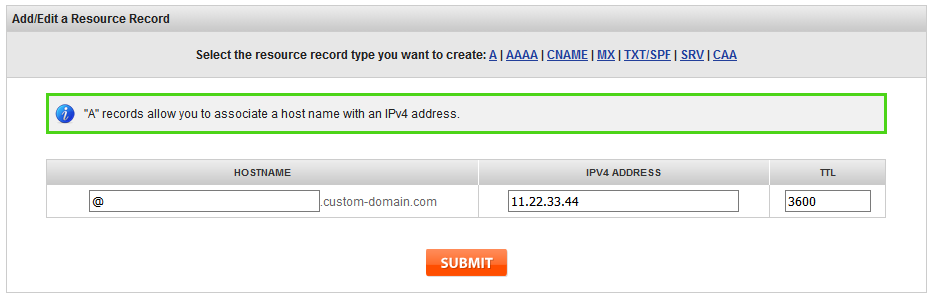
- You need to define either an A record, either a CNAME record.
- A Record – the A record should point to the IP address corresponding to your main CPV Lab Pro domain
- You can find the IP address of your main CPV Lab Pro domain using the Domain Lookup tool at https://ip-lookup.net/domain-lookup.php
- If you already have an A record for the
@ host, then edit this A record. Otherwise create a new A record with the following details:- Type: A Record
- Host: @
- Value: the IP address of your CPV Lab Pro instance
- TTL: Auto or 3600
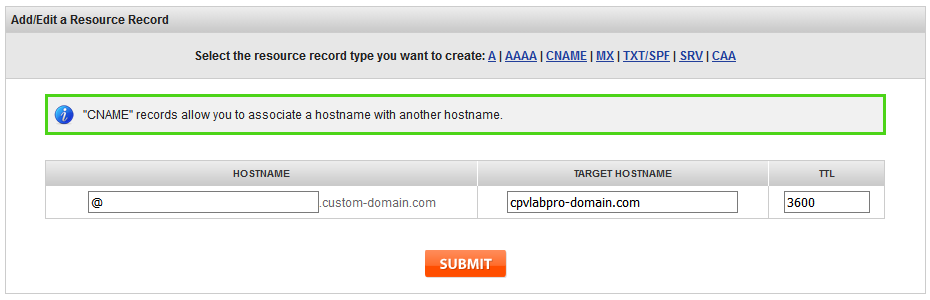
- CNAME Record - the CNAME record should point to the domain corresponding to your main CPV Lab Pro instance
- If you already have an A record for the custom tracking domain, then edit this CNAME record. Otherwise create a new CNAME record with the following details:
- Type: CNAME Record
- Host: @
- Value: the domain of your CPV Lab Pro instance
- TTL: Auto or 3600
- If you already have an A record for the custom tracking domain, then edit this CNAME record. Otherwise create a new CNAME record with the following details:
- A Record – the A record should point to the IP address corresponding to your main CPV Lab Pro domain
Step 4. (optional) For shared IP addresses on the main CPV Lab Pro domain
- If your CPV Lab Pro instance doesn't have a dedicated IP address and it can share the IP address with multiple domains on the same server, then you also need to complete one of the 2 steps below:
1. On servers with cPanel administration
- add the Custom Tracking Domain as an Addon Domain and define its Document Root to the same server path as Main Domain in cPanel for the Main CPV Lab Pro domain
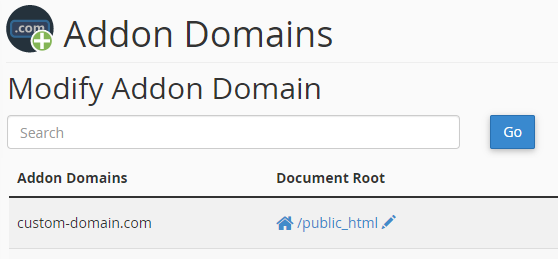
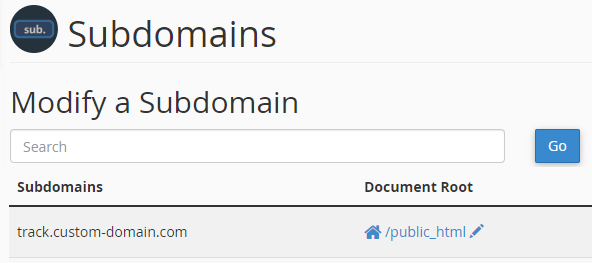
- If using a subdomain for the Custom Tracking Domain, you need to create the subdomain and define its Document Root to the same server path as the Main Domain
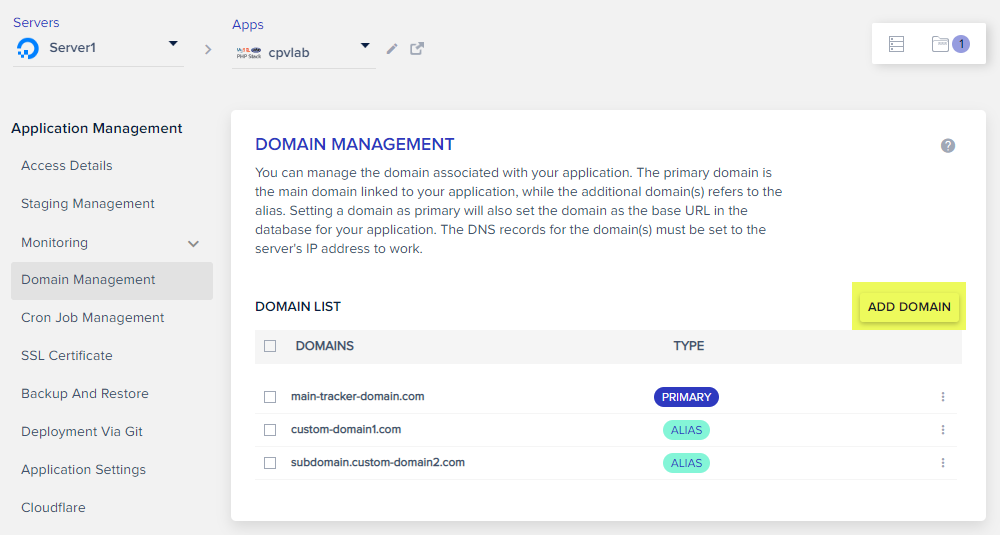
2. On Cloudways servers
- For Cloudways you will access your CPV Lab application in their interface, then go to the Domain Management page.
- You should have your tracker domain already appearing as the Primary domain in the list.
- You need to add the custom tracking domain or subdomain as an Alias domain in the list. Use the "ADD DOMAIN" button for this.
3. For other servers
- add a virtual host (vhost) in Apache on the Main Domain server for the Custom Domain to point to the same server path as Main Domain
Step 5. Test your custom domain
- You need to wait for the new domain to propagate somewhere between 1 and 24 hours.
- Once the domain is propagated you can call the
login.phpon the custom tracking domain in a browser and the page should load fine (note: you won’t be able to login at that custom domain URL, just check that the page loads). - Once you have the login page loading on the custom tracking domain, you can select the custom tracking domain in your campaigns and all tracking links provided in the campaign setup page will use the custom domain.
Examples:
Example 1: CPV Lab Pro installed in root of domain and custom domain is root of domain as well
Step 1: The CPV Lab Pro instance is installed in root of domain
cpvlabpro-domain.com, the IP address of CPV Lab Pro instance is 11.22.33.44 and the desired custom domain is root of domaincustom-domain.comStep 2: Enter the custom domain in the Settings page from CPV Lab Pro as:
https://custom-domain.comStep 3: Define either an A record, either a CNAME record:
- A Record
- Type: A Record
- Host: @
- Value: 11.22.33.44
- TTL: Auto or 3600
- A Record
Or define CNAME record:
- Type: CNAME Record
- Host: @
- Value: cpvlabpro-domain.com
- TTL: Auto or 3600
Step 4 Optional:
- Setup the Add-On domain custom-domain.com using cPanel on the main domain server and point it to the main CPV Lab Pro server location.
- Or create a virtual host on the server for
custom-domain.com
Example 2: CPV Lab Pro installed in root of domain and custom domain is subdomain
Step 1: The CPV Lab Pro instance is installed in root of domain
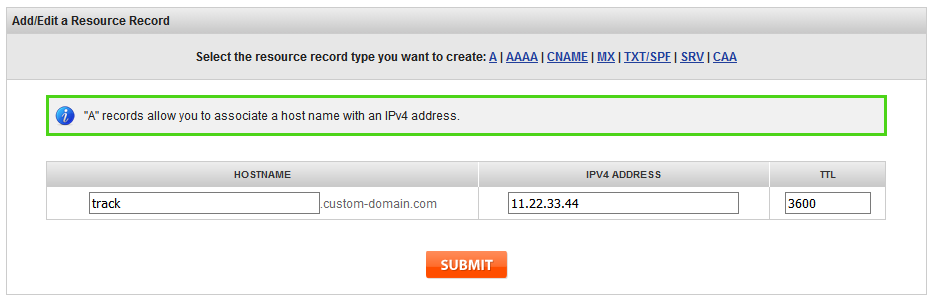
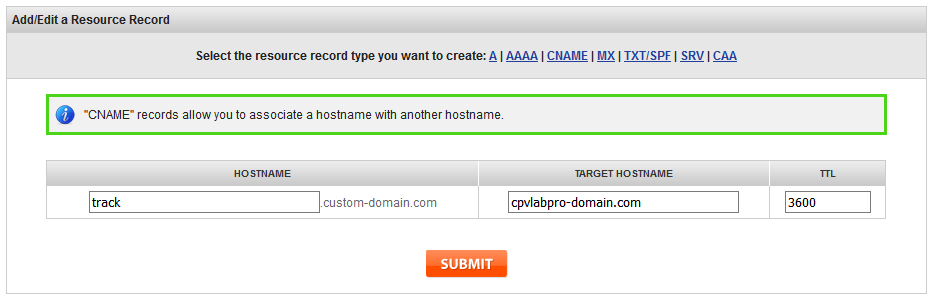
cpvlabpro-domain.com, the IP address of CPV Lab Pro instance is 11.22.33.44 and the desired custom domain is a subdomaintrack.custom-domain.comStep 2: Enter the custom domain in the Settings page from CPV Lab Pro as:
https://track.custom-domain.comStep 3: Define either an A record, either a CNAME record:
A Record
- Type: A Record
- Host: track
- Value: 11.22.33.44
- TTL: Auto or 3600
Or define CNAME record:
- Type: CNAME Record
- Host: track
- Value: cpvlabpro-domain.com
- TTL: Auto or 3600
Step 4 Optional:
- Setup the Add-On domain
custom-domain.comusing cPanel on the main domain server, then create thetracksubdomain and point it to the main CPV Lab Pro server location. - Or create a virtual host on the server for
track.custom-domain.com
- Setup the Add-On domain
Example 3: CPV Lab Pro installed in subdomain and custom domain is root of domain
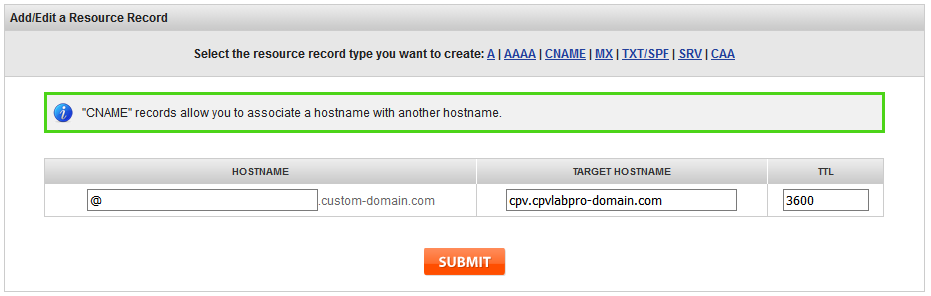
Step 1: The CPV Lab Pro instance is installed in root of domain
cpv.cpvlabpro-domain.comthe IP address of CPV Lab Pro instance is 11.22.33.44 and the desired custom domain is root of domaincustom-domain.comStep 2: Enter the custom domain in the Settings page from CPV Lab Pro as:
https://custom-domain.comStep 3: Define either an A record, either a CNAME record:
- A Record
- Type: A Record
- Host: @
- Value: 11.22.33.44
- TTL: Auto or 3600
- A Record
Or define CNAME record:
- Type: CNAME Record
- Host: @
- Value: cpv.cpvlabpro-domain.com
- TTL: Auto or 3600
Step 4 Optional:
- Setup the Add-On domain
custom-domain.comusing cPanel on the main domain server and point it to the main CPV Lab Pro server location. - Or create a virtual host on the server for
custom-domain.com
- Setup the Add-On domain
Example 4: CPV Lab Pro installed in subdomain and custom domain is subdomain as well
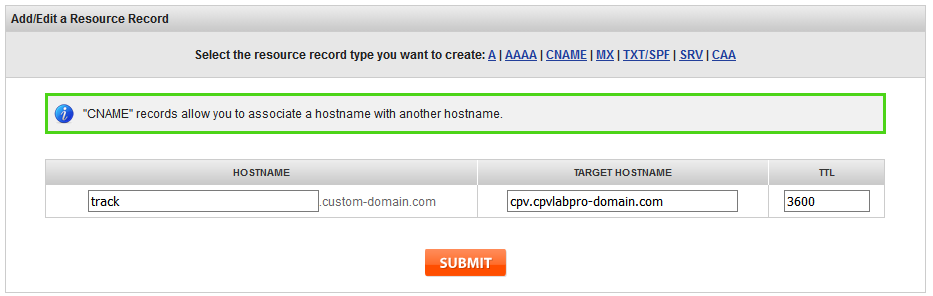
Step 1: The CPV Lab Pro instance is installed in subdomain
cpv.cpvlabpro-domain.com, the IP address of CPV Lab Pro instance is 11.22.33.44 and the desired custom domain is a subdomaintrack.custom-domain.comStep 2: Enter the custom domain in the Settings page from CPV Lab Pro as:
https://track.custom-domain.comStep 3: Define either an A record, either a CNAME record:
- A Record
- Type: A Record
- Host: track
- Value: 11.22.33.44
- TTL: Auto or 3600
- A Record
Or define CNAME record:
- Type: CNAME Record
- Host: track
- Value: cpv.cpvlabpro-domain.com
- TTL: Auto or 3600
Step 4 Optional:
- Setup the Add-On domain
custom-domain.comusing cPanel on the main domain server, then create thetracksubdomain and point it to the main CPV Lab Pro server location. - Or create a virtual host on the server for
track.custom-domain.com
- Setup the Add-On domain
SSL Support
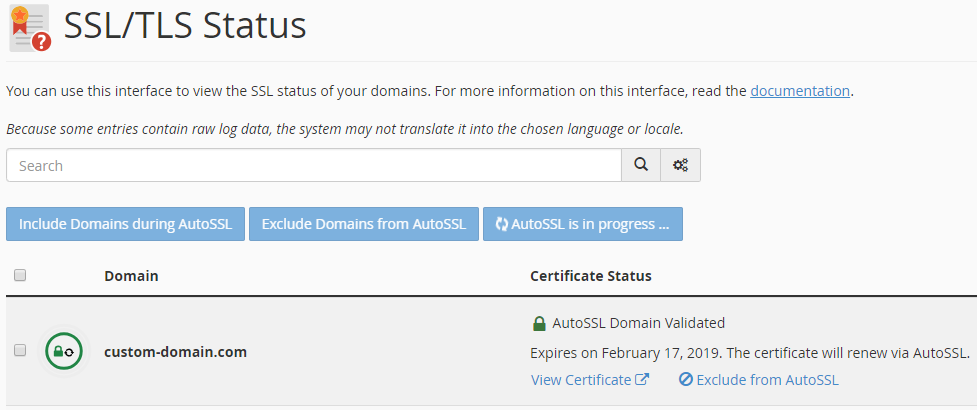
- If you have an SSL certificate on the main CPV Lab Pro instance, then most likely you want to have SSL enabled on the custom tracking domains as well.
- This can be done either on the main CPV Lab Pro server (using Let’s Encrypt or any other SSL certificate authority), either using the Cloudflare services for free.
1. Generate an SSL certificate for the custom tracking domain on the main CPV Lab server
This method works if you already have added the custom tracking domain entered as a
vhost, add-on domain or subdomain on the main CPV Lab Pro server.The SSL certificate for the custom tracking domain can be obtained from Let’s Encrypt for free or from any other certificate authority (where a cost may be involved).
To install the Let’s Encrypt SSL certificate you can use the Let’s Encrypt or SSL utility in cPanel or you can follow the instructions from the following link: https://letsencrypt.org/getting-started/
Make sure that the SSL certificate is generated for the exact domain or subdomain as the custom tracking domain.
2. Let Cloudflare handle the DNS records of the custom domain.
- This method means that you will create all the A Records and CNAME Records directly at Cloudflare and they will offer SSL support to your domain.
TIP
Note: If your custom domain has other content and nameservers pointing to another location (like Wordpress), then using the domain on Cloudflare may break the existing website because you need to change these nameservers to point to Cloudflare.
In this case we recommend that you purchase a new domain that will be only used as a custom tracking domain.
Steps to enable SSL on custom tracking domains with Cloudflare:
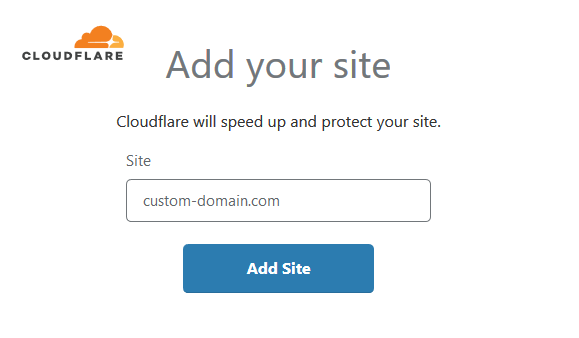
Create a new account at Cloudflare
Add a new site in Cloudflare and enter the custom domain. Import all the DNS records for the custom domain into Cloudflare
Now navigate to the DNS tab and follow the steps above to create either an A Record, either a CNAME network for the custom domain or for a subdomain on the custom domain. Cloudflare will automatically enable SSL on the custom domain.
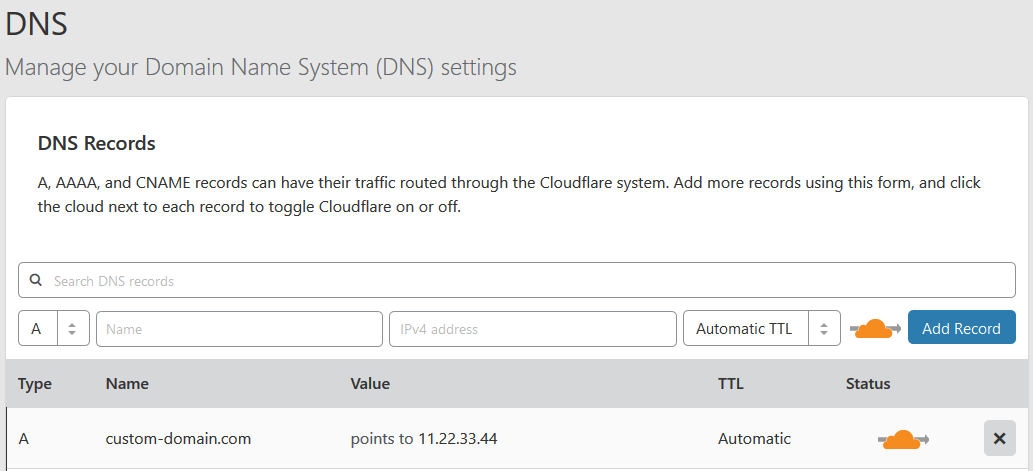
Make sure that you have the orange cloud visible for the A Record or CNAME record in order to let Cloudflare act as DNS and HTTP Proxy (CDN)
Cloudflare will provide you 2 nameservers that you need to set for your custom domain at your registrar.
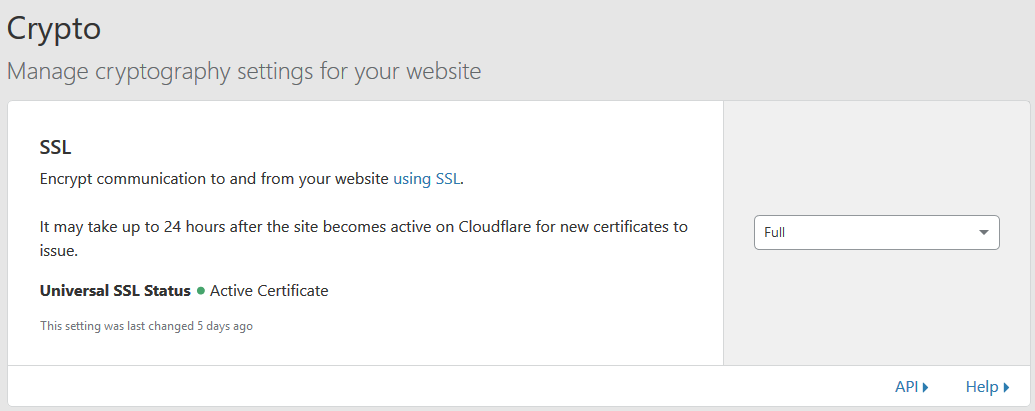
On the Crypto tab from Cloudflare make sure that you have Universal SSL Status set to “Active Certificate” and that the certificate type is set to “Full”
Learn more about Custom Domains
To learn more about Custom tracking domains: why are they useful and how to use them, check out this article: