Campaign Setup
To setup a campaign in CPV Lab (opens new window) or CPV One (opens new window) you need to complete the following sections:
- General settings - where you will add information about the campaign and the custom tracking domain
- Tracking settings - where you will select the extra data options to be tracked, the type of redirect and the engagement settings
- Macros and Tokens - where you select the traffic source, the bid type and the extra tokens you want to capture
- Landing pages and Offers - here you define the landing pages (if any) and offers to be used in your campaigns. Also the shares for each of them
- Links and Pixels - here you will get all the tracking links and tracking codes that you will use with your ad network, in your landing page or thank you pages.
General settings
Below you’ll find explanations for each of the General Campaign Settings, used when creating or editing Campaigns.
This page looks intimidating, but it’s really not. Many of the settings are optional or use the default options.

Open Stats
- If editing an Existing Campaign, Jump to the Campaigns Stats for the Selected Campaign.
Campaign Name
- Enter a Name for the Campaign
- It should be something relevant to the campaign you are running
- It can be something with the format "Country|Offer|Traffic"
Campaign ID
- Campaign ID is automatically assigned by CPV Lab Pro (opens new window)
Campaign Status
- Set Campaign Status to Active or Inactive
- If the campaign is active, it will show up in reports
Assign to Group
- Select a Campaign Group to Assign the Campaign to
- It is useful to keep the campaigns in groups based on the GEO, traffic source or offer type.
Failure Page
- This page/url will be called in the event something happens to a visitor where CPV Lab Pro (opens new window) cannot redirect the visitors to the next page.
- It can be any page on your website or on the internet. The visitor will be redirected to it in case the redirect done by CPV Lab is not working right.
TIP
Technical explanation:
- If the tracking cookie gets deleted from the browser and the visitor clicks on a base2.php or base3.php link, CPV Lab Pro won’t know what campaign that visitor is associated with (since the cookie doesn’t exist anymore) and won’t know what Failure Page to redirect them to.
- You can use the parameter (‘clfpc’) and add it to
base2.phpandbase3.phpcalls in order to tell CPV Lab Pro (opens new window) what campaign ID the visitor was associated with, so the correct Failure Page is displayed when necessary. - So if you have defined a Failure Page for your campaign and want to cover possible visitors who remove cookies, then you will use base links like below to redirect between LPs and to the offer pages:
- https://yourdomain.com/base2.php?clfpc=xxx
- https://yourdomain.com/base3.php?clfpc=xxx
- https://yourdomain.com/base3.php?id=1&clfpc=xxx
- where ‘xxx’ will be replaced with the actual Campaign ID
- You can use the parameter (‘clfpc’) and add it to
Alert Profile
By default, there is one alert profile defined but you can define multiple profiles. An alert profile is a set of rules for which you want to get alerts and discover the unperforming campaigns, for example.
Tracking Domain
It allows you to create Campaign URLs and Tracking Links within a Campaign using a specific domain instead of using your CPV Lab Pro installation domain
You have a list of tracking Domains from which you can pick one
It is very important to use your own custom tracking domain (or subdomain) because the normal tracking domain (for CPV One for example) may be blocked by ad blockers
- by using your own domain, you have 2 advantages
- bigger trust in your campaign for the visitor (because the initial link domain is the same with the landing page domain, for example )
- you will be using first party data (first party cookies)
- by using your own domain, you have 2 advantages
For more information on how to setup a Custom Tracking Domain please check Custom Tracking Domains
Hide Inactive & Unused

- Turn this Option to ON to Hide any Unused or Inactive Offers and Landing Pages from View within the Campaign Setup Page.
Just makes things a bit cleaner and easier on the eyes.
Info
- Click to see a quick explanation and outline of the selected campaign type
- An info icon is also available for many of the other fields so you can get more information on those fields
Tracking Settings
![]()
Data Options
Here you can select the Data Capture Options to Apply to the Campaign.
- Only select the options that you need to see in reports, if there is anything that is not needed, then leave it unchecked.
The most commonly used Data Options are GEO Data, Mobile Data, Computer Data and User Agent.
Here is a list with all the Data Options available to be capture with CPV Lab | CPV One ad trackers.
- GEO Data – Capture geographical data from visitors: Continent, Country, State and City
- Mobile Data - Capture information related to mobile devices used: device type, brand, model, commercial name, browser name & version, operating system name & version etc.
- Computer Data - Capture information from computer/desktop visitors: browser name & version, operating system name & version etc.
- ISP/Carriers - Capture ISP (Internet Service Provider) and/or Mobile Carrier from visitors (such as Verizon, T-Mobile, etc.)
- User Agent - Capture visitor User Agent. Useful when using an API integration with the Traffic Source (Facebook, TikTok, etc.)
- Screen Resolution - Capture Screen Resolution for visitors; useful when optimizing landing pages for several screen sizes
- Referrers - Capture Referrer Domain and Referrer Page from visitors, shows where your visitors come from
- Browser Language Header - preferred language passed by visitors' browsers; useful when creating localized landing pages and content
Engage Rate
- This feature gives you an idea of how long visitors are staying on your landing pages.
- Enter a setting here, in seconds or 0 if you don't wish to use this feature.
- This metric will show you in the Performance Reports the overall percentage of your visitors that went over your set Engagement Rate time
Example:
- if you setup Engagement Rate = 5, this means that the visitor who spends more than 5 seconds on your page is considered "Engaged"
- if you have 100 visitors and 50 from them stay more than 5 seconds on your landing page, then your engagement rate will be 50%
Campaign Priority
This setting is used if you have campaigns using a Direct Traffic Code (you use direct traffic to your landing page, without redirects).
- When using the direct traffic code, you may have campaigns using the same landing page or campaigns where visitors may go through multiple landing pages with direct traffic codes from different campaigns.
- Using this setting, you can decide which of those campaigns should have priority of the visitor.
- Each campaign setup page has a textbox where you can enter the campaign priority, a positive numeric value, where 1 is the highest priority.
Example:
you have 2 Campaigns: “Campaign1” and “Campaign2”
“Campaign1” has the Priority =1 and “Campaign2” has the Priority=2.
Here is the Visitor Path or Flow:
- “Campaign1” URL ➡️ LP 1 ➡️ LP2 (direct traffic code for “Campaign2”) ➡️ Offer
So in this example
- you have Visitors going through the campaign url for “Campaign1” and then clicking through to Landing Page 1 (LP 1)
- then the visitor goes to Landing Page 2 which is also used in “Campaign2” and has the direct traffic code for “Campaign2”.
- In this case campaign 1 takes priority and the visitor continues through the path as defined in Campaign 1
With the Priority setting in CPV Lab Pro (opens new window), a check is made on the fly to determine which Campaign has the highest priority and which way the visitor should go.
If any 2+ campaigns have the same priority set, the tracking cookie from one campaign won't be overwritten by another campaign.
If a campaign has a priority of 0, the tracking cookie is always overwritten by the direct traffic code.
Capture IP Adresses
- It allows you to choose if you want to capture visitors IP addresses based on your needs and GDPR regulations
- It has 3 options:
- All - The IP Address will be captured for all the visitors accessing the campaign
- Non-EU - The IP Address will be captured just for the visitors coming from Non-EU regions
- None - No IP address will be saved
Redirect Type
There are 3 redirect types available in CPV Lab Pro and CPV One, 2 of them that hide the referrer, but are a little slower than the redirect that sends referrers:
- Direct Redirect – sends referrer details.
- The referrer will appear as the Landing Page from your campaign or a page from your Traffic Source.
- Double Meta Refresh – hides the referrer
- With this method the referrer will appear blank.
- Redirect Loop – hides the original referrer.
- In this case the referrer appears as the baseloopredirect.php page from your CPV Lab Pro domain
Campaign Type
This field is available in Direct Link and Landing Page Campaigns Only
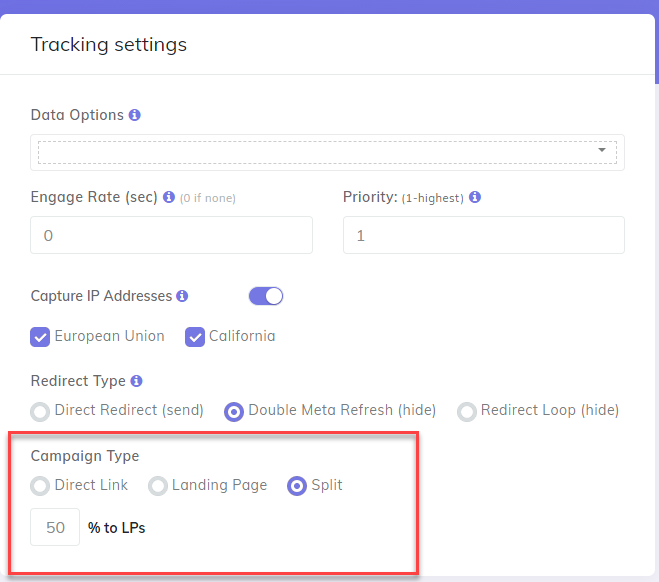
- Direct Link - Send Visitors Directly to the Offer/s
- Landing Pages - Send Visitors to Landing Page/s and then to Offer/s on the Click Through
- Split - Rotate traffic through each of the above, and set the % of the Traffic that will be redirected to the Landing Pages and the remainder will direct link to the offers.
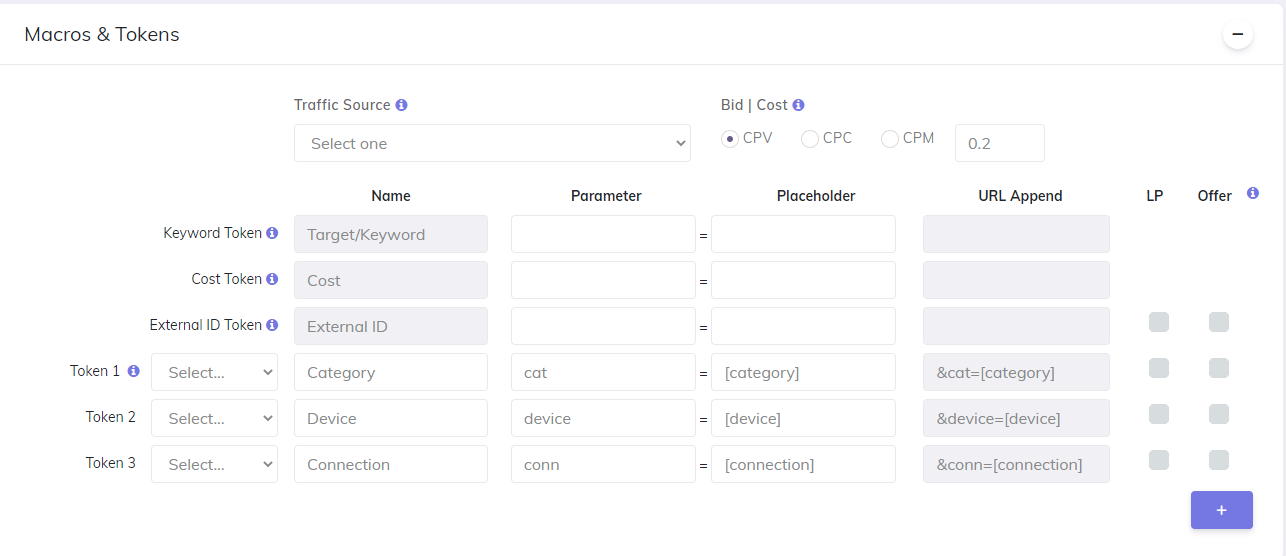
Macros and Tokens

In this section you will define everything regarding the traffic source and what extra tokens you want to track in the tracker.
Traffic Source
- Select the Traffic Source for the Campaign.
- If the traffic source you need is not in the list, go to Sources -> Traffic Sources menu and import the traffic source you need from the catalog
- Then refresh the campaign page and the traffic source list will be updated
- For each traffic source the CPV tracker can capture some information sent by the ad network.
- You need to add what information you want to bring over from the ad network ( click on the "+" sign and add the tokens you need)
- You can also add some extra tokens for to track Bot and Proxy traffic, which are available in the list of tokens
Bid | Cost
It is important to pick the correct bid / cost model when you create a campaign in CPV Lab or CPV One. It keeps your reporting accurate and tells the tracker how to calculate spend when the traffic source does not provide real cost data.
Cost models
- CPV – cost per view (used by some push/native networks).
- CPC – cost per click (common for display, search, many native sources).
- CPM – cost per mille (cost per 1,000 impressions / views).
- CPA – cost per action / conversion (no initial visitor cost; cost applied only on conversion).
How the Bid | Cost works in CPV Lab
- Enter an estimated cost for the selected cost model in the campaign form.
- This estimate is used to compute spend, EPC, ROI, and other cost-based metrics only when the traffic source does not send actual cost data.
- If the traffic source sends the actual cost (via a Cost Token or API), leave the textbox at 0. The Cost Token / API value has priority and will be used in reports.
- For CPA campaigns there is no per-visitor cost initially. The value in the Cost textbox is applied only when a conversion (action) happens — e.g., it becomes the cost for the conversion event.
Important notes
When CPC is selected, the reports such as Target Performance Stats and Trends will adapt to show CPC-focused stats (instead of CPV-focused).
Cost coming from the traffic source (Cost token) or from an API integration (Google Ads, Microsoft Advertising, Facebook Ads, TikTok Ads etc.) will override the campaign textbox value.
If your traffic source supplies no cost and you leave the textbox empty or 0, CPV Lab will compute revenue-related metrics using cost = 0 (this will distort ROI/EPC), so add a reasonable estimate if actual cost is unknown.
Which bid type to choose
- Does the traffic source give a cost token in the click URL or have an API integration with cost sync?
- Yes → Pick the cost model that matches the source billing (CPC/CPM/CPA) and set Cost textbox = 0. API/Cost token will supply real cost.
- No → Pick the model the source charges you (or the model you want to report as) and enter an estimated cost in the textbox.
Example calculations (how the estimate is used)
- If you set model = CPC and
Cost = 0.10, each visitor that clicks is counted as$0.10in reports (unless a Cost Token overrides it). - If model = CPA and
Cost = 5.00, no cost is assigned to visitors. When a conversion appears, CPV Lab records a $5.00 cost for that conversion.
WARNING
Estimated bid is used only when the traffic source does not send cost.
If the traffic source provides cost via a Cost Token or you use an API integration (Google Ads, Microsoft Advertising, Facebook Ads, TikTok Ads etc.), that synchronized cost value will be used in stats and will override the textbox value.
Macros & Tokens
- You can select Tokens that you have already setup for the Traffic Source or Add new Tokens here.
Each token requires the following details to be entered:
- Name – the name that will appear in the header of the token column in the Stats.
- Parameter – the parameter that is passed in the campaign URL and will be captured by the base.php page.
- Placeholder - the macro/token format
- URL Append – Is automatically filled with
parameter=placeholder - LP/Offer checkboxes
- LP - controls if the token should be sent as a parameter in the Landing Page URL
- Offer - controls if the token should be sent as a parameter in the Offer URL
- If the selected Traffic Source has Keyword, Cost, External ID or Ad tokens defined, then they will be automatically captured.
Example:
- if you have the token
{banner}which you want to capture, then you will set it up like this:- Name: Banner
- Parameter: bn
- Placeholder: {banner}
- URL Append - will be added automatically
TIP
Note:
Not all traffic sources provide dynamic tokens to Ads or Creatives as in the examples above.
In those cases, you’ll simply add your own Unique Ad Identifier within your Campaign URL when placing it at the traffic source.
For Example:
- Bing uses {AdId} as the token to capture the Ad ID from within your AdCenter Account. So Your Campaign URL may look like:
https://YourCampaignURL.com/base.php?c=323&key=3e48ee4a6a49134cb4a5d218092a6677&keyword={keyword}&ad={AdId}
- Other Traffic Sources however, you may need to pre-fill a Unique Ad ID when placing your Campaign URL for each ad if they don’t offer the ability to pass this data as in the example.
- Pre-Fill Example (a Campaign with 3 Ads Setup):
You could enter each Ad Destination URL as:
Ad 1:
https://YourURL.com/base.php?c=323&key=3e48ee4a6a49134&keyword={keyword}&ad=1Ad 2:
https://YourURL.com/base.php?c=323&key=3e48ee4a6a49134&keyword={keyword}&ad=2Ad 3:
https://YourURL.com/base.php?c=323&key=3e48ee4a6a49134&keyword={keyword}&ad=3In the example above we used simple #’s (1, 2, 3) to separate the ads, but here you can pre-fill any data you wish to use for separating the Ads from one another. It’s NOT recommend to use blank spaces however such as:
&ad=ad one.Instead of blank spaces use separating characters to avoid any breakage or mishandling of URLs. So instead of
“&ad=ad one”this would become“&ad=ad_one”or“&ad=ad-one
Landing Pages & Offers
In this section, depending on the campaign type you selected, you can define your funnel flow.
Landing pages
You can add multiple landing pages and define the shares for each of them.

- You can add a new Landing page directly in the campaign or select a predefined one (recommended)
- Each Landing page will get the following information:
- Name - the name of the landing
- URL - the URL to the landing page
- ID - this is a unique ID automatically generated by CPV tracker
- Share % - is the percentage of the total traffic that you want to go that landing page.
- The Total Share for all the landing pages in a campaign must be 100
- The "Even Shares" button will split equally the shares between the landing pages.
- Even Share button - this will split equally the shares between the offers
- Active/Inactive - if the landing page is used or not in the campaign (maybe you want to remove it after tests)
Offer pages (or affiliate links)

The offers section allows you to add the offer page (or the affiliate link from your affiliate network). Each offer will get the following information:
- Name - the name of the offer
- Source/Network - the affiliate network from where the offer is
- if it is your own offer, then you should have "In-house" selected
- URL - the URL to the offer
- it needs to have the Affiliate Network Subid parameter assigned in order for the network to identify the visitor and assign correctly the conversion
- Payout - is the estimated payout that you will get for each conversion coming from that offer
- This value will be used in Stats and reports
- If the Affiliate Network will send information about the payout via Server To Server Postback URL, then the actual value of the commission will be recorded
- ID - this is a unique ID automatically generated by CPV tracker
- Share % - this is the share of the traffic you want to be sent to this offer. The total for all the offers in a campaign needs to be 100.
- Even Share button - this will split equally the shares between the offers
- Active/Inactive - if the offer is used or not in the campaign (maybe you want to remove it after tests)
Easy Tokens Menu

- The Easy Tokens Menu shows up for each URL field on the Landing Pages and Offers sections
Campaign Notes

- Save some special notes about this campaign (like what are the latest updates, what you want to update in the future, etc)
- The information saved in notes will help you track better the changes done to each campaign
Additional Settings in Landing Page Sequence and Lead Capture Campaigns Only
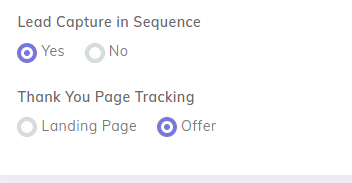
- Lead Capture in Sequence - If you have a Lead Capture or Optin Form within the Campaign, Set this to Yes.
- Thank You Page Tracking - If you send visitors to a Landing Page after Optin, select Landing Page. Or if you send visitors to an Offer after Optin, select Offer.
Always “Save Campaign” After Any Changes
- After making changes or editing your campaigns, always click the “Save Campaign” Button to make sure the changes are updated.
- If You want to exist the Campaign Setup page, just click on "Save and Exit" button
- If you don't want to save your changes, click "Cancel"

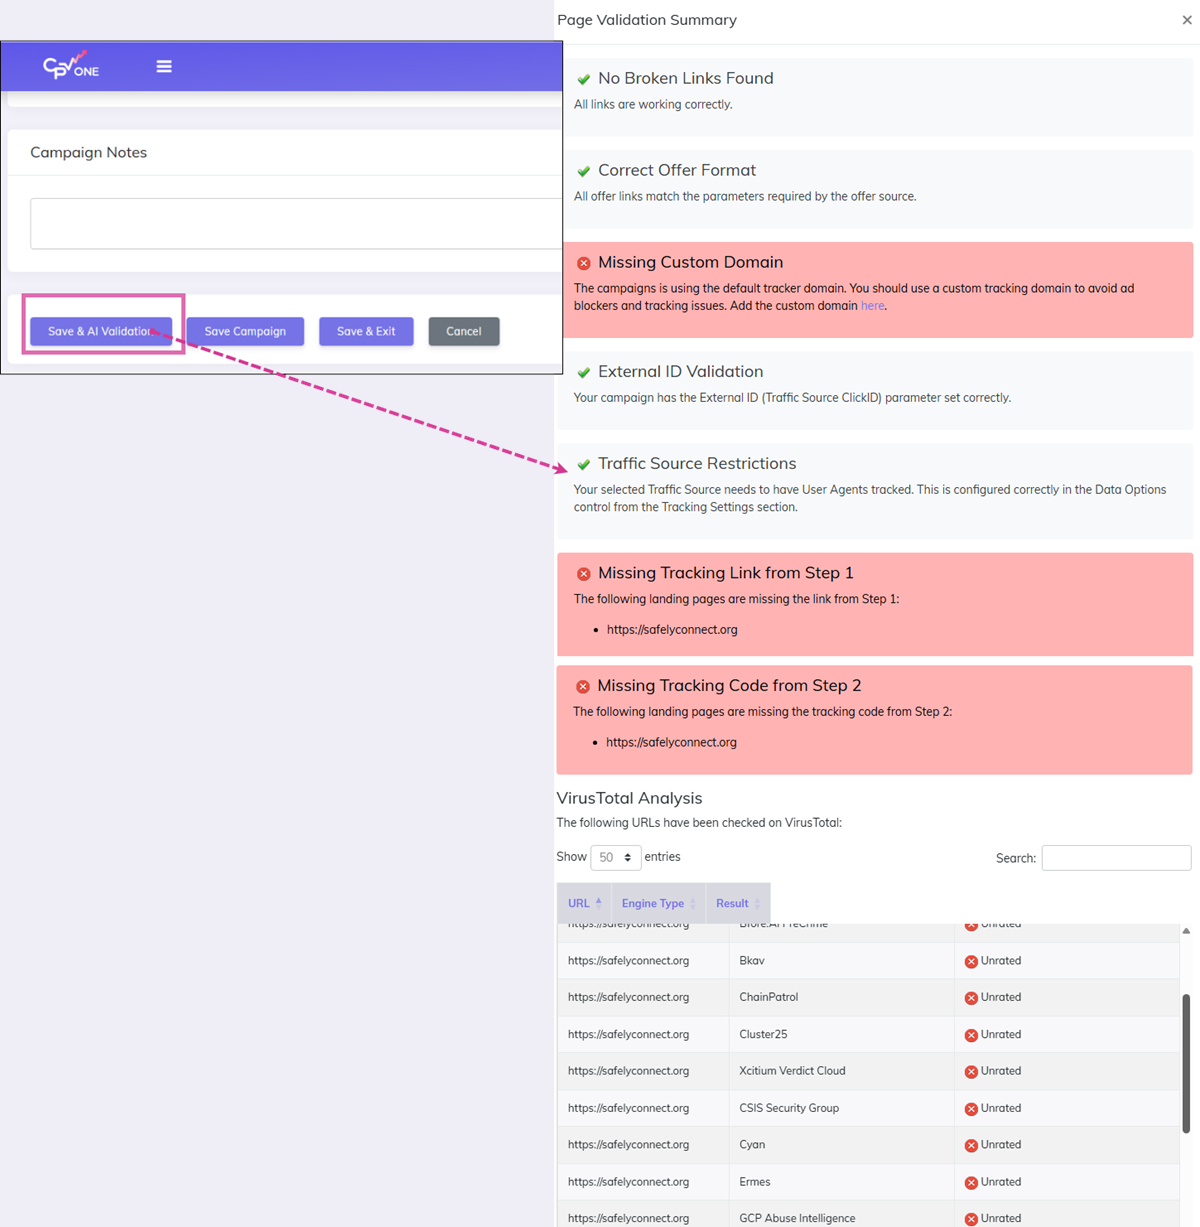
AI Page Validation
AI Page Validation checks your campaign automatically so you know what to fix before you go live. Run it after you finish the campaign setup and it will test links, tracking, offer formats and even scan the landing page on VirusTotal.
How it works
- On the Campaign Setup page, finish your campaign settings.
- Click Save & AI Validation to save and start the validation run.
- A popup appears with all checks and their status.
- V (green) = OK — the item passed.
- X (red) = Failed — you need to fix this.
Fallback (emoji): ✅ = OK, ❌ = Failed
What the validation checks (and why)
- Broken Links — tests each landing page and offer URL to make sure they load (no 404s).
- Correct Offer Format — verifies offer URLs include the required
subidparameters and correct token names. - Missing Custom Domain — checks whether you selected a custom domain (recommended) instead of the default tracker domain.
- External ID Validation (ClickId) — ensures the traffic source is passing a External ClickId/visitor ID to the landing page so clicks can be matched to conversions.
- Traffic Source Restrictions — flags source-specific requirements (for example, special UA or header tracking needed for Meta/Google).
- Missing tracking links (Step 1) — confirms the landing page links point to the correct offer tracking links.
- Missing tracking code (Step 2) — checks that the CPV Lab visitor tracking code is present on the landing page (before
</body>). - VirusTotal analysis — checks the landing page domain against VirusTotal to detect if the domain is flagged or suspicious.
If a check fails, the popup shows a short explanation and a suggested fix. Fix the issue, then click Save & AI Validation again to re-run the checks.
Links & Pixels
This section contains Links samples, Tracking Pixels code samples and 3rd party pixels for the campaign
Available information:
- Campaign Link - it can be used to test the campaign in browser
- Step1: Edit Landing Pages Offer Links - it shows the link to Offer to be used in your Landing Page
- Step 2: Add Code to Landing Pages - The code to be added to your Landing Page (before the
</body>tag
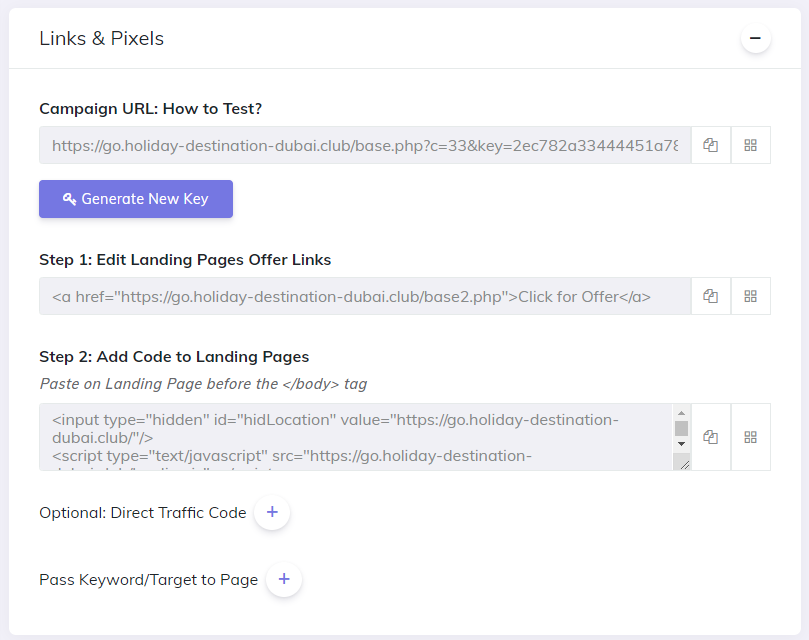
- Tracking Pixel: Add Pixel to Offer Source - 4 types of samples for Tracking Pixels to be added to your Offer Source
- Image Pixel
- Iframe Pixel (required when calling multiple 3rd party pixels)
- Script Pixel
- Postback URL Pixel (Server2Server Pixel)
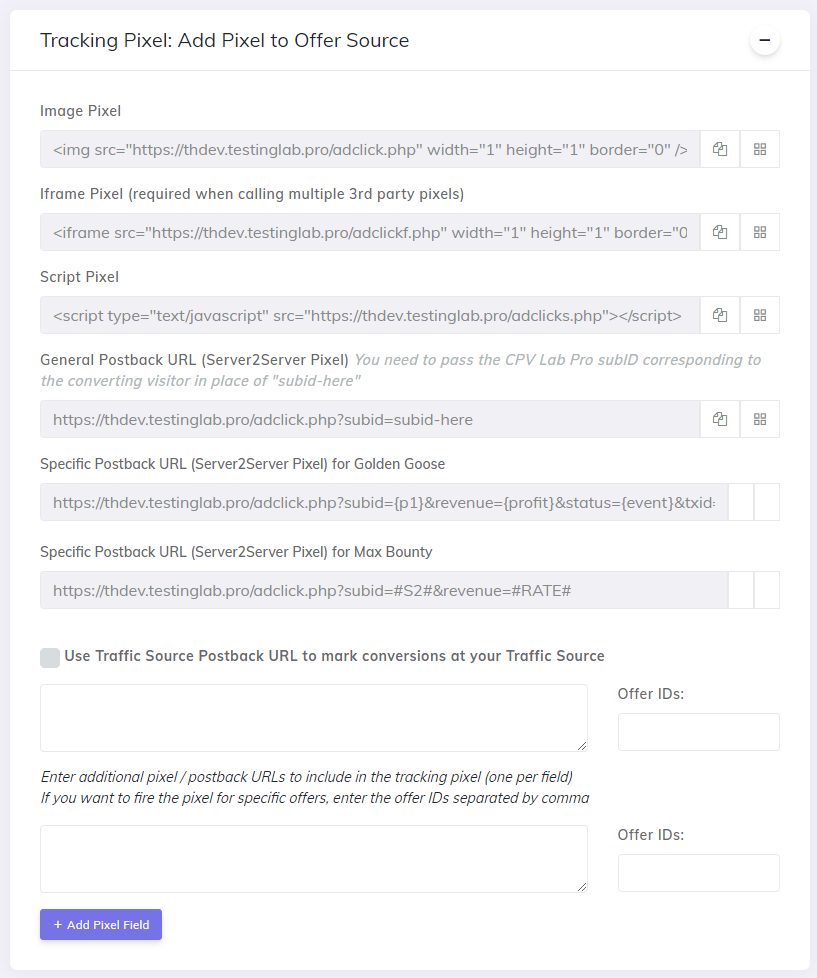
- If the selected Traffic Source has a Postback URL setup, you will see that URL in the "Links & Pixels" section Notes:
- If you want to use the Traffic Source Postback URL, check the checkbox in front of it
- Also, make sure that all the specific parameters (like your Traffic Source Unique ID) are replaced in the Postback URL
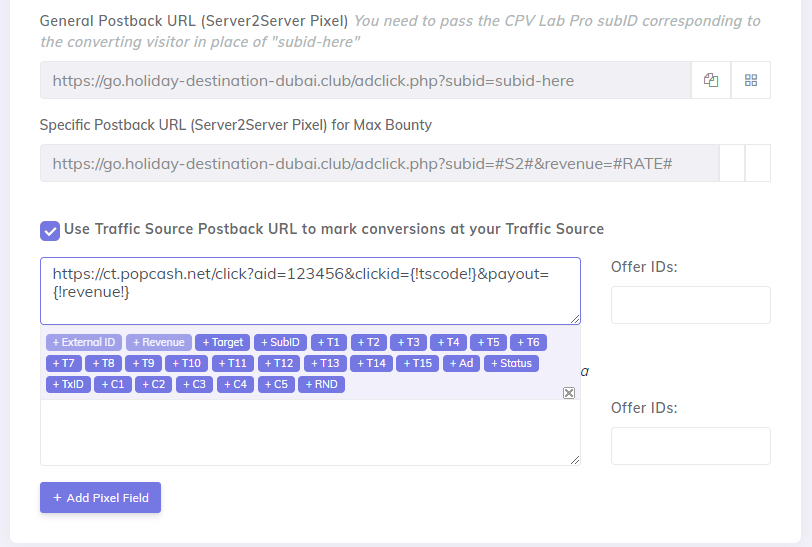
For Advanced Users
- you can also use a 3rd party Pixel (usually a Traffic Source pixel) and add it to your campaign
- Enter additional pixel / postback URLs to include in the tracking pixel (one per field)
- If you want to fire the pixel for specific offers, enter the offer IDs separated by comma
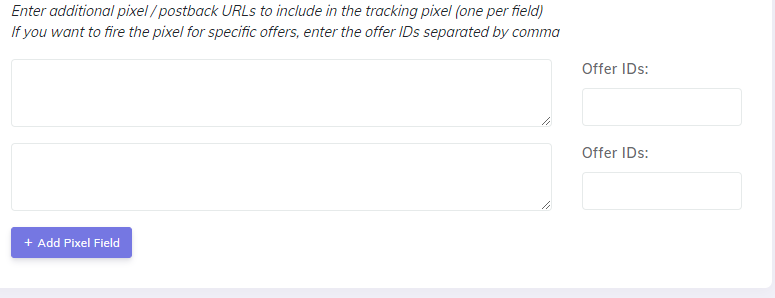
- If you want to pass the keyword or the target to the page
- you need to have a
.phppage - add the sample code to the Page in Location to display the target
- you need to have a
- you can also use a 3rd party Pixel (usually a Traffic Source pixel) and add it to your campaign
![]()
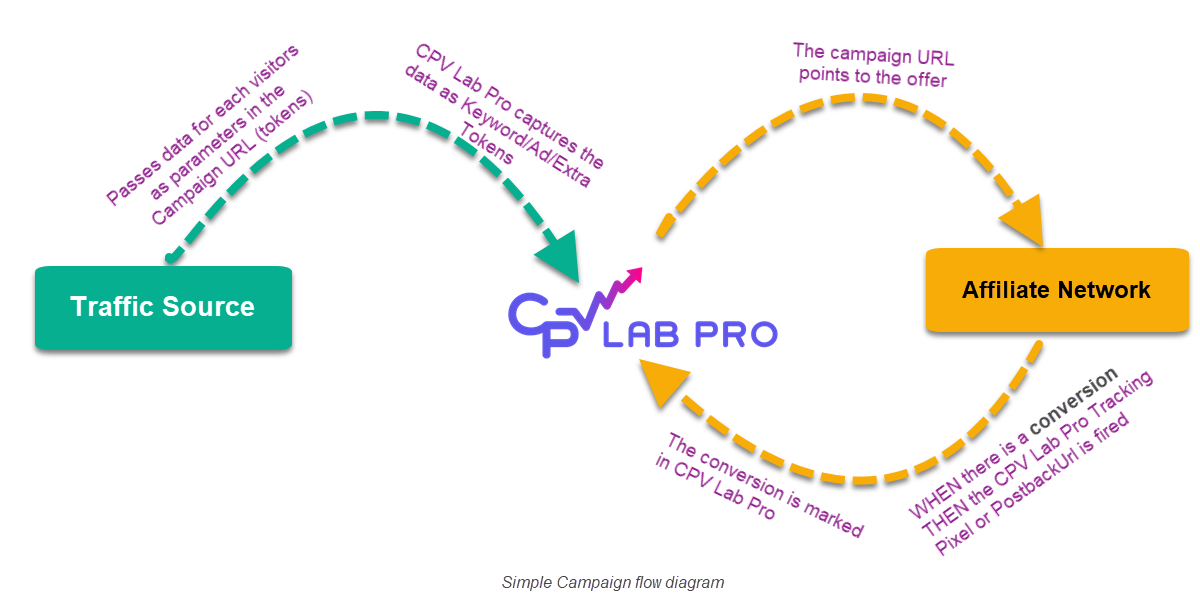
- Simple campaign flow diagram:
Find more details in the video below:
Video Tutorial for setting up your first CPV Lab Pro campaign (opens new window)
You may also find useful: