Posting conversion details to Google Ads
Let's see why you should pass informations about conversions to Google Ads and how to do that by using CPV Lab | CPV One ad tracker.
TIP
You can use CPV One (opens new window) cloud-hosted ad tracker in the same way as we exemplify below for CPV Lab (opens new window)
Below is the complete guide on passing conversions to Google Ads.
Why is it important to pass conversions to Google Ads?
Passing conversions back to Google is very important for audience optimization.
How does it work?
- GoogleAds uses an AI algorithm to show conversions to the target audience;
- This AI needs data to get trained;
- When GoogleAds receives information about conversions, it can train the attribution algorithm (the AI) with each conversion that you pass to them.
- This means that the traffic attribution algorithm from Google Ads will know what kind of traffic is bringing you more conversions
- Knowing what visitors converted in your campaign will allow Google to send you more targeted traffic in the future (more traffic like that one that converts!), so you get visitors that are more likely to convert. This will reduce the costs per conversion and increase the number of sales.
How is Google Conversions working?
Unlike most traffic sources that use a Postback URL (Server-2-Server pixel) to receive conversion details, Google Ads uses a JavaScript tracking pixel which cannot be fired unless placed directly in the Confirmation or Thank You page.
- This will work if you run your own offers and have access to the page HTML code, but it won’t work if you run offers from Affiliate Networks.
In order to overcome this limitation and to be able to see your conversions in Google Ads even when using an Affiliate Network, we have introduced an automatic process of uploading conversion data to Google Ads, without using the Google tracking pixel.
- This method doesn’t use the Google API either, so we will NOT ask for your Google Ads account credentials.
- You only need to make a few configuration settings once, then the process will run automatically for you.
- You need to use CPV Lab Pro or CPV One.
Process overview
The process works like this:
- Google Ads sends a unique code (External ID) for each visitor to CPV Lab Pro in the gclid parameter;
- CPV Lab will provide you the code needed to return the unique codes for converting visitors in a format accepted by Google Ads;
- Google Ads calls this code periodically and imports conversions into the Google Ads interface!
WARNING
Important:
Google Ads only accepts using Secure/SSL pages (starting with https://) for the conversion import, so before continuing please make sure that you have a valid SSL certificate installed on your CPV Lab Pro domain.
- In order to check this, you can access your login page starting with https:// and make sure that everything loads correctly:
- The entire process is fully automated, once you perform the initial configuration there is no need to do anything else and conversions will be sent from CPV Lab Pro / CPV One to Google Ads.
Initial configuration
Here is what you need to do in order to install and make the initial configuration for sending conversions to Google Ads from CPV Lab:
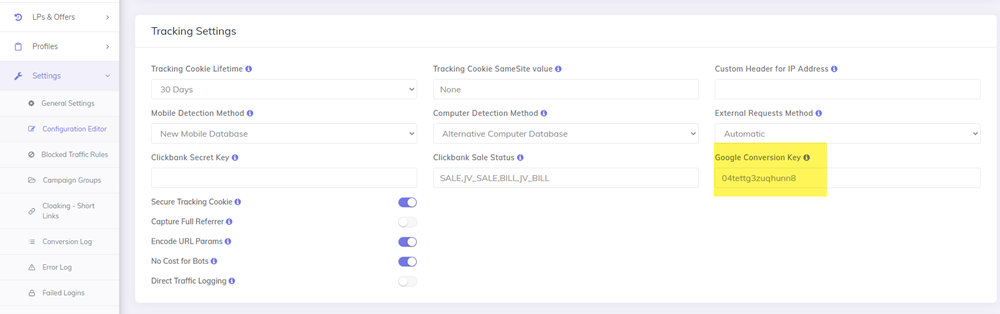
1. Define "Google Conversion Key"
- Use the Configuration Editor page from the Settings menu in CPV Lab Pro and define a Google Conversion Key.
- This should be a random string that you define (10-20 characters) which will be used to authenticate Google requests and prevent unauthorized access to your data.
- It can look like in the image below:
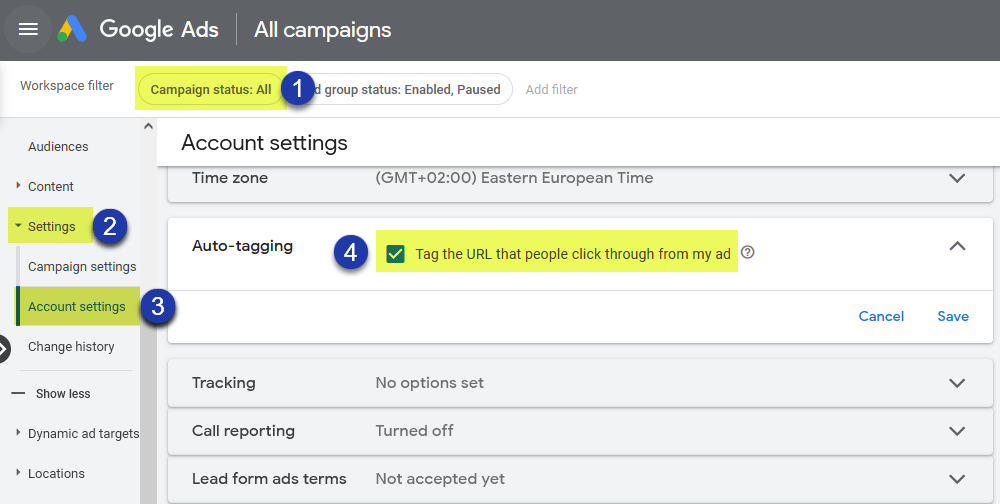
2. Enable auto-tagging
- You need to enable auto-tagging in your Google Ads account.
- This is a global setting and it will automatically append the
'gclid'parameter with a unique code in the Final URL for each visitor. - This unique code is needed in order to identify the converting visitor.
- This is a global setting and it will automatically append the
In your Google Ads account go to Admin -> Account Settings and look for "Tag the URL that people click through from my ad" (see below).
- Make sure that you check this checkbox in order to enable Auto-tagging.
3. Create a conversion action in your Google Ads account:
- Go to Goals -> Summary -> Conversions goals
- then click on the
+ Createconversion actionbutton to add a new conversion action.
- then click on the
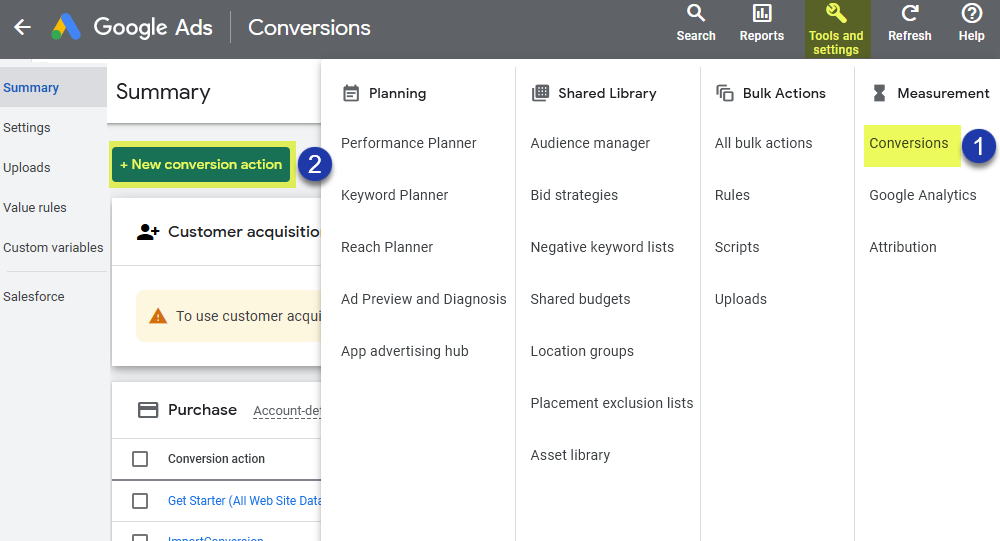
- Select Import as the type
- then select 'CRMs, files, or other data sources' and 'Track conversions from clicks'
- For "Data source" select 'Skip this step and set up a data source later'
- Click Continue
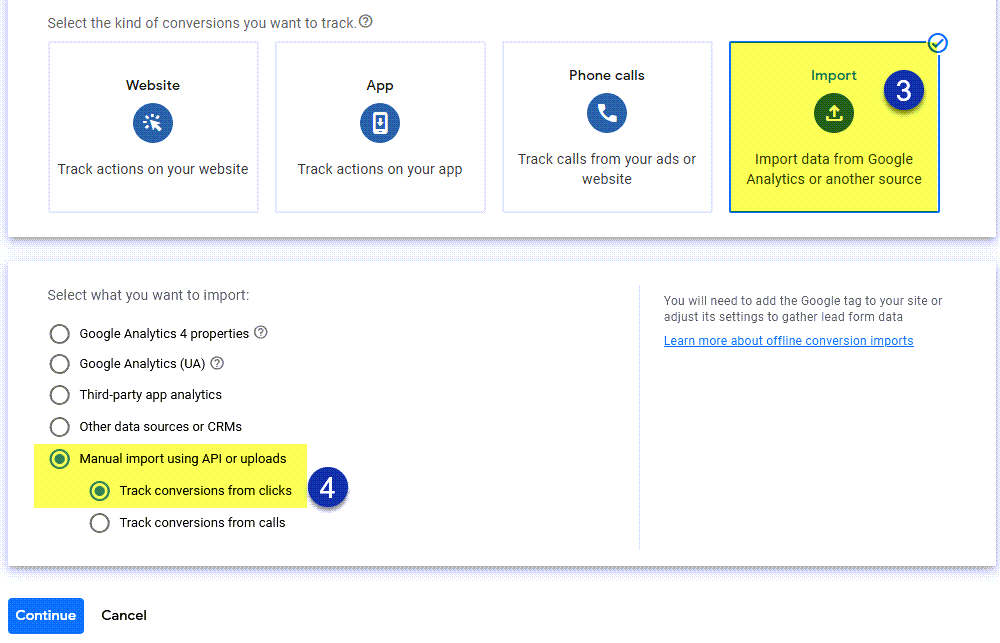
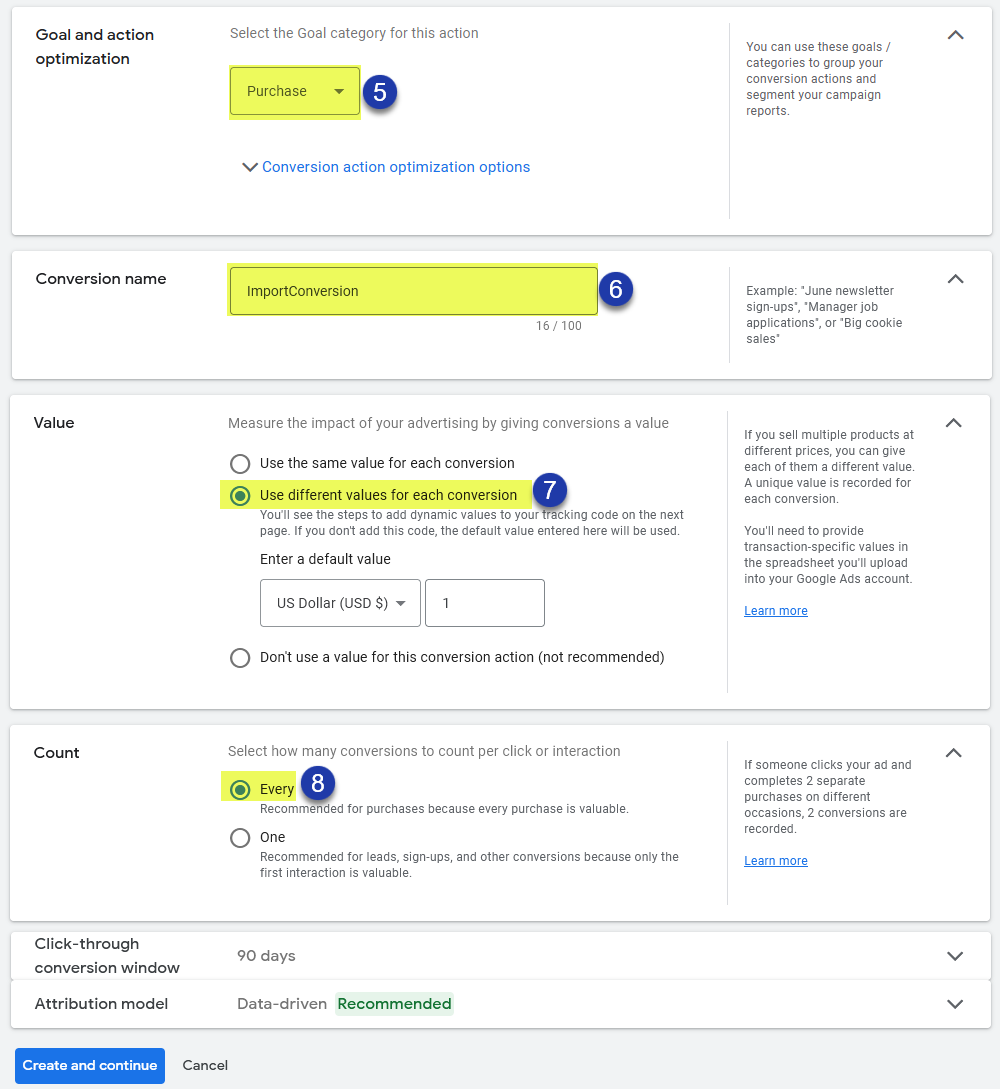
- name the conversion action 'ImportConversion', choose Purchase as Category, then "Add" the conversion action.
- select the "ImportConversion" data source and click "Done"
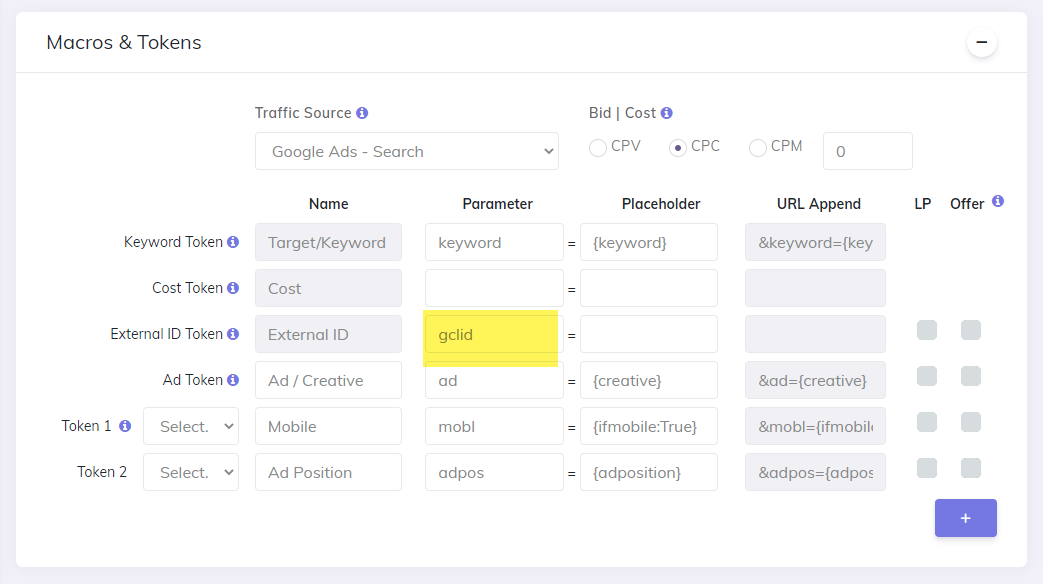
4. Capture the 'gclid' values
- In your Google campaigns from CPV Lab Pro, make sure that you have
'gclid'defined as the Parameter for the External ID token and leave the Placeholder blank (see below). - This will make CPV Lab Pro capture the unique codes for visitors coming from Google Ads.
5. Test the integration
- Now you can test the page that reports conversions by calling the following URL in a browser:
- where
google-conversion-keyshould be replaced by the random key that you defined at Step 1 above. - and
your-tracking-domainshould be replaced with your actual CPV Lab instance domain. - The result should be a page that looks as follows:

TIP
- If you get the above, it means that the new page works well (it doesn’t show any conversion data yet, but it will show data once you get some conversions).
- If you get an error message, then please check that the Google conversion key is the same in the Configuration Editor page (Step 1) and in the URL (Step 5).
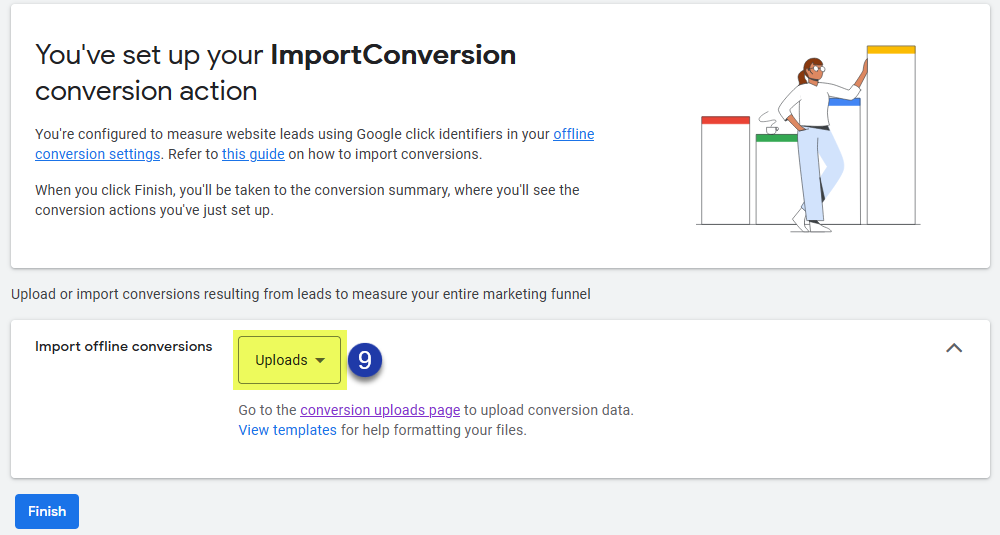
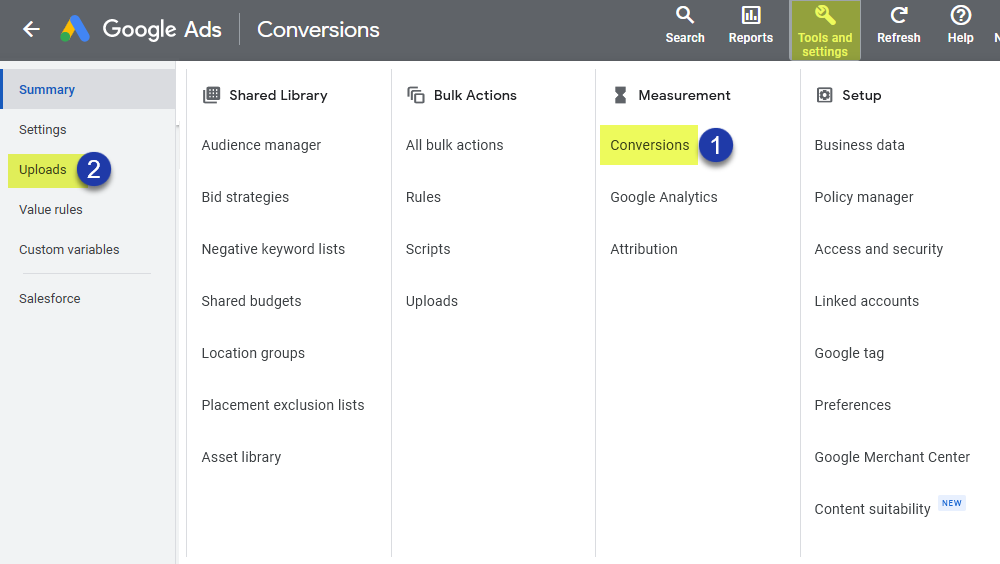
6. Create the Upload Schedule in Google Ads
- Go to your Google Ads account and navigate to Tools -> Conversions, then select Uploads on the left:
- Now select Schedules from the top and then the
+sign to create a new scheduled conversion upload:

- Here you need to:
- select HTTPS as the Source
- enter the URL from Step 5 above for your new page as the Source URL
- choose ‘Every 24 hours’ as the Frequency
- choose any time that you want conversions to be retrieved from CPV Lab Pro
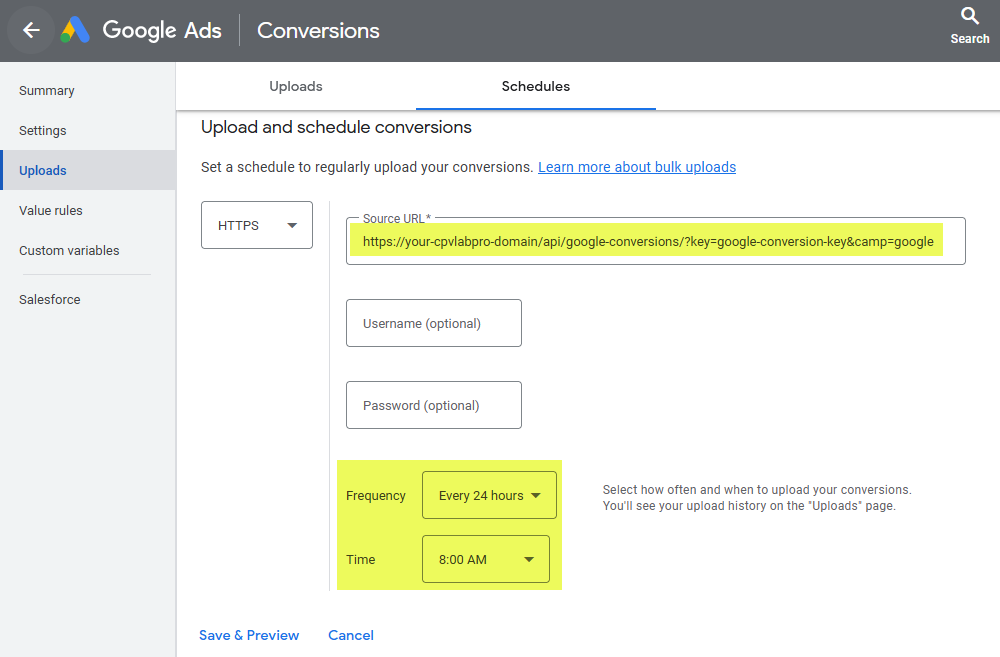
- Save the current settings and you have created the Schedule that will import conversions periodically from CPV Lab Pro to Google Ads.
- You will see a record each time the upload executes in the ‘Uploads’ section from the same page.
- Once conversions are uploaded you will also see them appearing in your Google Ads reports.
Optional parameters
There are several optional parameters that you can use in the URL that you submit to Google Ads:
| Parameter | Default Value | Details |
|---|---|---|
| name | ImportConversion | The name of the Conversion Action that you defined in Google Ads |
| currency | USD | The currency to use for revenues reported to Google Ads |
| cstrev | If you prefer to hide the actual revenues and not pass them to Google Ads, then enter a custom value that will be reported for each conversion in this parameter. For example, if you add ‘&cstrev=0’ to the URL, then all conversions will be reported with 0 as revenue | |
| days | 7 | The number of days to return conversion for. By default, conversions from the past 7 days are returned. |
| camp | The campaigns to return data for. Possible values: - google – all your campaigns that use Google as traffic source; - a numeric Campaign ID – only the campaign with this ID; - a list of numeric IDs separated by comma (,) – only the campaigns with the IDs specified | |
| event | conversions | The event that will be passed to Google Ads. Possible values: - conversions – send conversions; - subscribers – send subscribers (leads); - clicks – send clicks made to your landing page |
WARNING
When starting a campaign, before you get conversions, you may still want to pass data to Google Ads in order to optimize the audience. So you can choose to pass subscribers or clicks and then change after a few days to conversions.
FAQ
1. What if I have multiple Google Ads accounts?
- Then you need to perform the process described above in all you Google Ads accounts.
- Define the Conversion Action and schedule the daily import from Google Ads for all your accounts.
- Conversions belonging to other accounts will simply be skipped during the import by Google.
2. How to hide the actual revenues of my conversions from Google?
- You can define a custom revenue to be reported to Google instead of the real revenue if you want to hide those from Google.
- In order to do this, you need to include the
‘cstrev’parameter followed by the desired revenue in the URL submitted to Google.
- In order to do this, you need to include the
Example:
For example, if you want to pass 0 as the revenue for conversions, then your URL would become: https://your-tracking-domain.com/api/google-conversions/?key=google-conversion-key&camp=google&cstrev=0 (opens new window)
And if you want to pass 1.25 as revenue, then your URL would become: https://your-tracking-domain.com/api/google-conversions/?key=google-conversion-key&camp=google&cstrev=1.25 (opens new window)
3. I get an error message on the uploaded file in Google Ads saying “This conversion action was created too recently”
- This error appears sometimes immediately after you create the Conversion Action.
- The solution is to wait a few hours, then try to upload the file again and it will be processed correctly. No need to change anything else, just wait for a few hours.

4. I get an error message on the uploaded file in Google Ads saying “The conversion action specified in the upload request cannot be found”
- Make sure that you have created in the Conversion Action and that you named it ImportConversion as described at Step 3 above

5. I get an error message on the uploaded file in Google Ads saying “This GCLID belongs to an account that you are not authorized to access”
- This error may appear when you have multiple Google Ads accounts since the CPV Lab Pro page will return the
gclidvalues (unique codes) for all conversions from all accounts. - There is no problem when this error is received and conversions associated to each Google Ads account will be imported correctly, while conversions from other accounts will simply be ignored.

6. I get an error message on the uploaded file in Google Ads saying “The click's GCLID has been altered or is invalid”
- This indicated that an incorrect clickID was passed for the conversion. You should make sure that the External ID Token in the campaign setup page is configured correctly to retrieve the Google GCLID values
