Configuration Editor
Navigation: Settings ➡️ Configuration Editor
The Configuration Editor page shows the default values for your ad tracker as they are the first time.
- You only need to edit the settings that you are sure about, as the default values will work fine most of the times.
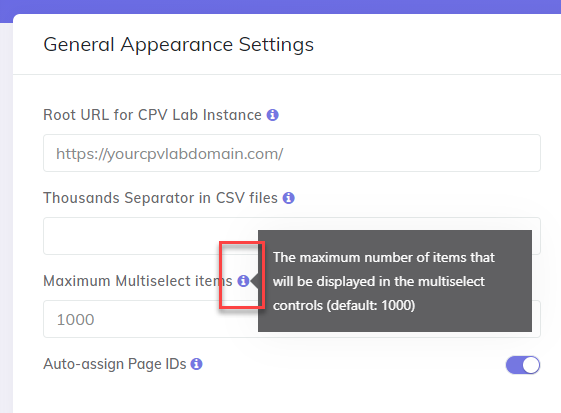
- If you are unsure about what a setting is for, then you can click on the small
'i'icon and a tooltip window will open with more details.
There are multiple categories of settings which can be changed:
- General Appearance Settings - here you can change the appearance of the tracker like: date format, menu on top or on the left, the thousands separater.
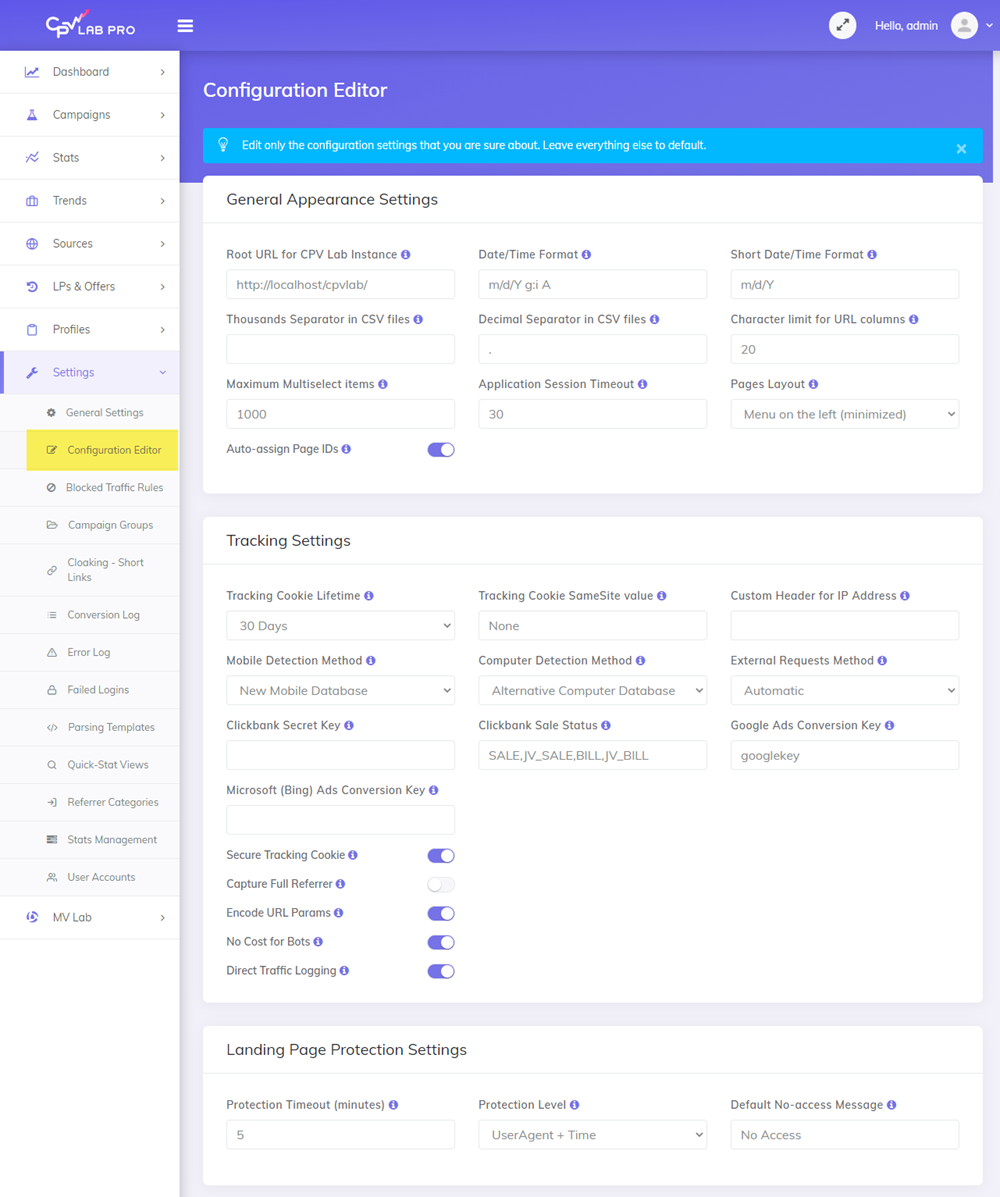
General Appearance Settings
| Option Name | Default Value | Description |
|---|---|---|
| Date/Time Format | m/d/Y g:i A | The pattern used to display dates in the application |
| Short Date/Time Format | m/d/Y | The pattern used to display dates in the short format in the application |
| Maximum Multiselect items | 1000 | The maximum number of items that will be displayed in the multiselect controls |
| Thousands Separator in CSV files | The character used as thousands separator in the exported CSV reports | |
| Decimal Separator in CSV files | . | The character used as decimal separator in the exported CSV reports |
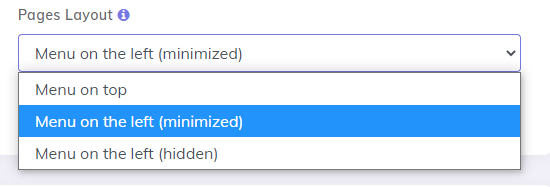
| Pages Layout | Menu on the left side - minimized | General pages layout used in the application |
Example: you can change the application layout with the option "Page layout"
- There are 3 layouts available:
- Menu on Top
- Menu on the left (minimized)
- Menu on the left (hidden)

Tracking Settings
| Option Name | Default Value | Description |
|---|---|---|
| Tracking Cookie Lifetime | 30 Days | Time interval to keep the tracking cookie in visitors' browser |
| External Requests Method | Automatic | The request method to use for external requests like 3rd party pixel calls |
| Custom Header for IP Address | If the visitors' IP address is passed using a custom header, specify the header name here. Useful when running reverse proxies. | |
| Capture Full Referrer | OFF | Whether to capture the full referrers including the query string or just the page names |
| Mobile Detection Method | New Mobile Database | The Mobile Detection Method to use |
| Computer Detection Method | Alternative Computer Database | The Computer Detection Method to use |
| Google Conversion Key | The Key used to authenticate Google requests when uploading conversions to Google Ads | |
| Bing Conversion Key | The Key used to authenticate Bing requests when uploading conversions to Bing Ads | |
| Encode URL Params | ON | Whether to apply URL encoding to parameters added by the tracking links |
| No Cost for Bots | ON | Whether to set 0 as the cost for bot traffic |
| Direct Traffic Logging | OFF | Whether to log direct traffic calls, use only when debugging direct traffic issues |
| Clickbank Secret Key | The Clickbank Secret Key used in your Clickbank account | |
| Clickbank Sale Status | Statuses sent from Clickbank that will mark a conversion in CPV Lab Pro (default: SALE,JV_SALE,BILL,JV_BILL) | |
| Capture Full Referrer | this settings tells the tracker if it should capture the full referrer, with parameters, or only the page name | |
| Check blocked Traffic | this settings tells the tracker if it should ignore bot traffic coming from ad networks | |
| Pages Rotation method | this defines the algorithm used by the tracker to rotate the offers or landing page |
![]()
Landing Page Protection Settings
| Option Name | Default Value | Description |
|---|---|---|
| Protection Timeout (minutes) | 5 | Maximum allowed time to access the Landing Page before it becomes inaccessible |
| Protection Level | UserAgent + Time | The level of LP protection - based on several metrics retrieved from visitors |
| Default No-access Message | No Access | Default message to show for unauthorized LP access |

Page Name Settings
In this section you can change the name of the pages used for tracking by your ad tracker.
- For example:
- if the links to the offers are tracked with based2.php, you can rename it to "gotooffer.php"
- after you do the setting, all your link to the offer generated by the ad tracker will use this new page name
| Option Name | Default Value | Description |
|---|---|---|
| Campaign URL Page | base.php | Name of the Campaign URL page |
| Offer Redirect Page | base2.php | Name of the Offer Redirect page |
| Offer Redirect LPS Page | base3.php | Name of the Offer Redirect for Landing Page Sequence campaigns page |
| Tracking Pixel / Postback URL Page | adclick.php | Name of the Tracking Pixel / Postback URL |
| Tracking Pixel iframe Page | adclickf.php | Name of the Tracking Pixel iframe |
| Tracking Pixel script Page | adclicks.php | Name of the Tracking Pixel script |
| Subscribers/Lead Pixel Page | adsub.php | Name of the Subscribers/Leads Pixel |
| Double Meta Refresh Page | baseredirect.php | Name of the Double Meta Refresh page |
| Redirect Loop Refresh Page | baseloopredirect.php | Name of the Redirect Loop Refresh Page |

Email Notification Settings
In this section you can define a SMTP server and all email details to get notifications from CPV Lab. All the notifications sent by CPV Lab and CPV One are sent based on the Alert Profiles you have defined.
Example when you can receive notifications:
- if a campaign has received a number of visitors for the first time ( like reaching 1000k vsits)
- When your can campaign gets more than 1000 visitors and less than 10 conversions /subscribers
- etc
The Email Notification settings require the following information to have the STMP (email) setup and get notifications about your CPV Lab campaigns:
| Option Name | Default Value | Description |
|---|---|---|
| SMTP Server | The name of the SMTP (email) server to be used to send emails | |
| SMTP Port | The SMTP Port for the email server | |
| SMTP Transport | TLS (encrypted) | The way the emails should be sent, encrypted or not |
| Email Login | The email adress used to send the emails | |
| Email Password | The password for the email account used to send notifications | |
| From Name | CPV Lab Pro | The name that should appear as FROM in the email |
| From Email | The email to show up in the from | |
| Email Subject | CPV Lab Pro Notifications | The email subject |
| Send HTML Email | no | If the emails should be sent in a HTML format or not |
| STMP Authentication | On | Use SMTP authentication when sending emails |

True Caching Settings
This section from CPV Lab | CPV One is used to define if you want to aggregate your data in your reports.
- it is very useful if you run high traffic (more than 100K visitors per day)
- it will allow all the reports in the tracker to load faster
Here you will setup:
- Whether to use cached data in reports;
- you must also setup the Cache Cron job for this.
- Here you can find more details about True Cache
- By default it is Off
| Option Name | Default Value | Description |
|---|---|---|
| Clicks to process at once | 10000 | The maximum number of clicks processed in a single Cron job execution |
| Delay in aggregating clicks | 10 Minutes | The delay in aggregating clicks in order to keep the most recent clicks not aggregated |
| Click removal delay | 30 Days | The interval after which already aggregated clicks are removed from the non-aggregated table |
| Conversion removal delay | 30 Days | The interval after which conversions cannot be marked in the aggregated data |

Geo Cron Job Settings
The GEO Cron Job settings is used by CPV Lab users if they want to use a separate Cron Job for GEO data.
- Important: you must also setup the Cache Cron job for this.
- Here you can find more details about Capturing Geo Data
- By default it is Off
| Option Name | Default Value | Description |
|---|---|---|
| Clicks to geo-encode at once | 2000 | The maximum number of clicks geo-encoded in a single Cron job execution |

Cron Jobs General Settings
The Cron Jobs section is used to setup information about the cron-jobs that are running behind CPV Lab. The settings here are important especially for CPV Lab users. For CPV One users, the cron-jobs are automatically managed by the devops team managing the CPV One server.
