Available Data Options in CPV Lab Pro
Getting to know your visitor details is essential for the success of a campaign and for optimizing the audience.
CPV Lab Pro (opens new window) captures many metrics related to the visitor and provides detailed reports to help you understand your traffic.
- Tracking your campaigns with CPV Lab Pro (opens new window) helps you gather all the details about visitors in a central location and see only the metrics that you want in the customizable reports.
- Your campaigns will be integrated with the Traffic Source, with the Offer Source (Affiliate Network) and also with the internal databases from CPV Lab Pro to offer a detailed image over your visitors.
There are 2 main categories of metrics that you can track with CPV Lab Pro:
- Data passed from your Traffic Source
- Data captured internally by CPV Lab Pro using the integrated databases
1. Data passed from the Traffic Source
- Traffic Sources use parameters appended to the Campaign URL in order to pass details about each visitor, the keyword that triggered the click and the ad/banner that was clicked.
- Any parameter passed in the Campaign URL can be easily captured by CPV Lab Pro and displayed in reports.
The URL parameters can be captured in the following fields in CPV Lab Pro:
- Keyword Token – used for the Target/Keyword or the most important metric from your campaign
- Cost Token – used only for capturing the actual cost of each visitor (CPC); this needs to be a numeric value (eg. 0.12)
- External ID Token – used to capture the Traffic Source Unique Code that will be used in the Traffic Source Postback URL call (can be called clickID, userID or subID by the Traffic Sources)
- Ad Token – used for the Ad ID, Ad Name, or Banner Name – only in CPC campaigns
- Extra Tokens – used to capture any other details passed in the Campaign URL
Such Traffic Source parameters are extremely quick to capture and basically there is no added time to the redirect speed for such parameters.
Add Traffic Source
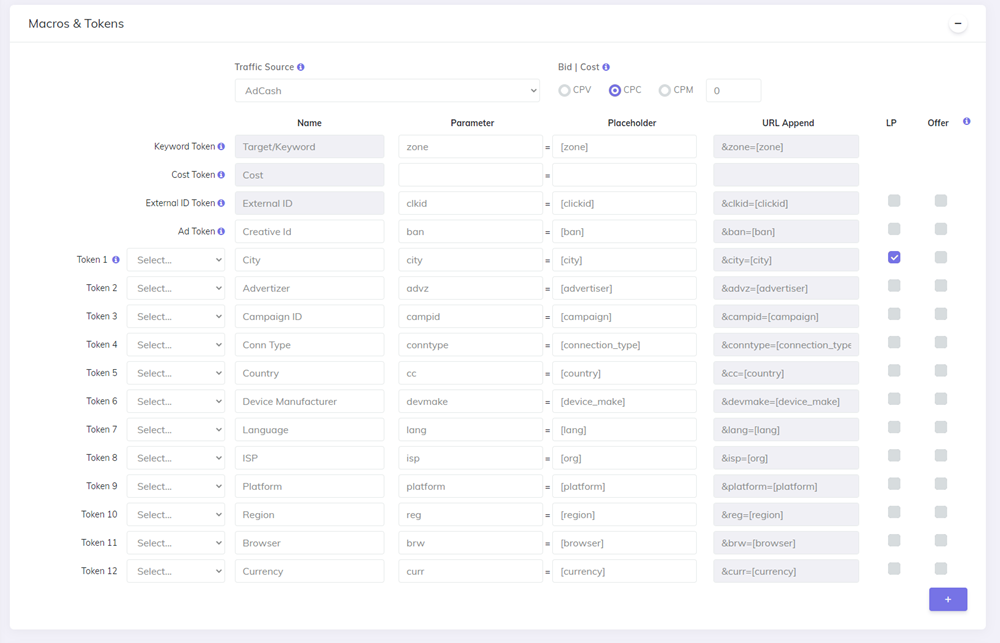
When you import a Traffic Source in your CPV Lab Pro instance using the Catalog you will see that the available tokens are already configured. The following fields are available:
- Name – the name that appears in column headers of report pages
- Parameter – the parameter used in the Campaign URL to send the value (can be any parameter)
- Placeholder – the token used by the Traffic Source for this metric (it is specific to each traffic source)
- URL Append – filled automatically, it is the part that will be automatically added to the Campaign URL
Here is an example of a traffic source with tokens already configured:
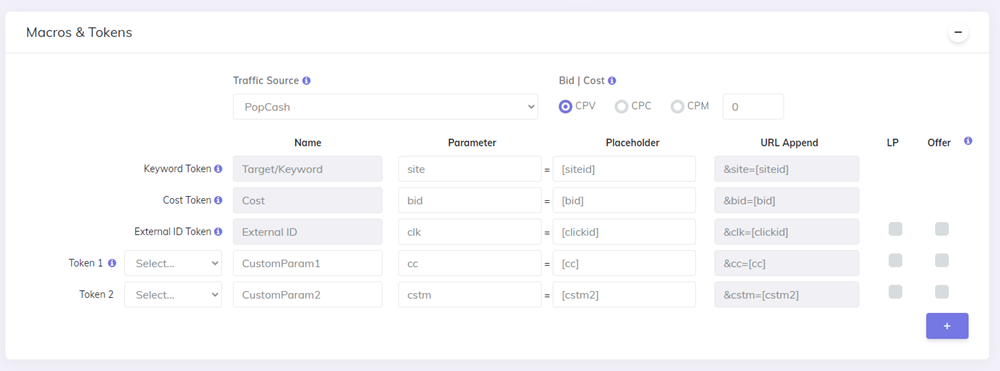
You can add or change the tokens as you wish. The Catalog allows you to import the predefined settings for a Traffic Source and these can be altered as needed.
Tokens on Campaign Setup page
In your campaign setup page you need to select first the desired Traffic Source and then you will have the Target, Cost, External ID and Ad tokens pre-filled automatically.
- You just need to select up to 15 Extra Tokens that you want to capture in your campaign using the Tokens dropdown control.
- You can also configure other custom tokens directly in the campaign setup page.
Tokens on the Stats page
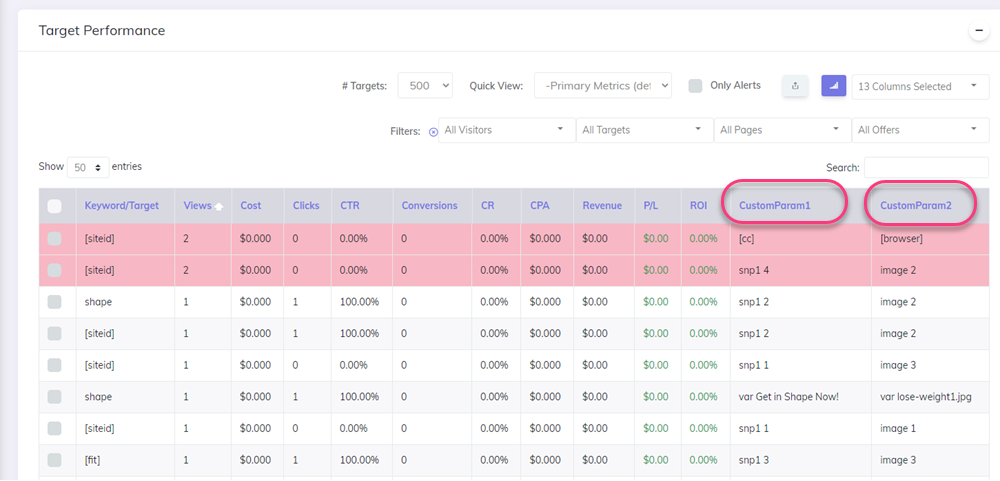
In your Stats page you need to make the Extra Token columns visible first from the Columns dropdown control and then these columns will appear in reports like in the image below:
- notice the Custom Tokens columns that were captured in the example above using Token 1 and Token 2
2. Data captured internally
CPV Lab Pro includes several internal databases that can capture the metrics which are not provided by the Traffic Source in order to offer you a complete view over your visitors.
- The internal metrics that will be captured in each campaign are controlled from the Data Options dropdown control placed in the campaign setup page.
- You should select only the metrics that you are interested in seeing in reports and leave the ones that you don’t need unchecked.
- The available Data Options that can be captured internally are described below.

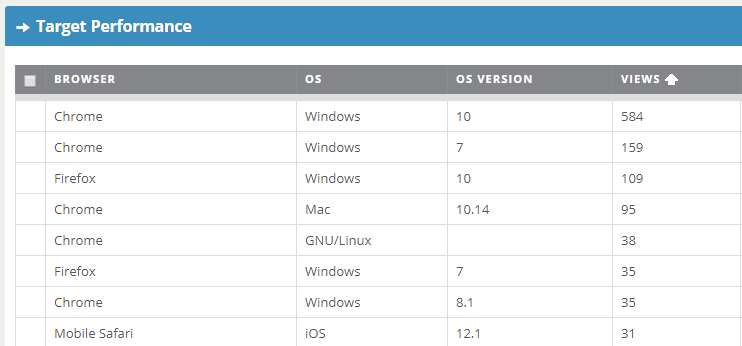
1. Computer Data
- This will capture details about Desktop (Computer) Visitors such as: Browser, Browser Version, Operating System, Operating System Version.
- CPV Lab Pro provides 2 internal databases for capturing computer data: the main desktop database used since version 2 (ID=1) and an alternative desktop database introduced in CPV Lab Pro 5.0 (ID=3).
- On new CPV Lab Pro installs, the default option is set to the alternative database (ID=3).
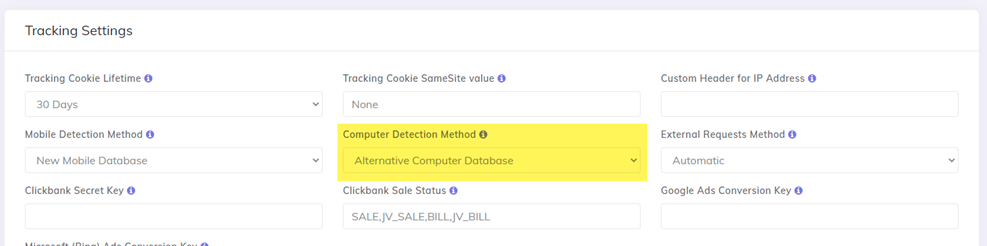
- If you want to see what option is used on your instance of CPV Lab Pro or if you want to switch to the other method, then you need to edit the
Computer Detection Methodfield from the Configuration Editor Page.
- The Computer Data metrics can be displayed in the Target Performance report from the Stats page, Visitor Stats page, Conversion List page and GEO Stats page by making the corresponding columns visible using the Columns dropdown.
2. Computer Resolution
- This will capture the screen resolution for Desktop (Computer) Visitors.
- This only works in campaigns with Landing Pages (so not for Direct Linking) because the screen resolution identification executes in the Landing Page.
- The resolution can be displayed in the Target Performance report from the Stats page by making the “Screen Resolution” column visible using the Columns dropdown.
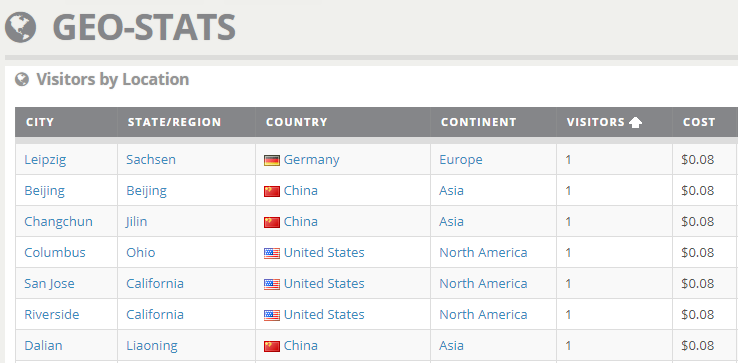
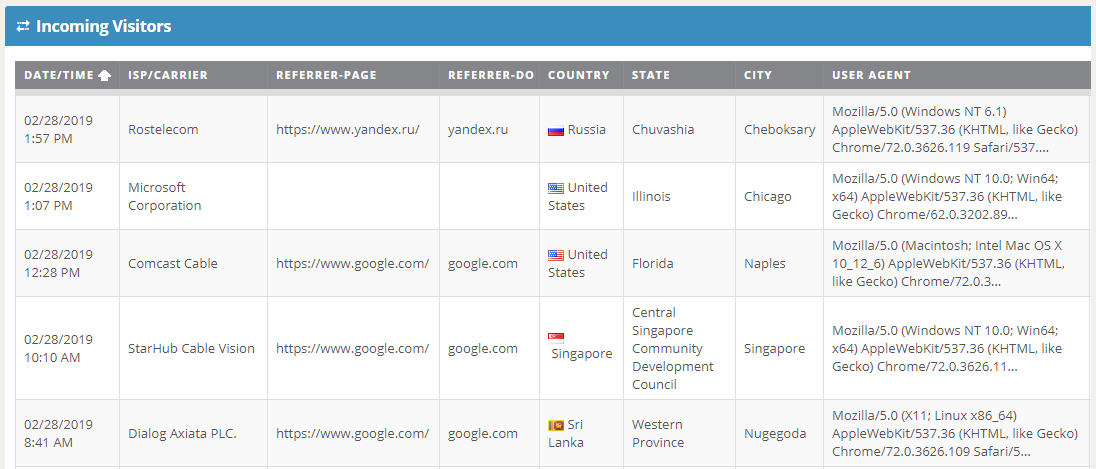
3. GEO Data
- This will capture geographical details of the visitor: Continent, Country, State/Region and City.
- The GEO Data for visitors are displayed in Visitor Stats, Conversion List and also in the dedicated reports from the GEO Stats and Geo Details pages.
4. ISP/Carriers
- This will capture the ISP (Internet Service Provider) for Desktop visitors and the Carrier for Mobile visitors.
- The ISP/Carriers can be displayed in the Target Performance report from the Stats page, Visitor Stats page and Conversion List page by making the “ISP/Carrier” column visible using the Columns dropdown.
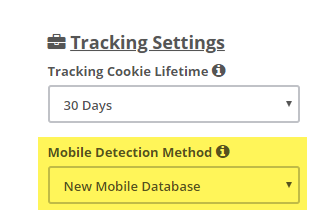
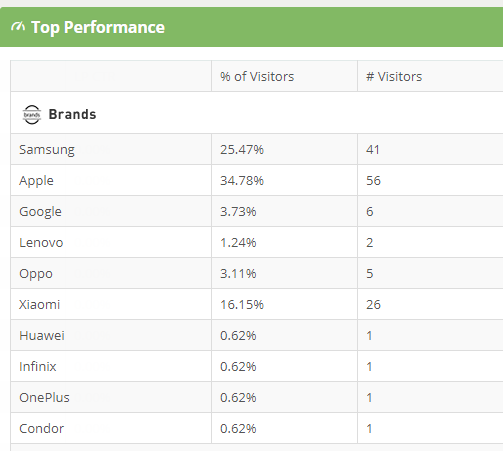
5. Mobile Data
- This will capture the details for visitors using mobile devices. Such details include: Device Type, Device Brand, Device Model, Browser, Browser Version, Operating System, Operating System Version etc...
- CPV Lab Pro provides 2 internal databases for capturing mobile data: the legacy mobile database (ID=1) and the new mobile database (ID=3).
- On new CPV Lab Pro installs, the default option is set to the new mobile database (ID=3).
- If you want to see what option is used on your instance of CPV Lab Pro or if you want to change to the other method, then you need to edit the
Mobile Detection Methodfrom the Configuration Editor Page.
- The Mobile Data metrics can be displayed in the Target Performance report from the Stats page, Visitor Stats page, Conversion List page, GEO Stats page and the dedicated Mobile Audience page by making the corresponding columns visible using the Columns dropdown.
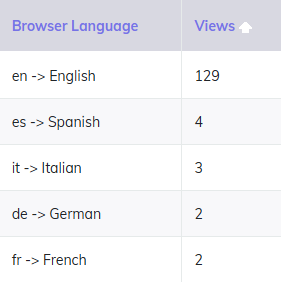
6. Browser Language Header
- This captures the preferred language passed by visitors’ browsers
- It is a useful metric in order to understand which languages visitors prefer for the displayed content and can help you see which languages to translate your landing pages into.
- This information can be combined with Redirect Profiles which can automatically send visitors to specific versions of the landing pages. You can configure something like:
- Visitors with the Browser Language Header set to “en” – redirected automatically to the English version of the landing page;
- Visitors with the Browser Language Header set to “fr” – redirected automatically to the French version of the landing page;
- Visitors with the Browser Language Header set to “es” – redirected automatically to the Spanish version of the landing page;
- And so on for all Browser Language values that you discover that your visitors prefer.
TIP
NOTE: This Language shows the preferred language for your visitors, not the location. If you want to know the exact location of your visitors, then select to capture the Geo Data Option.
Example:
- in order to see a breakdown or your visitors based on the Browser Language, you can check the Target Performance report from Stats and make the Browser Language column visible. You will get a report like this:
7. Referrers
- This will get the referrer for each visitor.
- The referrer is the page that was previously accessed before clicking on your Ad.
- There are cases when the referrer is blocked by the Traffic Source, so it may appear empty.
- The Referrers can be displayed in the Target Performance report from the Stats page, Visitor Stats page and Conversion List page by making the Referrer and Referrer Domain columns visible using the Columns dropdown.
8. User Agent
- This will get the User Agent string for each visitor.
- The User Agent is a string identifying the browser and operating system which is sent be the visitor’s browser.
- The User Agent can be displayed in the Visitor Stats page and Conversion List page by making the UserAgent column visible using the Columns dropdown.
Additional Info
- The metrics captured using the internal databases have been optimized and these databases use caching in order to be fast even when dealing with high traffic figures.
- Each of these Data Options will add a small amount of time (milliseconds) to the initial Campaign URL redirect when the database lookup is performed.
- It is always preferred to try and capture the metrics that you need from the parameters passed by the Traffic Source first and, if something is not provided, then enable the corresponding Data Option in your CPV Lab Pro campaign.
Which internal database to choose for Computer Data?
- The 2 internal databases for Computer Data, the main database and the alternative database, are both pretty similar and very accurate, so there is little difference between them.
- The lookup time for each visitor is very low because both options use caching in order to speed up the lookups.
- For new install we have made the alternative database as the default option.
- Older installs will have the main database enabled, but this can be changed using the
Computer Detection Methodkey from the Configuration Editor Page. - We recommend that you run tests for a few days with each of the 2 computer databases to see exactly what gets captured by each of them and then decide on which one to use.
Which internal database to choose for Mobile Data?
- There are some differences between the legacy database and the new database for mobile traffic, so you need to choose the one that will offer the required data.
- The legacy database is less accurate especially for new mobile devices, but it provides more metrics like Screen Size and Screen Resolution.
- The new database is more accurate, with a good coverage of new mobile devices, but it is missing some metrics like Screen Size and Screen Resolution.
- The most important metrics are included in both mobile detection databases:
- Device Brand
- Device Model
- Device Type
- Browser
- Browser Version
- Operating System
- Operating System Version
- So based on these differences we are recommending the new database for mobile data since it has the most accurate and up-to-date information.
- If you have a fresh install, starting with version 5.0, then the new database is already selected as the mobile detection method.
- If you have upgraded to version 5.0+, then most likely you have the legacy database selected and you can switch to the new database by changing the
Mobile Detection Methodfrom the Configuration Editor Page. - We recommend that you run tests for a few days with each of the 2 mobile databases to see exactly what gets captured by each of them and then decide on which one to use.