Rename tracking pages and pixel pages
CPV Lab Pro (opens new window) introduced the option to use custom names for the tracking pages (base pages) and pixel pages. This means that you can change the default tracking pages from CPV Lab with some other names.
- This is useful if you want to have nicer links instead of the regular tracking links and may also be helpful in order to avoid getting clicks blocked by AdBlocker tools.
- You will be able to add any name you want instead of the base.php, base2.php and base3.php tracking links in order to blend with your websites and hide the real page names from your visitors.
WARNING
Important: this functionality is only availble for CPV Lab (opens new window) ad tracker. It is not available for CPV One (opens new window) cloud-hosted ad tracker.
The following pages can be renamed:
| Default page name | Description |
|---|---|
base.php | The Campaign URL page, it is the page that you submit to the Traffic Source |
base2.php | Tracking page that redirects from Landing Page to Offer page or from one Level to another in a Landing Page Sequence Campaign |
base3.php | Tracking page that redirected to the Offer page in a Landing Page Sequence Campaign |
adclick.php | Tracking Pixel and Postback URL page |
adclickf.php | Tracking Pixel used in the iframe pixels |
adclicks.php | Tracking Pixel used in the script pixels |
adsub.php | Tracking Pixel for Subscribers / Leads |
baseredirect.php | Page used for redirects with the Double Meta Refresh method |
baseloopredirect.php | Page used for redirects with the Redirect Loop method |
The preferred way of accomplishing this is by using rewrite rules in the .htaccess file placed in the root of you CPV Lab Pro instance.
- The process is pretty simple, but you need to have a little server knowledge in order to change the
.htaccessfile.
TIP
Note: In order to use rewriting with .htaccess your server must have the mod_rewrite module installed and enabled.
Steps:
- Login to your server, either with an FTP client, either with the File Manager utility from cPanel.
(optional) if using the File Manager utility from cPanel, you need to open the Settings window (link in the top-right corner) and select the option to ‘Show Hidden Files (dotfiles)’.
- Locate the
.htaccessfile from the root of your CPV Lab Pro install. If the file doesn’t exist, then you should create it. - Edit this
.htaccessfile and define the rewrite rules that you want to use. - Save the modified
.htaccessfile - Define the new page names in CPV Lab Pro
How to define rewrite rules?
- For each page that you want to rename, define a rewrite rule with this format:
RewriteRule ^new-page-name.php$ old-page-name.php [L,QSA]
- Then write the generated rules in the .htaccess file.
- Make sure that your
.htaccessfile includes the following line before any rewrite rule line:RewriteEngine on
- Make sure that your
- These new lines should be appended to the .htaccess file.
- Don’t remove the lines that already exist in the .htaccess file because doing that may lead to errors in the application!
How to define the new page names in CPV Lab Pro?
- In your CPV Lab Pro instance, go to Settings->Configuration Editor Page
- Edit the
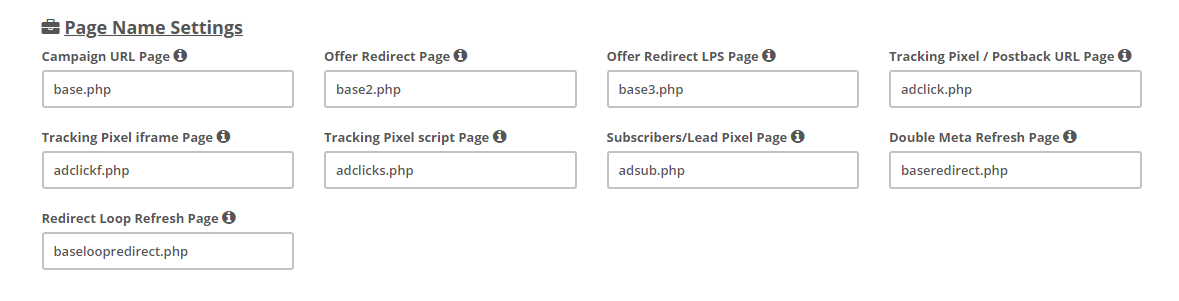
Page Name Settingsand enter the new page names in the corresponding fields.
Example:
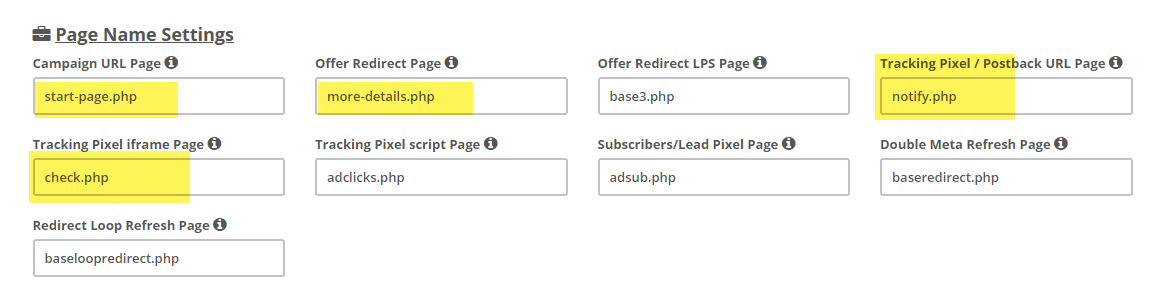
- Let’s say that we want to rename the pages as follows:
| Old Name | New Name |
|---|---|
| base.php | start-page.php |
| base2.php | more-details.php |
| adclick.php | notify.php |
| adclickf.php | check.php |
- Then the
.htaccessfile will look like this:
RewriteEngine on
RewriteRule ^start-page.php$ base.php [L,QSA]
RewriteRule ^more-details.php$ base2.php [L,QSA]
RewriteRule ^notify.php$ adclick.php [L,QSA]
RewriteRule ^check.php$ adclickf.php [L,QSA]
- And the values entered on the Configuration Editor Page should be like in the image below:
DANGER
Important!
This is the preferred method of changing page names because the real page names won’t be changed and so a future CPV Lab Pro upgrade will also upgrade the pages.
Additionally you can perform a physical rename of the pages instead of creating the rewrite rules in .htaccess, but on a future CPV Lab Pro upgrade you need to make sure that you will rename the pages again.