Redirect Profiles Page
Navigation: Profiles ➡️ Redirects
- Redirect Profiles allow you to Redirect Visitors for any campaign, by specific conditions, such as:
- Location (Country, State or City)
- the Type of Device they are using
- Brand of Device they are using
- Supported Screen Size
- GET/Post request from an URL
- etc. (choose from over 40 conditions to create specific visitor segments)
TIP
Important: All Offer and Landing Page URLs defined in a campaign should have numeric UNIQUE IDs assigned to them. Eg: 1, 2, 3, 102, 203, etc.
A. Page fields and details
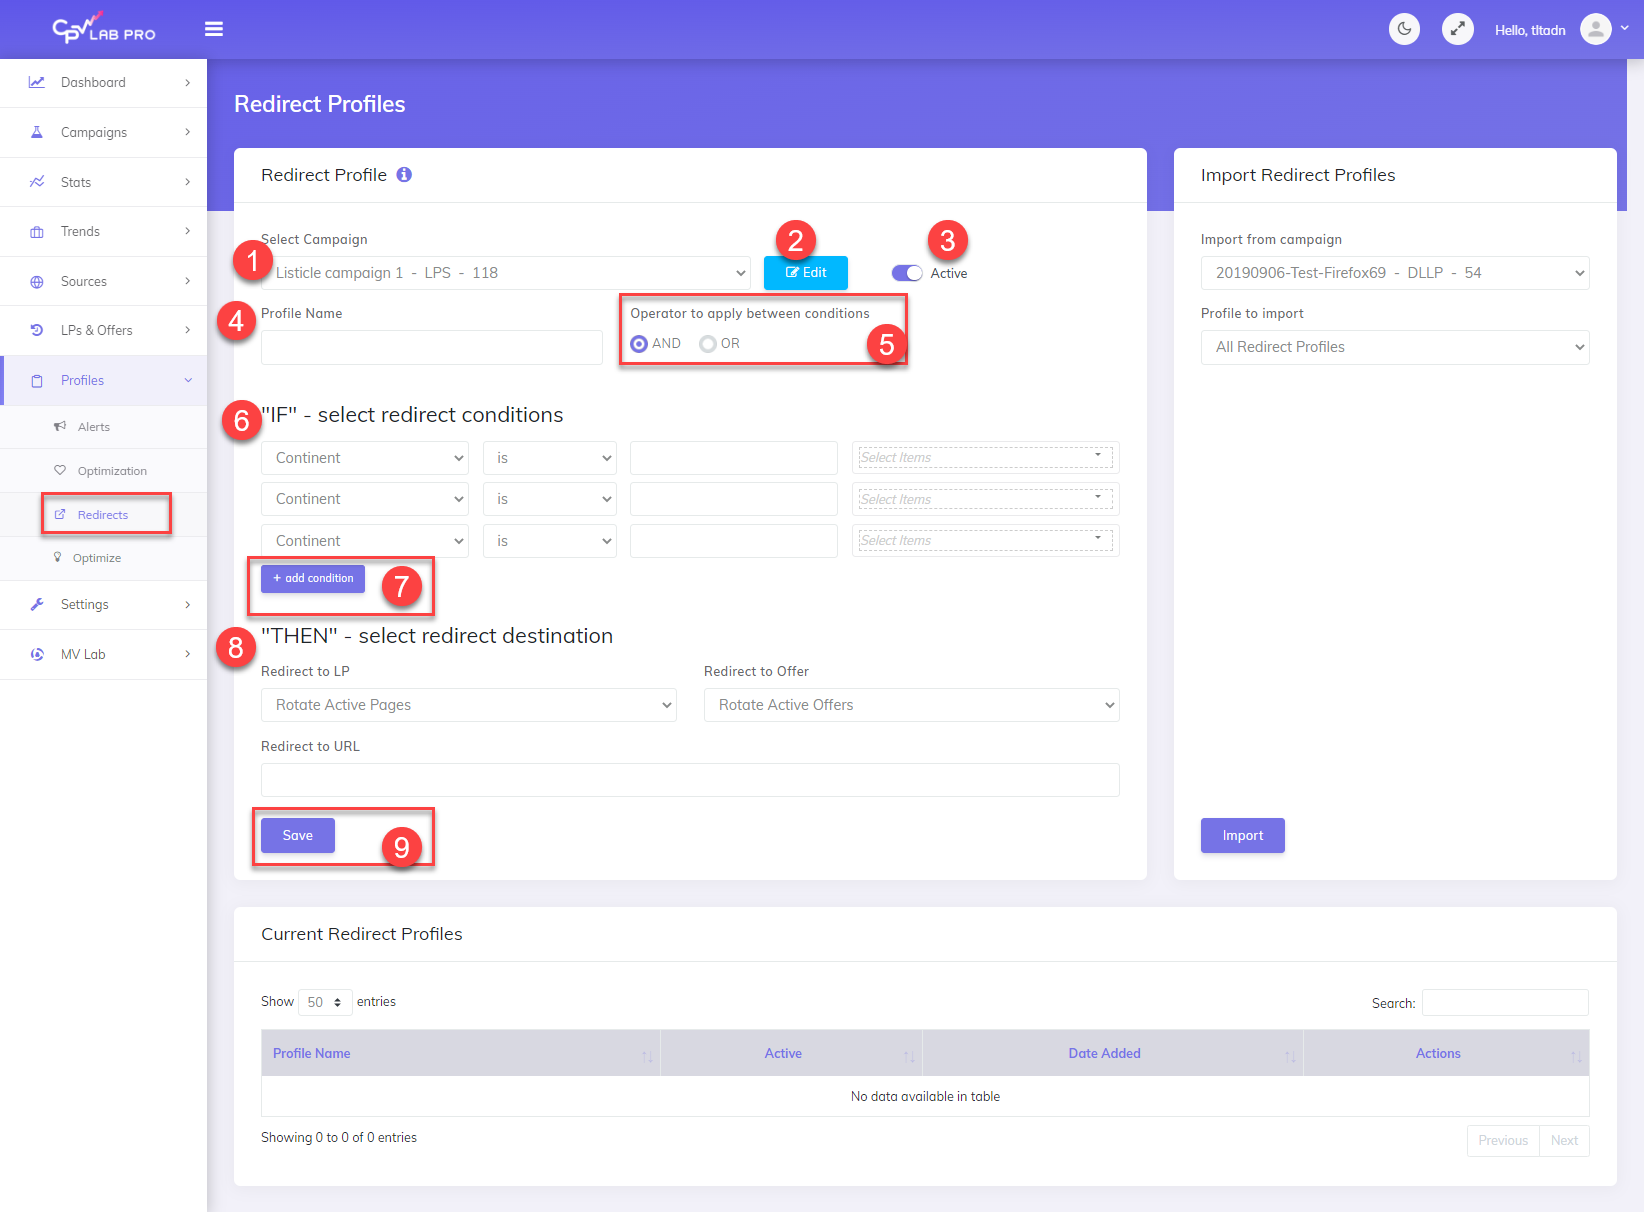
1. Select Campaign
- Choose a Campaign the Redirect Profile will be applied to.
2. Edit Campaign
- Jump to Campaign Settings Page for the Selected Campaign and do the changes you want.
3. Active
- Set this Redirect Profile Active or Inactive.
4. Profile Name
- Enter a Name for the Redirect Profile.
- When setting up a campaign you can easily pick up a Redirect Profile for it. So, use an easy to remember name.
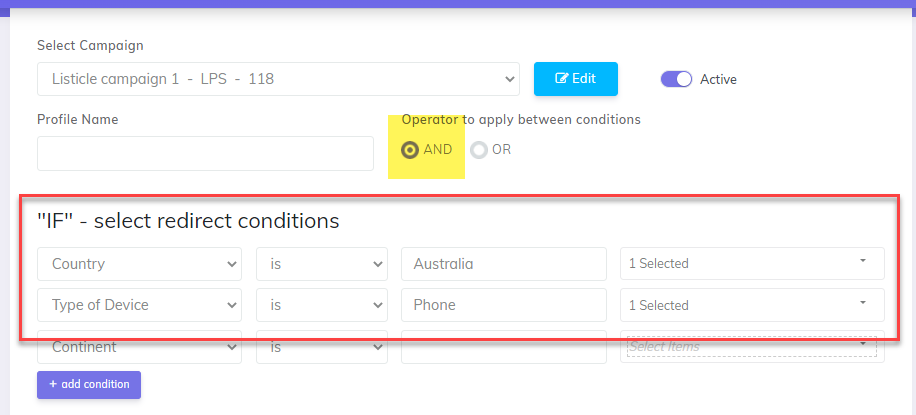
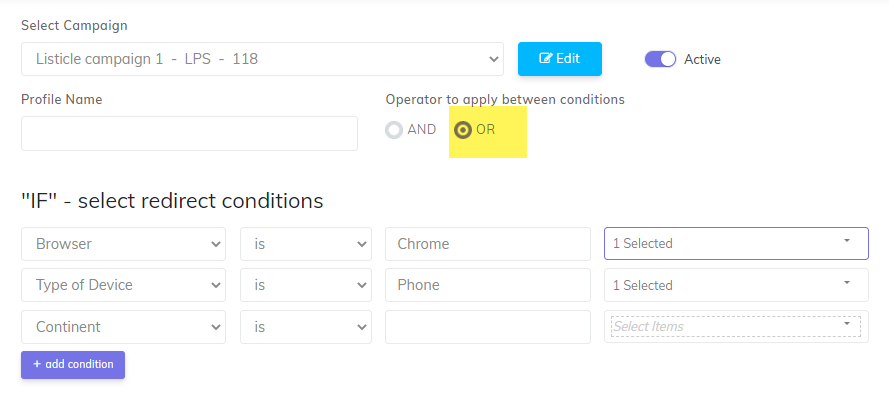
5. Operator to apply between conditions
- For example: if you set Conditions for Country and Device Type:
- AND - Both the Country & Device Type Conditions must be met for the redirect to occur
- OR- Only one of the set Conditions, Country or Device Type must be met for the redirect to occur
Example with AND operator:
- Country is "Austalia" AND Type of device is "Phone"
- This condition will tell CPVLab to check both conditions must apply in the same time for the redirect to happen
Example with OR operator:
- Browser is "Chrome" OR Type of device is "Phone"
- This condition will tell CPVLab to check if only one of the 2 conditions apply at a time for the redirect to happen,
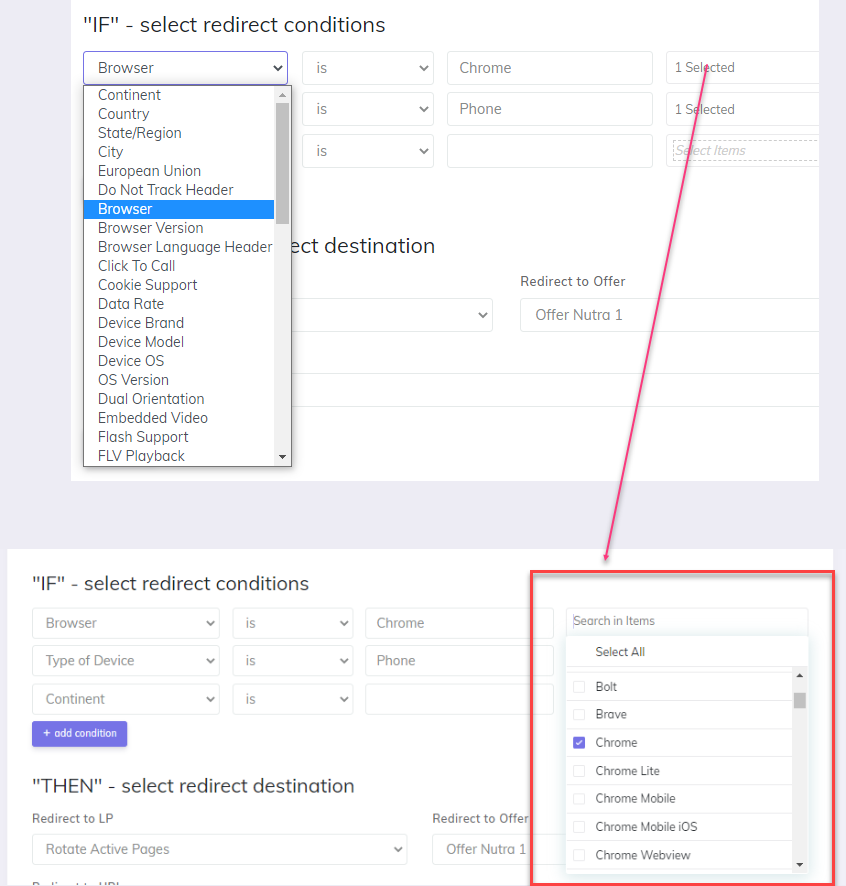
6. “IF” – Select Redirect Conditions
- Use the Simple dropdown menus to select and add Conditions to the redirect profile.
- Choose from over 40 Conditions such as GEO (Country, State, City), Carrier or Device.
- Select the parameter for which you want to add a condition and then select from the options available for it in the list "Search in Items".
For example, if you choose "Browser" then you can select what kind of browsers from the loaded list:
7. Add Condition
- By default you view 3 Conditions, and you can use just 1 Condition to create a redirect or any combination of multiple conditions.
- Click "add condition" to add more conditions to the profile.
8. “THEN” – Select Redirect Destination
- Redirect to LP - This will give you a list of active pages within the selected campaign.
- Redirect to Offer - This will give you a list of active offers within the selected campaign.
- Direct to Offer - This will skip any landing pages & direct the visitor to an Offer.
- Redirect to URL - Enter any URL you want to redirect the visitors that fit the profile to.
9. Save
- Click the SAVE button to save the new redirect profile
- it will show up in the datatable from the bottom of the page
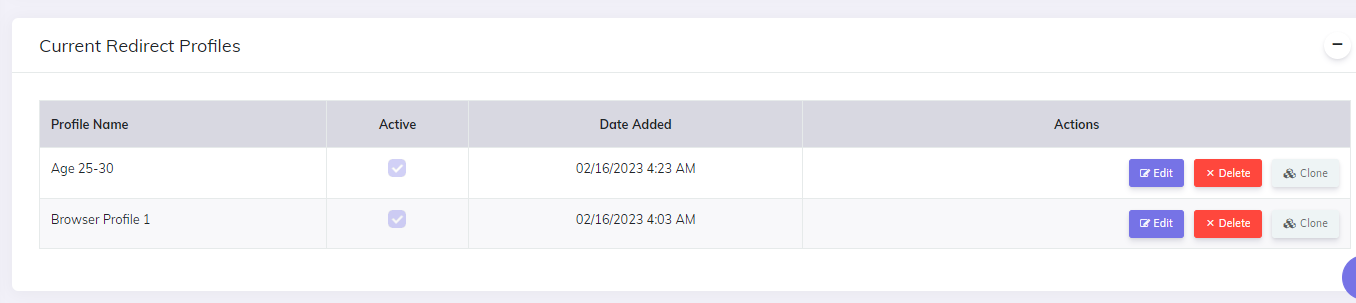
10. Current Redirect Profiles and Actions
View All Redirect Profiles for the Selected Campaign, Edit Profiles, Delete Profiles or Clone Profiles for Quick Creation of New Profiles.
11. Import Redirect Profiles
- Here you can import profiles from other campaigns.
- Import from campaign – Select the campaign you want to import redirect profiles from.
- Profiles to import – Select the profiles in the selected campaign to import into the current campaign.
B. Custom Redirects by Incoming Parameters
- You can now create Redirect Profiles based on incoming parameters within the **campaign URL for each visitor. **
Example:
- Let’s say you’re running a Facebook Ads Campaign and you have created an Extra Token with the parameter as
age

- Within the campaign you are targeting 3 age ranges, by replacing “edit” with the actual age range as:
- Let’s say you’re running a Facebook Ads Campaign and you have created an Extra Token with the parameter as
age=25_30
age=31_35
age=36_40
- This will return the data in the Campaign URL and Stats as:
age=25_30
age=31_35
age=36_40
- With this data, you can Create a Redirect Profile to redirect each age range to a specific Landing Page, Offer or URL

TIP
Summary:
A - Select the Extra Token you would like to use to trigger the redirect.
B - Enter the Data as returned for the selected token to trigger the redirect.
C - Choose the redirect destination for this type of visitor.
Example of Redirects:
- IF
Ageis 25_30- THEN
redirect➡️ Landing Page A / Offer A
- THEN
- IF
Ageis 31_35- THEN
redirect➡️ Landing Page B / Offer B
- THEN
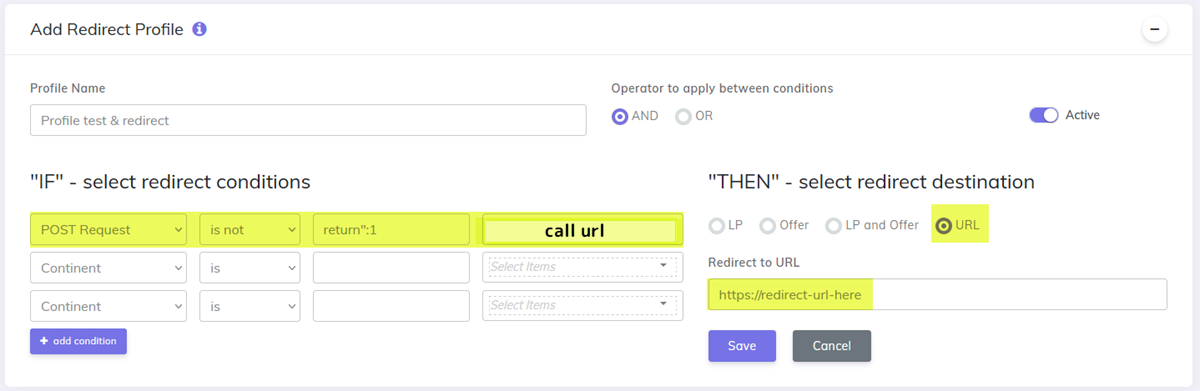
Redirect Profiles based on GET/Post results
You can send unwanted traffic to a specific URL in case an API/URL request is returning you the information needed for it.
It will work like this:
Define an URL to be called (it can be an API call, a URL where you get a response from)
the redirect condition will be
trueorfalsebased on the value returned from the requested URLyou will define a Redirect Profile for your campaign (in thecampaign setup page or in the dedicated Redirect Profiles page)
set any name you wish for the Redirect Profile
define a condition for the redirect with the following values: -> type:
POST Request-> operator:is not-> value:return":1-> URL:your request URLThis redirect will make a POST request to the URL (if you have parameters it will also pass the parameters also). If the response doesn't contain
return":1, then the condition is matched.choose as the redirect destination "URL" and enter the URL where you want to redirect traffic that matches the condition (unwanted traffic)
traffic that doesn't match the condition (legit traffic) will be sent to the offer URL.
TIP
If the requested URL is like: domain/api/?ip={!ipaddress!}&useragent={!useragent!}&campKey=CA-{!campaignid!}, then the redirect condition will first replace the wildcards and then do a POST request to the URL by passing the parameters as well.
WARNING
When you use Google Ads as the traffic source in your campaign, the redirect profile won't be applied before the landing page is displayed (since visitors are sent directly to the landing page). In this case the click on the base2.php tracking link from the landing page will be the one that redirects visitors matching the condition to the redirect URL.
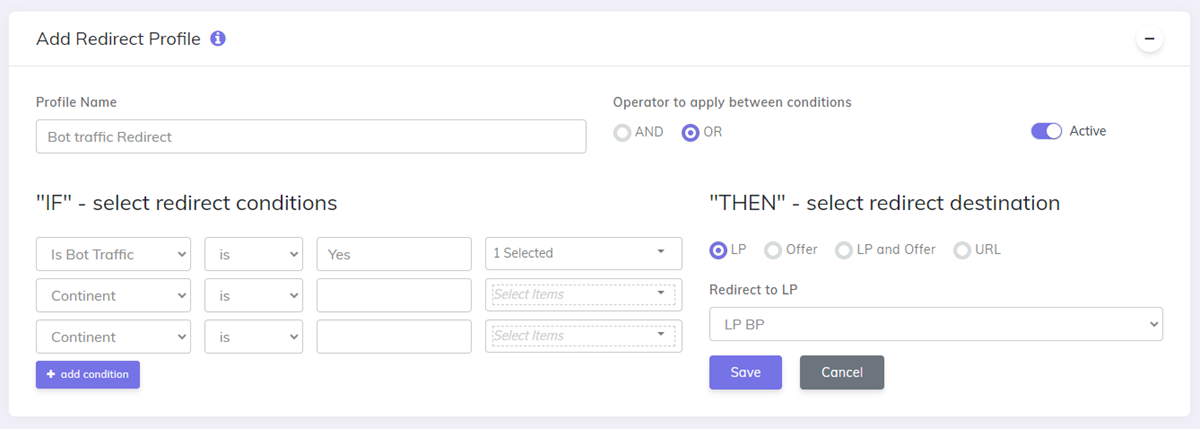
Redirect Profiles for BOT traffic
When you identify bot traffic, you can redirect traffic to a specific landing page. This will help your account with the affiliate network to not be flagged because of bad traffic.
To do that you need to:
- define a landing page with
0 sharesin your campaign - define new redirect profile for your campaign
- add a condition for
is botorbot name - select the Landing page to redirect to
You can find more details about Bot Traffic filtering here.
Find more details in the video below:
Video Tutorial for setting up your redirect profile with CPV Lab (opens new window)
You may also find useful: