MV Lab — Basic & Advanced Usage (with MV Lab Assistant)
This guide shows how to use MV Lab step by step. It covers both basic and advanced workflows and explains the MV Lab Assistant (AI) and how to use it to create better headlines, CTAs, and page elements.
Use this page as a simple how-to manual.
Quick overview
- MV Lab — Basic & Advanced Usage (with MV Lab Assistant)
MV Lab helps you create, save, and test many page variations fast. You can test headlines, CTA buttons, descriptions, and full landing page HTML. Use MV Lab together with CPV Lab (opens new window) or CPV One (opens new window) to track clicks, engagement, CTRs and conversions.
What you can do with MV Lab:
- Create many variations of a page element in minutes.
- Save and re-edit variations whenever you want.
- Generate MV Lab code from any saved page variation.
- Use the MV Lab Assistant (AI) to suggest new, high-quality variations.
- Track the varations of the landing page from CPV Lab / CPV One tracking links.

How to use MV Lab
Below are all the steps to create, edit and manage your MV Lab page variations.
Create, Save, and Export Page Code Variations
Below are all the steps on how to easily use MV Lab to test variations of a landing page.
Create a new variation (fast steps)
Follow these steps exactly to create a new page variation and link it to your tracker.
- Open MV Lab menu in your CPV tracker.
- Name the page variation — pick a clear name (example:
hero-apr24-red-cta). - Select campaign — choose the CPV Lab / CPV One campaign this page will be used with.
- The campaign must already exist in CPV Lab / CPV One.
- Select host domain — pick the domain where you will upload the landing page.
- Insert the vertical / topic — write the industry or offer (e.g.,
Ecommerce - Shoes). - Edit elements for your Page Variation:
- Groups — group elements you want to rotate together (see next section).
- Snippets — the page pieces you can change:
- Headline, subheadline
- Primary image or product photo
- Bullet points / benefits
- CTA button (text, color, link)
- Variations — add multiple values for each snippet (these are the different texts/images you will test).
- Generate code and Save — click
Generate code and Saveand confirm the variation name.
Tip: keep variation names short, descriptive, and consistent: element-date_variant (e.g., hero-apr24_v1).
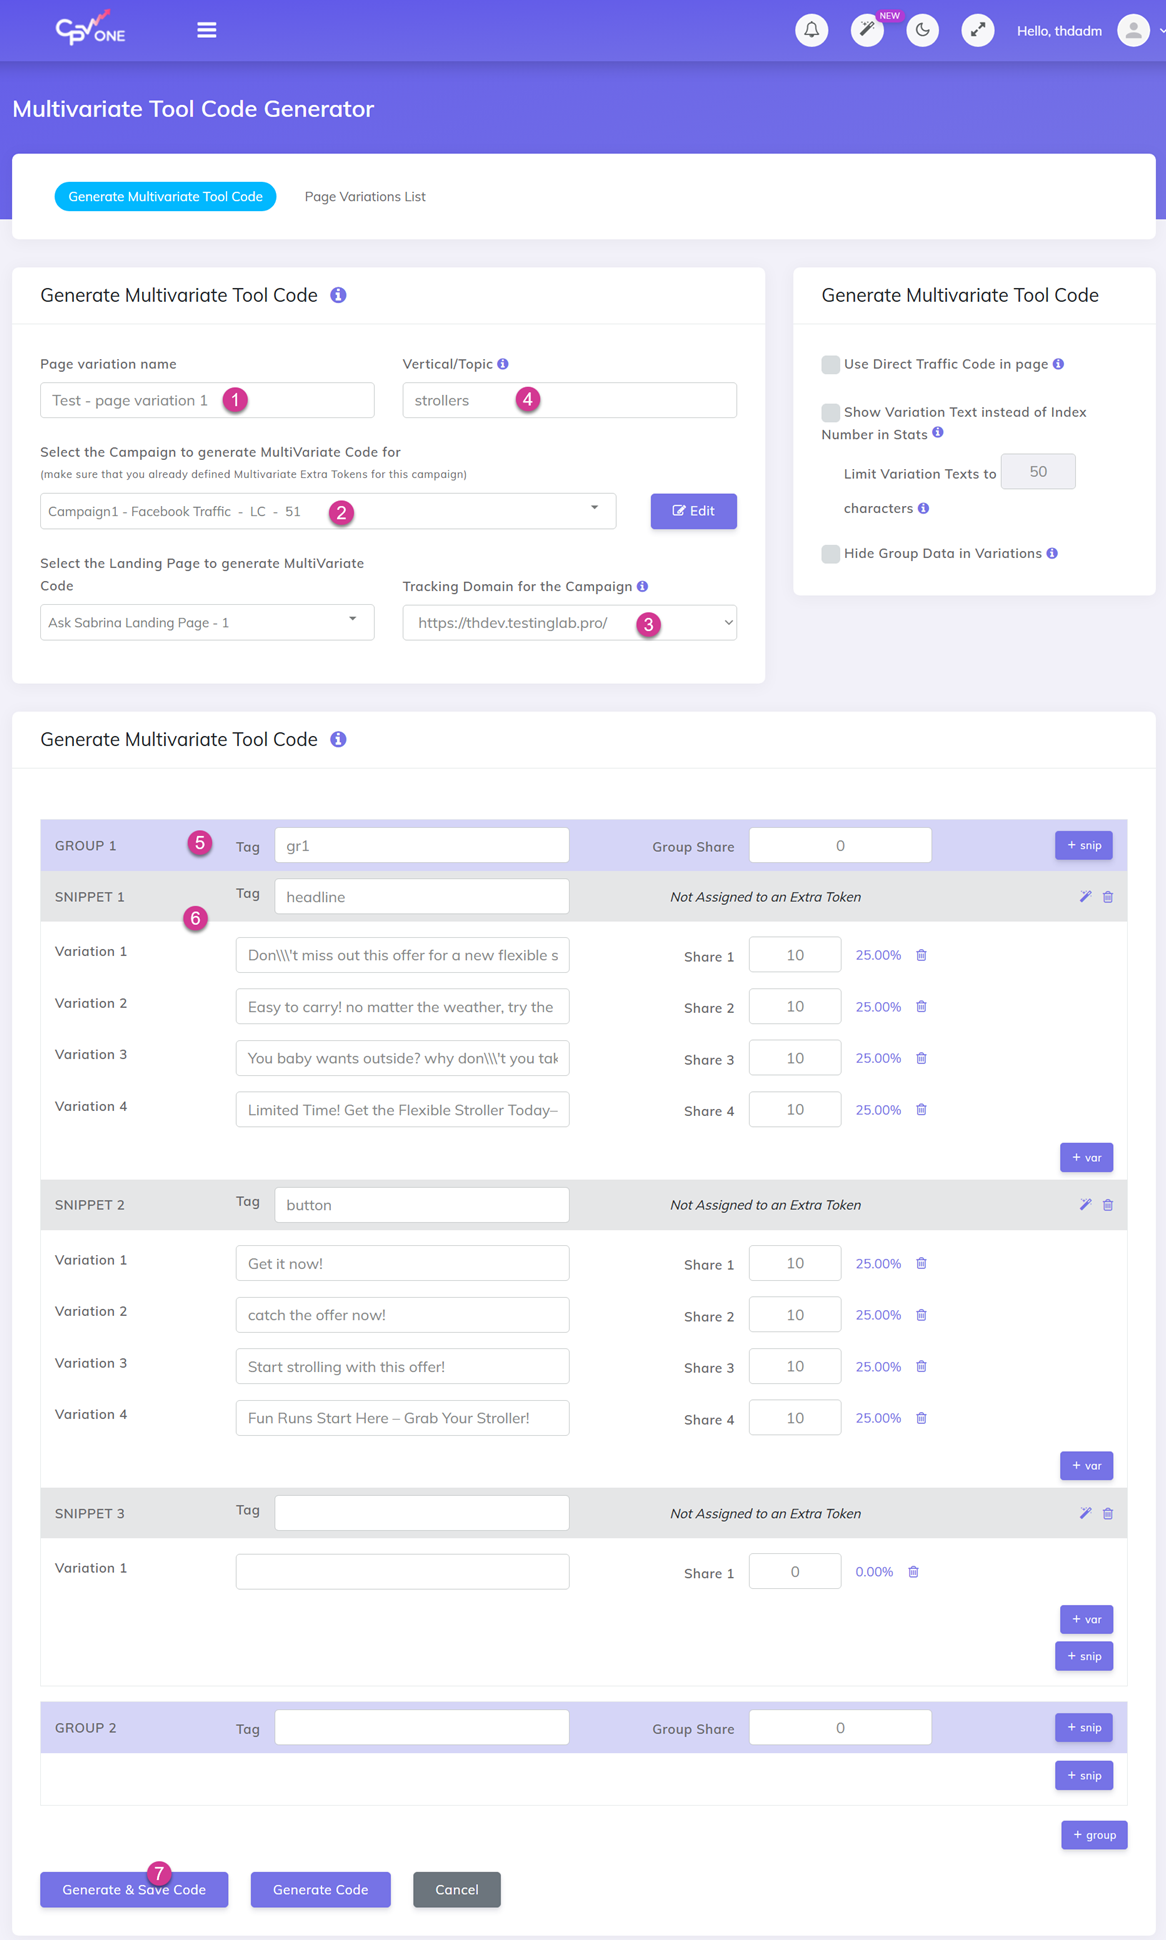 Alt: MV Lab - create new variation screen
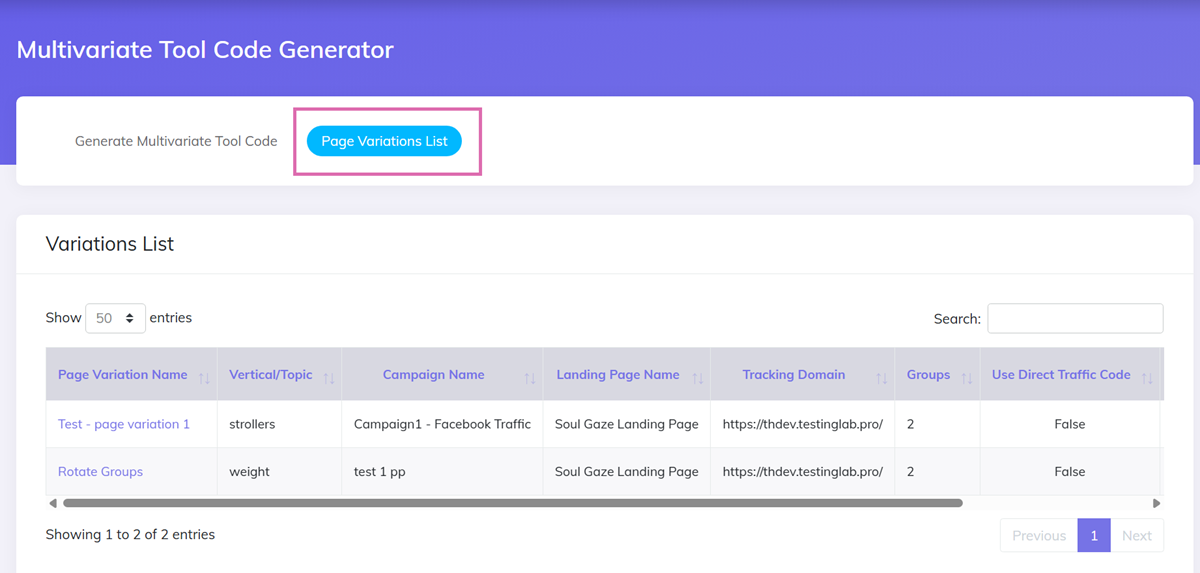
Edit and manage variations
- Open Saved Variations tab from under the "MV Lab" menu
- You will see a list with all the saved variations you generated so far.
- Click any variation name (or the edit button) to open it in the editor.
- Make changes and either:
- Generate Code & Save — overwrite the current variation and generate the code for it
- Generate Code — generate a new code to be used, but it will not be saved
Page elements
Snippet
- Each piece of content from your landing page that you want to test and rotate is named Snippet.
- You can have up to 8 different Snippets in a single landing page.
- The snippets are a piece of text, but they can appear as texts in a page or in any other HTML element (image source, iframe etc).
- Usually you would define snippets for page titles, headlines, paragraphs, call-to-actions and image names.
- Each piece of content from your landing page that you want to test and rotate is named Snippet.
Variation
- The values that will rotate inside each snippet are named Variations.
- There is no limit of variations for each snippet, you can define as many as you wish.
- You can specify a share for each variation and that will be the probability of that variation to appear in the snippet.
- Example:
- variation1 has
share=10and variation2 hasshare=30 - for 100 visitors, 25 of them will see variation1 and 75 will see variation2
- The values that will rotate inside each snippet are named Variations.
Groups & rotation — how to run multi-element tests
What are Groups?
Groups let you rotate sets of snippets as one unit.
- For example: a Group can contain a snippet with 3 variations for headline + a snippet with 2 variations for image + a snippet with 2 variations for CTA.
- If you have multiple groups, when you rotate groups, MV Lab will serve combinations that make sense together.
How to use Groups
- Create Group A (headline A1, headline A2, headline A3, image A1, image A2, CTA A1, CTA A2)
- Create Group B (headline B1, headline B2, headline B3, image B1, image B2, CTA B1, CTA B2)
- Rotate Group A and Group B so your visitors see different full creative sets.
Example table: groups & snippets
| Group | Headline | Image | CTA |
|---|---|---|---|
| A | "Save 30% Now" | hero-red.jpg | "Shop Now" |
| A | "Free Shipping" | hero-blue.jpg | "Get Discount" |
| A | "Save money Now" |
When to use groups
- When several elements must match visually (headline & image & CTA).
- For multivariate testing with controlled combinations.
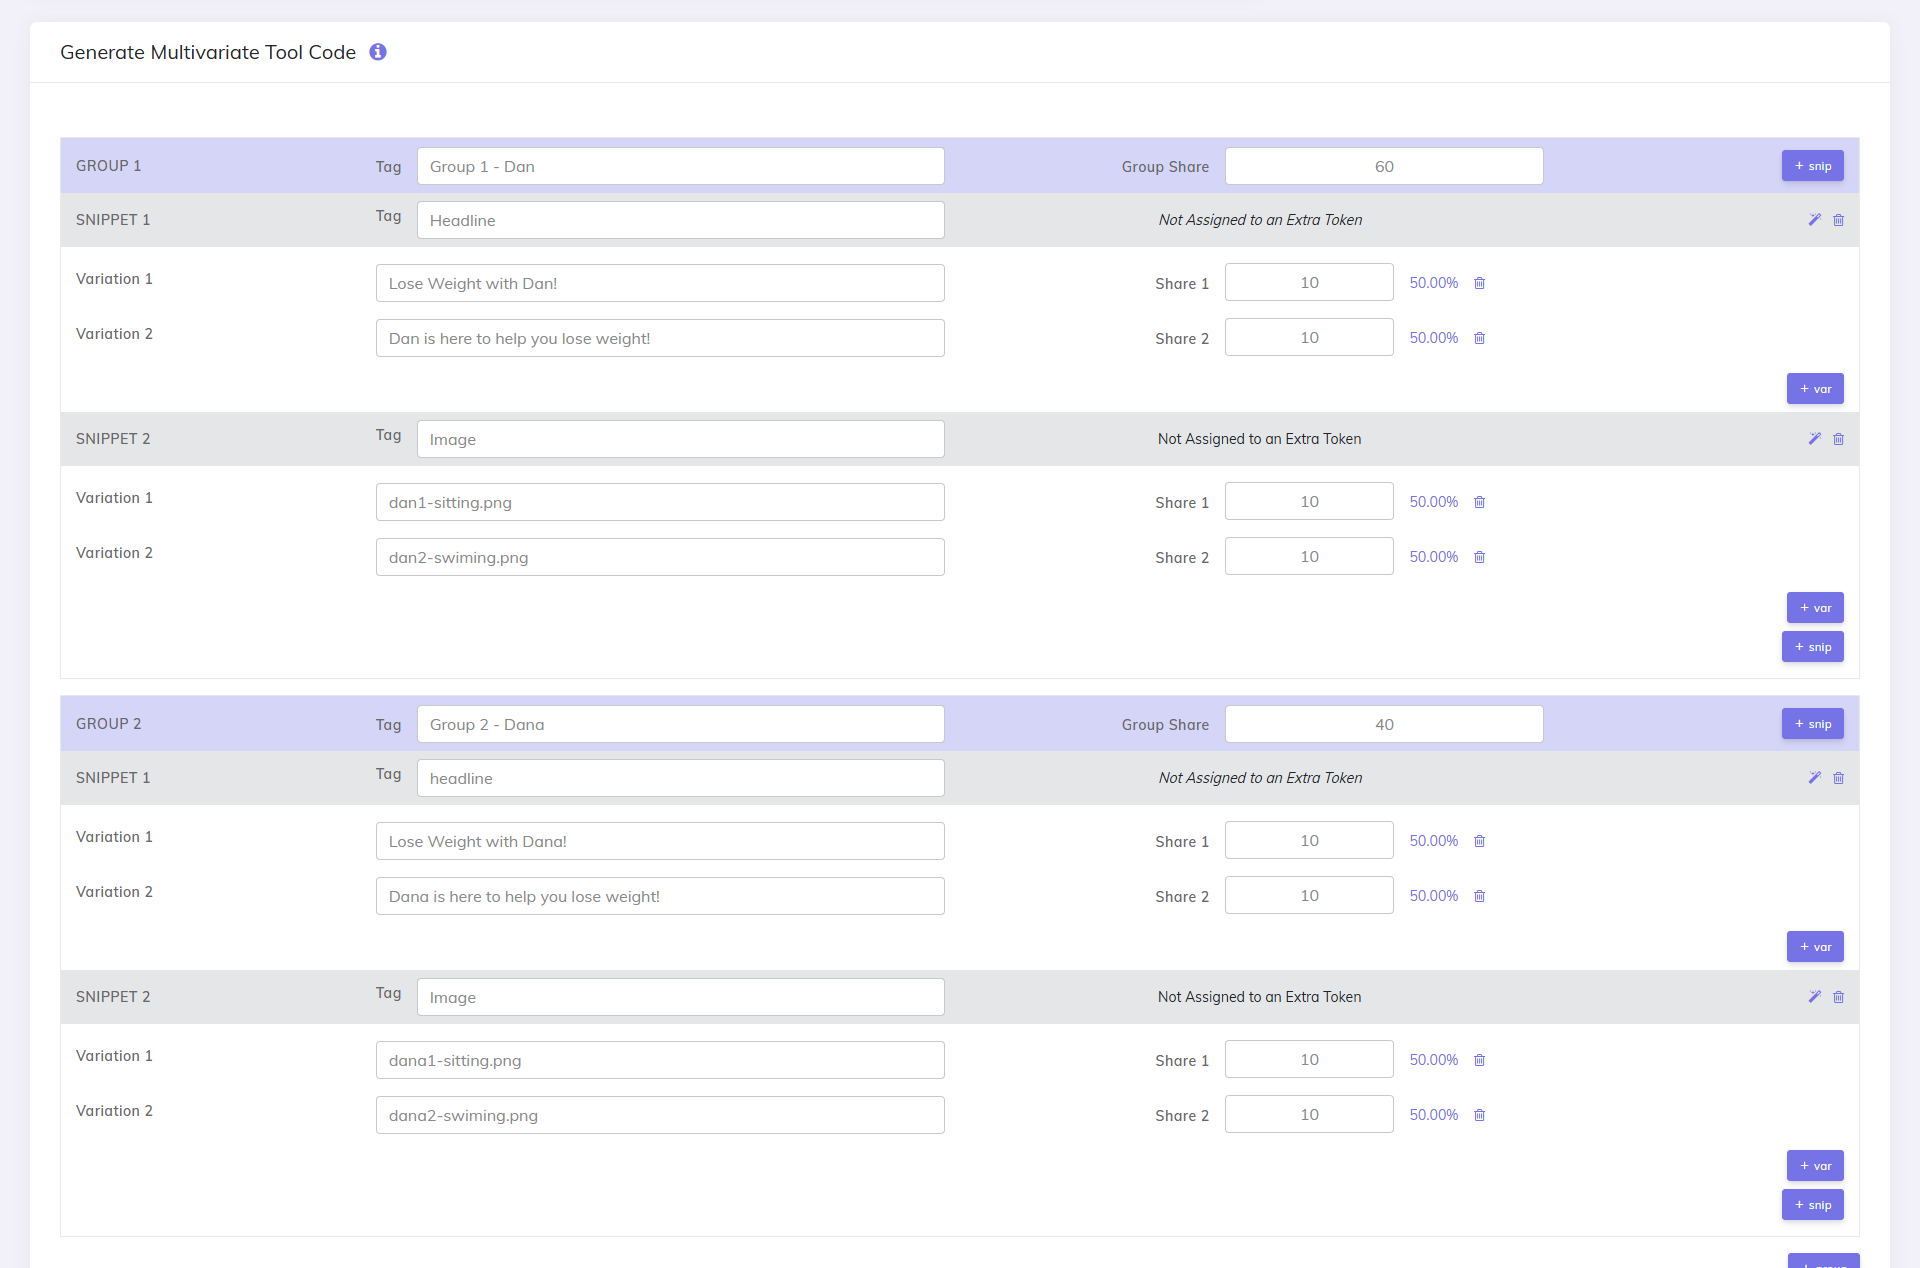
Example when to use groups:
- We may have a landing page that displays one of 2 headlines:
- ‘Dana has lost 30 lbs!’ and ‘Dan has lost 30 lbs!’
- and 2 images (one of a woman and one of a man)
- If we don’t use groups, the variations rotation may display the following combinations of "headline – image" for your visitors:
- Dana has lost 30 lbs! – image with a man
- Dan has lost 30 lbs! – image with a woman
- To not have such combinations where the headline has a woman name, but the image is a man or when the headline has a man name, but the image is a woman, then:
- To avoid such issues create 2 separate groups in the visual code-editor and place all variations related to Dana in one group and the variations related to Dan in the other group.
TIP
Note: You can define a maximum of 8 groups in your MV Lab landing pages.
Snippets & Variations — building your tests
Snippets = page elements (headline, bullets, CTA).
Variations = the different options for each snippet.
How to add variations
- For each snippet, add 3–8 variations.
- Example for a headline snippet:
- Variation 1: “Save 30% on Running Shoes”
- Variation 2: “Top-Rated Shoes — Free Shipping”
- Variation 3: “Shop Lightweight Running Shoes”
Best practice
- Change one main thing per variation set (headline or CTA), especially during early tests.
Shares for Variations and Groups
- In order to have more control over the number of times a variation or a group is displayed you can define shares for them.
- A share must be a positive numeric value which specifies the probability of that variation/group to be displayed for visitors.
- A variation with 100 share is 10 times more probable to be displayed than a variation with 10 share, which is 10 times more probable to be displayed than a variation with 1 share.
- If shares are not defined, then all variations will be equally likely to be displayed.
- Unlike the Landing Pages and Offers defined in the campaign setup page from CPV Lab Pro, these shares shouldn’t add up to 100%.
- The group shares work in the same way as the variation shares. A group with 10 share is 10 times more likely to be displayed than a group with 1 share.
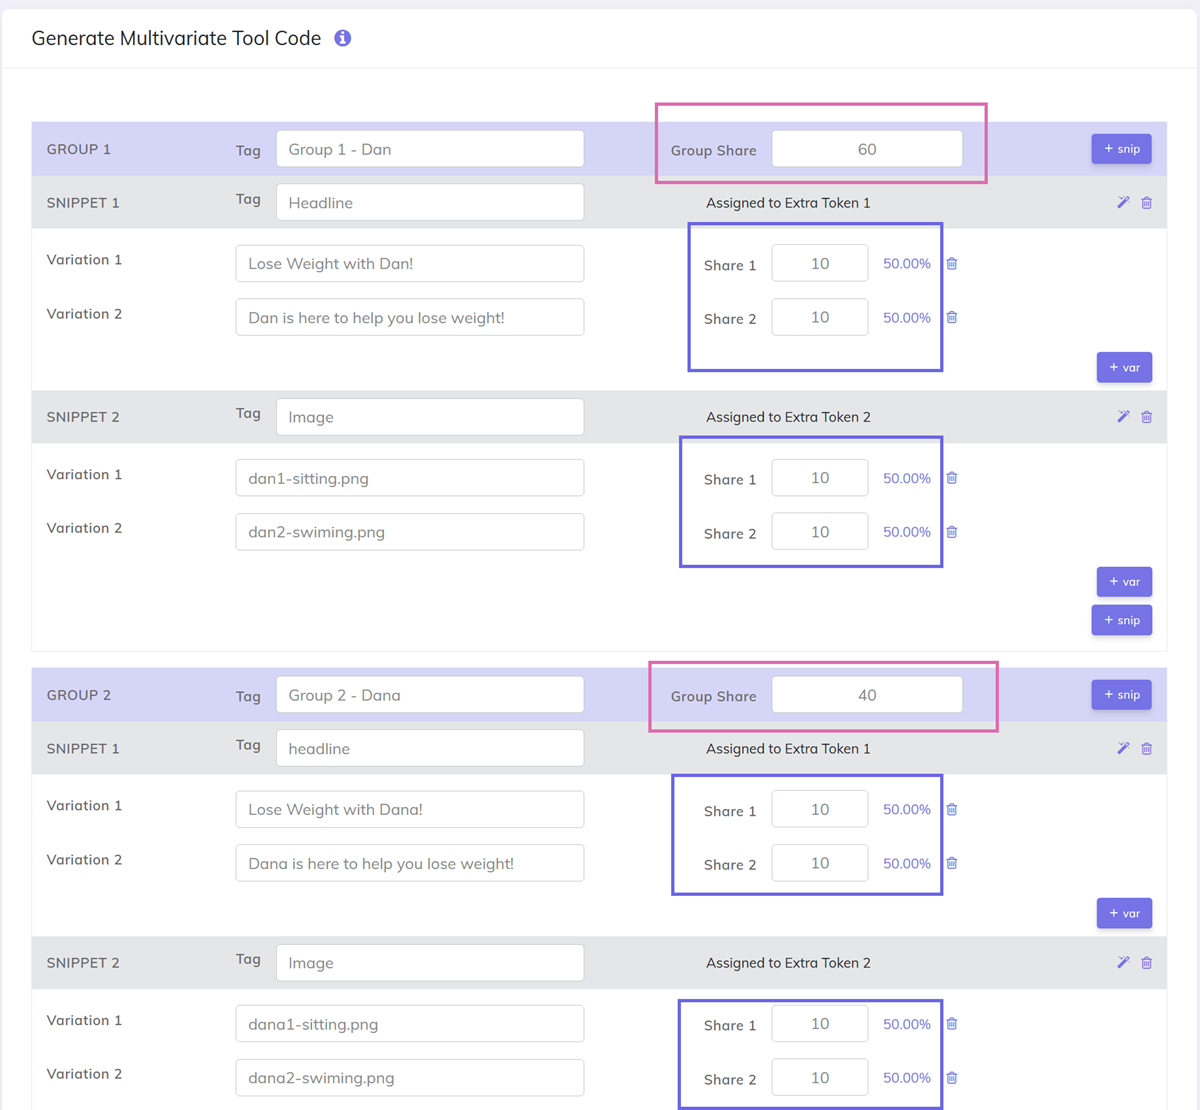
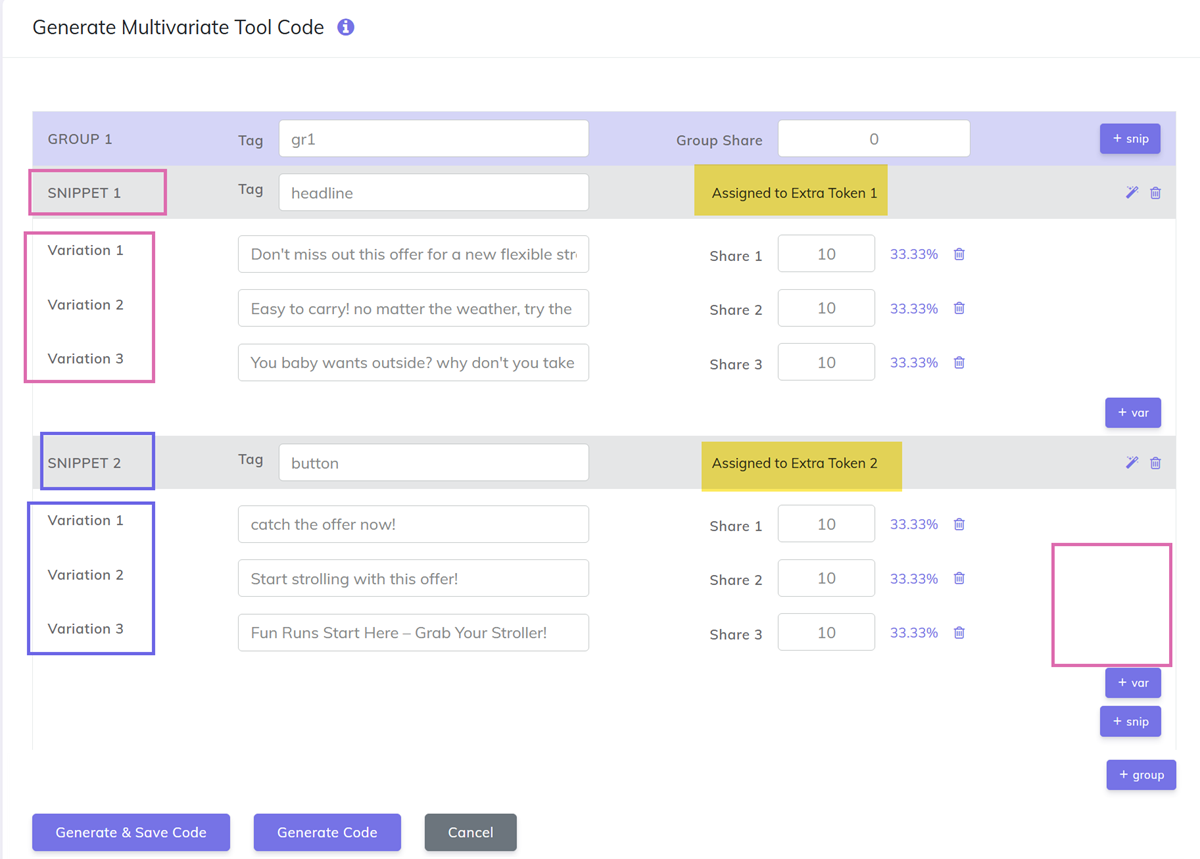
Tags for Snippets and Groups
- The tags can be used to make the variations appear in a more friendly way in your Stats.
- The tag should be a short description of the snippet or group and be specific to what it means for the landing page.
- Such examples of tags can be: image, logo, h1, cta, color...
- You can add tags for snippets and groups.
Example:
- In the example above, we used the following tags:
- For groups - we used Dana and Dan (to easily identify the groups)
- For snippets - we used headline, image and CTA
Example:
- We have a simple HTML page called
basic-sample.html - We use MV Lab to generate the code so we can create one landing page with multiple variations for texts/images/colors.
MV Lab Assistant (AI)
The MV Lab AI Assistant generates variations based on your input. It's an AI helper that suggests better variations for elements (headlines, buttons, bullets, etc.).
- It uses:
- the vertical (industry),
- the snippet name (button, headline, content), and
- the first 3 variations you enter as examples.
1. Start the assistant
- Open the "MV Lab Generate Code" Page
- Choose the vertical (industry) from the dropdown (e.g., Ecommerce, Health).
- Choose the snippet you want to create (headline, CTA, bullets).
- Type up to 3 example variations (each 1–2 lines).
- click the "magic wand" to open MV Lab Assistant for that snippet
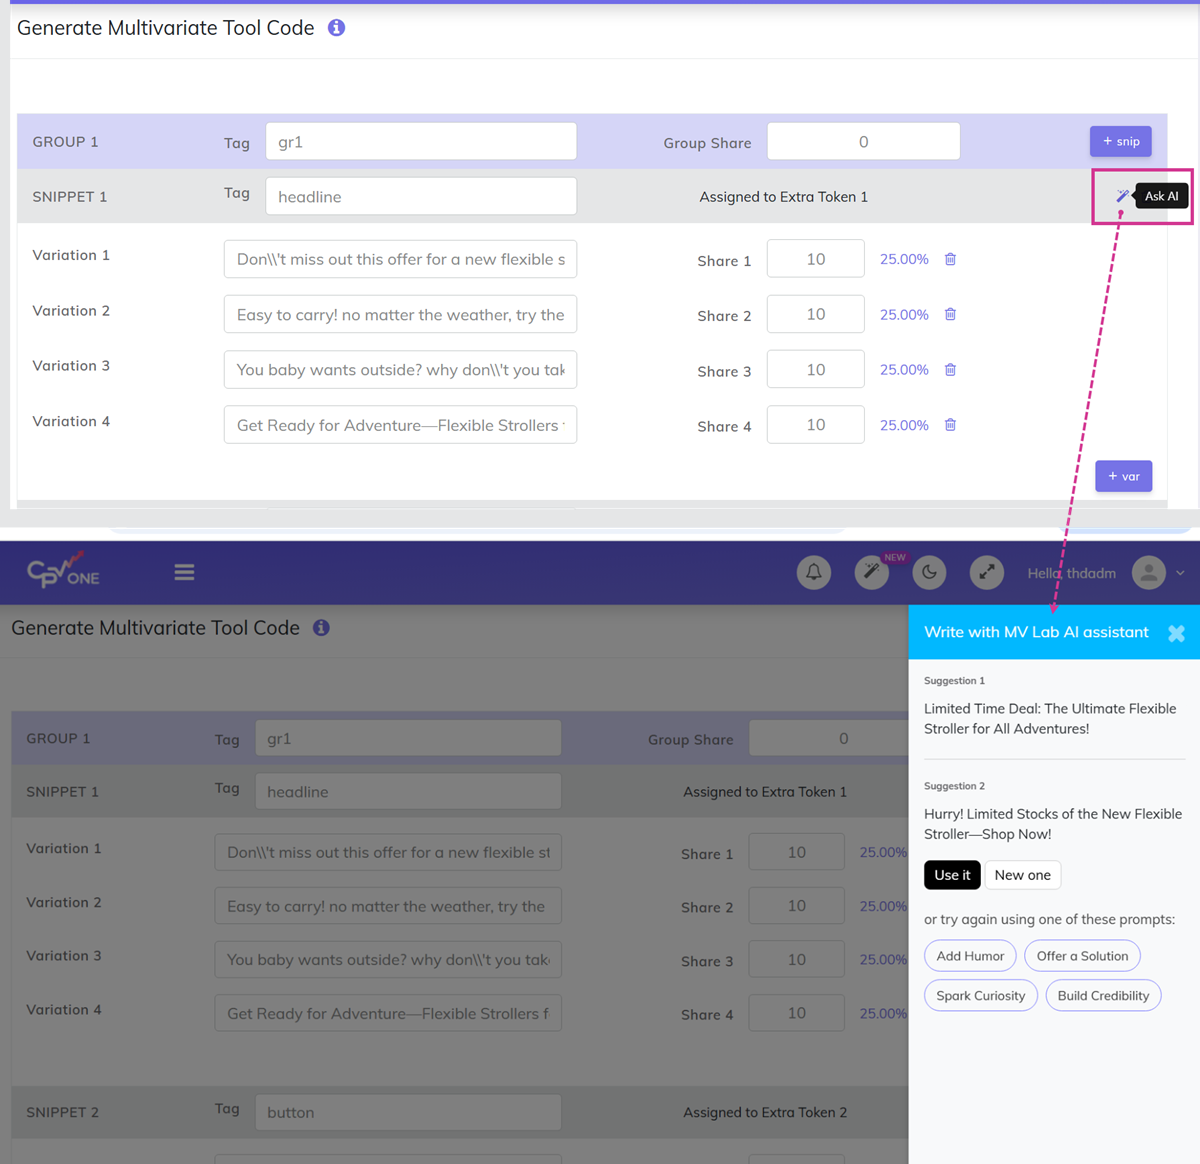
2. Review & save suggestions
- The Assistant returns max 3 suggestions at a time.
- Review each suggestion:
- If you like one, click Use it.
- If not, ask to generate a new one
- Save the best ones as variations for your snippet.
How it uses your examples
- It learns tone and style from the examples and vertical.
- Example flow:
- Vertical: Ecommerce – Shoes
- Snippet: headline
- Examples:
- “Save 30% on all running shoes”
- “Quick free shipping today”
- “Top-rated shoes for runners”
- Assistant output: 3 new headlines to test
MV Lab Code
MV Lab will generate a code for the landing page that will be used to test the variations.
1. Generate the code in MV Lab editor
- Once you have defined the snippets and variations, click the Generate Code and Save button and you will receive the code that should be added in your landing page, at the beginning of the page.
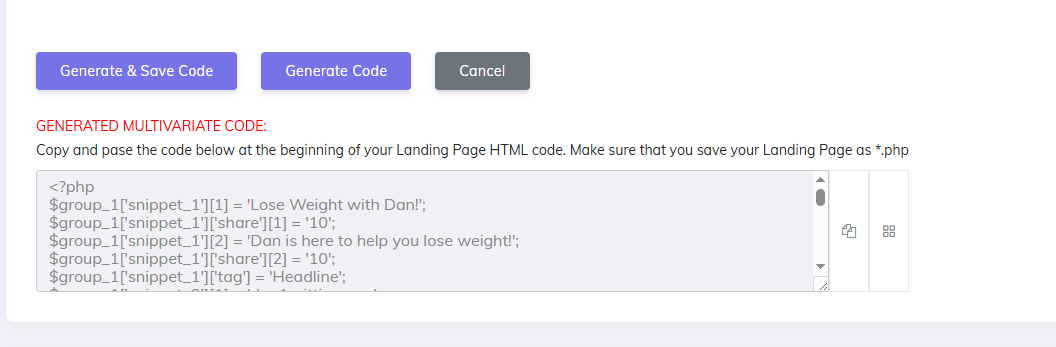
2. Create the landing page
- Once the Code is generated, you need to create a
.phppage to use it - Mark the places from your landing page where the multivariate snippets will appear.
- Each snippet will be marked with
##snippet_X##where ‘X’ will be replaced by the snippet number.
- Each snippet will be marked with
- Upate the original
.htmlpage and save it as an.phppage (example in the video below)
- Upload the landing page, any landing page dependencies (images, CSS files, JavaScript files) and the
mvlab.phpfile on your server.- Then you can access your landing page in a browser and see the first variations appear.
- Refresh the page several times and you will see new variations appearing each time. (check image below for details)
Testing workflows — A/B and multivariate
A/B test (simple)
- Variation A vs Variation B (only one element changed).
- Good when you want a clear winner fast.
Multivariate test (advanced)
- Multiple snippets change at once (e.g., headlines + images + CTAs).
- Use Groups to control combinations.
- Requires more traffic to get significant results.
Recommended test sizes
- For A/B: start with 1,000–5,000 clicks per variation to see early signals.
- For multivariate: plan for 500+ clicks per combination if possible.
Metrics to monitor
- CTR (Click-through rate) — did people click?
- CR (Conversion rate) — did people convert?
- EPC (Earnings per click) — revenue per click
- ROI or Profit — money made vs money spent
Advanced checklist
- [ ] Name and save variation (clear naming)
- [ ] Select campaign and domain in MV Lab
- [ ] Add Groups (if needed) and Snippets with Variations
- [ ] Use MV Lab Assistant to generate candidate copy (optional)
- [ ] Generate Code, add MV Lab Code to your landing page
- [ ] Upload to hosting and add pages in CPV Lab campaign
- [ ] Run small test → monitor CTR/CR/EPC → scale winner
Import existing code
- When you have an existing multivariate code in your landing page and you want to modify it (add/remove snippets and/or variations), then you can either do this manually in a text-editor, either use the same visual code-editor from CPV Lab Pro.
- Copy and paste the existing code in the dedicated box and then click the ‘Parse existing code’ button.
- You will see the boxes from the editor populate with the snippets and variations from the existing code.
- The visual editor can import multivariate codes generated by MV Lab and also by other multivariate tools (like Landing Page Genius).
MV Lab integration with CPV Lab | CPV One
To track what combination of variations is performing the best (CTR, CR, Engagement, etc), then the MV Lab page needs to be tracked with a campaign in CPV Lab ad tracker.
All the instructions on how to do this can be found here: MV Lab integrated with CPV Lab | CPV one
Advanced MV Lab features
Landing Page Rotator Tool
You can learn more about how to rotate landing pages with Landing Page Rotataor tool
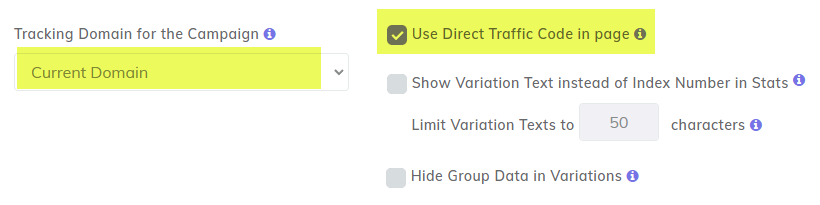
Using MV Lab with Direct Traffic Code
- If using the Direct Traffic code in your landing page, then make sure to choose your tracking domain and check the “Use Direct Traffic Code in page” option during the MV Lab generation code in the visual editor, as shown below:
- Once this is done, take the entire generated code and paste it as the first lines of code in your landing page.
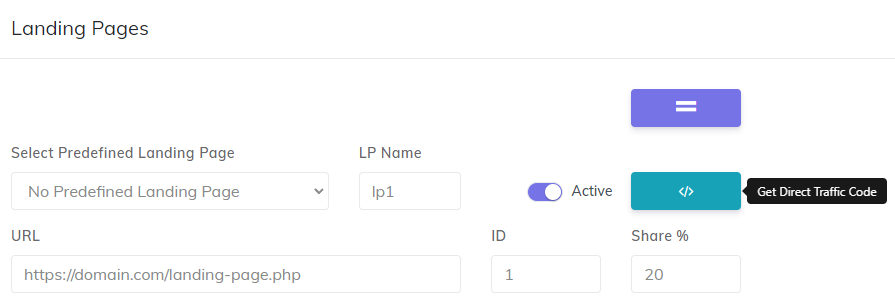
TIP
Make sure that you have the latest Step 2 code and Direct Traffic code (generated in CPV Lab Pro 9) placed in your landing page. You can get the latest Direct Traffic code from the button next to each landing page in the campaign setup page:
Ability to set shares to 0
- The MV Lab integration into CPV Lab Pro (opens new window) allows you to easily identify which variations are performing well and should receive more traffic.
But what to do with the variations that aren’t performing in order to stop traffic to them?
- Simply set those underperforming variations to 0 share in the HTML of the Landing Page and these will not receive traffic anymore.
- Just edit the Landing Page with an FTP client or with the File Manager utility from cPanel and set the shares to 0!
Assign MV Lab Variations to PHP variables
- You can assign MV Lab variations to PHP variables and then use them programmatically in the page as you wish.
- The following placeholders can be used to assign PHP variables (replace X with the snippet number, from 1 to 8):
##snippet_X##- the variation text for snippet X (text)##snippet_index_X##- the variation index for snippet X (numeric)##mv_X##- the variation string reported to the tracker
For example, the following PHP statements will assign the variation text and variation index to PHP variables:
<?php
$snippet1_text = '##snippet_1##';
$snippet1_index = '##snippetindex_1##';
?>
This feature offers great flexibility as it allows to perform any operations you need with the variations displayed in the page.
Video & Case studies
Find more details on how to use MV Lab in the video below:
Case studies with MV Lab
You may also find useful: