TrafficJunky integration in CPV Lab | CPV One
This guide shows how to connect TrafficJunky to CPV Lab (or CPV One). After you finish these steps you will:
- Send campaign traffic from TrafficJunky to CPV Lab.
- Track clicks, costs and conversions in CPV Lab.
- Use a Postback (server-to-server) URL so CPV Lab reports conversions back to TrafficJunky.
Who is TrafficJunky?
TrafficJunky (opens new window) is a large adult and mainstream ad network that serves display, native and video ads.
Media buyers use TrafficJunky for direct response campaigns because it offers audience targeting, device and geo targeting, and detailed campaign controls.
TrafficJunky provides a conversion tracking system (Conversion Trackers / Invocation Code) and a unique click parameter called aclid for each visitor.
Integrating TrafficJunky with CPV Lab lets you measure which clicks and offers convert, do split testing more easily and it helps you optimize ROI.
WARNING
In this guide we will be using CPV Lab as an example, but the setup is the same for CPV One (opens new window) ad tracker as well.
Step 1: How to set up TrafficJunky as a traffic source in CPV Lab | CPV One
CPV Lab (opens new window) comes with the TrafficJunky Traffic Source pre-configured in the Traffic Sources Catalog pages, so in this case all you have to do is import it from the Catalog.
- Sign into your CPV Lab (or CPV One) admin.
- Go to Settings → Traffic Sources
- Click "Import from catalog" and choose TrafficJunky from the catalog (or create a new custom source named “TrafficJunky”).
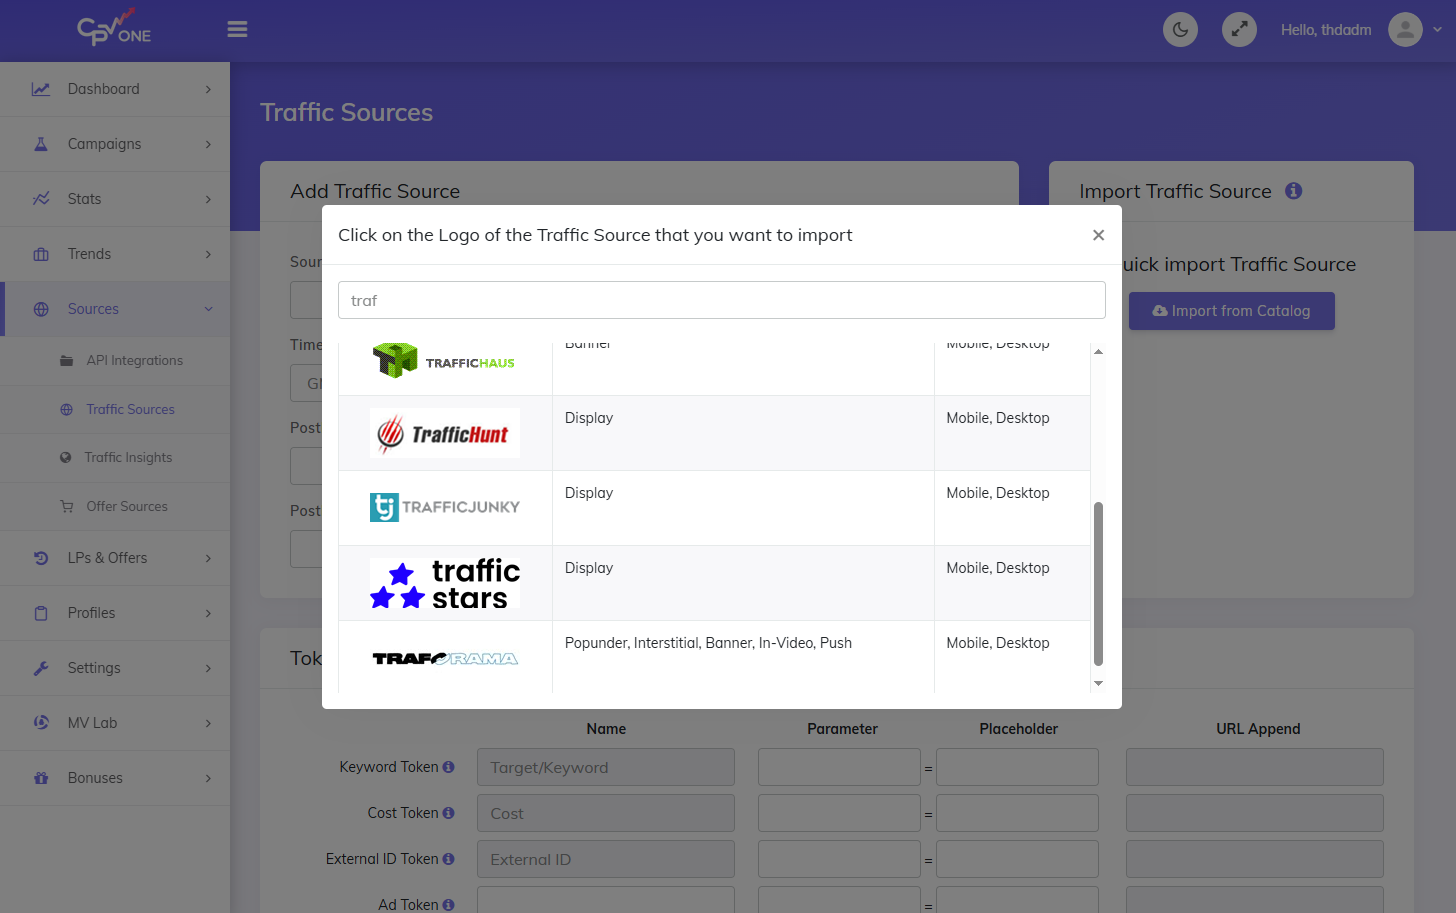
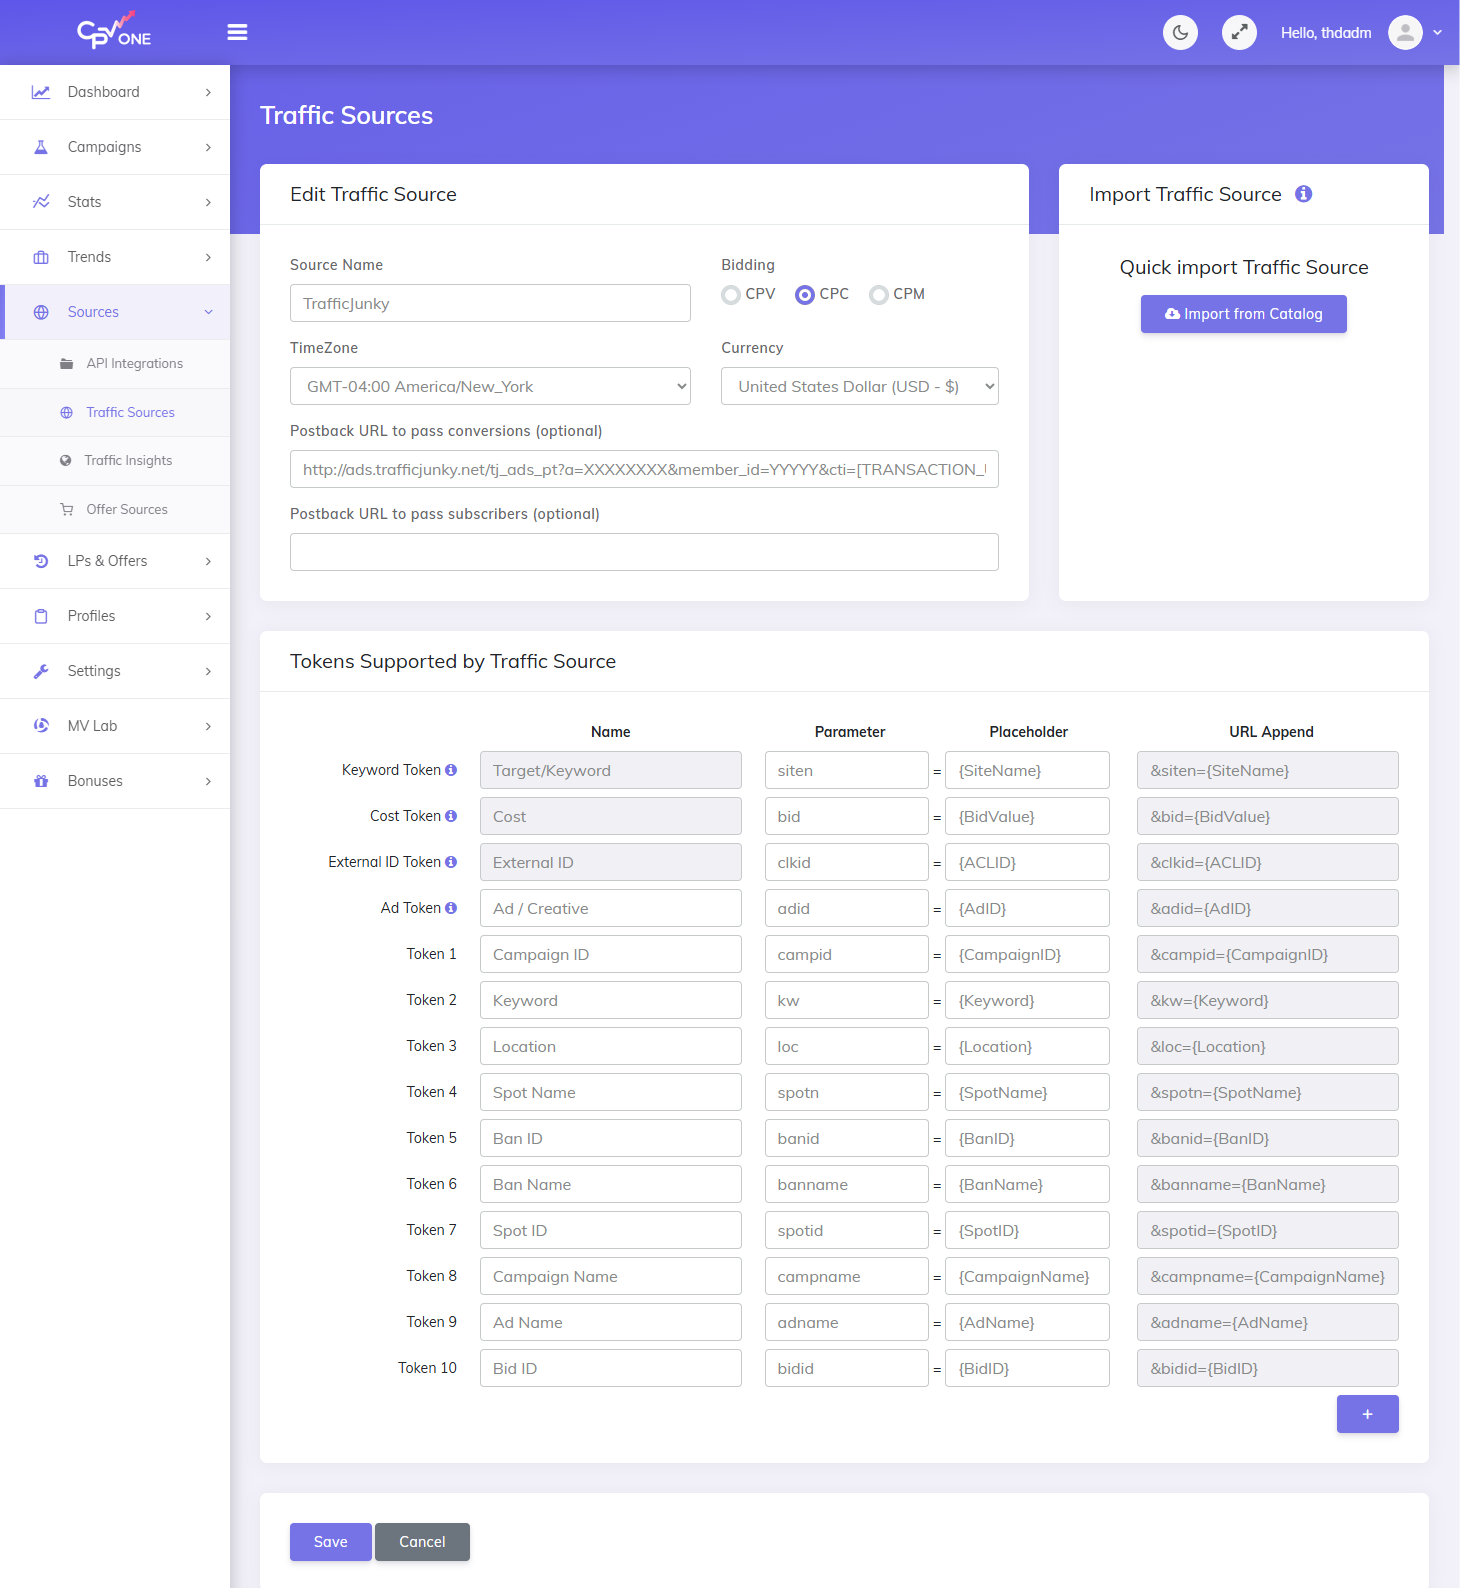
- All the fields will be prefilled:
- Source Name: e.g., TrafficJunky (a friendly name you will recognize).
- Postback URL (template): You can leave the default and you will update it later with information from Step 3 below.
- Tokens / Captured Parameters: enable tokens you want to capture (example tokens: aclid, country, city, device, browser, carrier, subid1, etc.). They are all already prefield.
- Save the Traffic Source settings.
TIP
Tip: If you add your Postback template on the Traffic Sources page, CPV Lab (opens new window) will auto-fill it in the Campaign Setup later for any campaign that uses TrafficJunky.
Step 2. How to add CPV Lab as a conversion tracker in TrafficJunky
In order to have TrafficJunky (opens new window) generate all the necessary information for your Postback URL, you need to add CPV Lab Pro as a tracker in your TrafficJunky account.
- Log into your TrafficJunky account.
- Go to Tools → Tracking Tools.
- Select Conversion Tracker menu.
- Click New Conversion Tracker button.
- Name it (e.g., CPV Lab).
- Choose the event you want to get information about (like Purchase/Sale)
- Save it
![]()
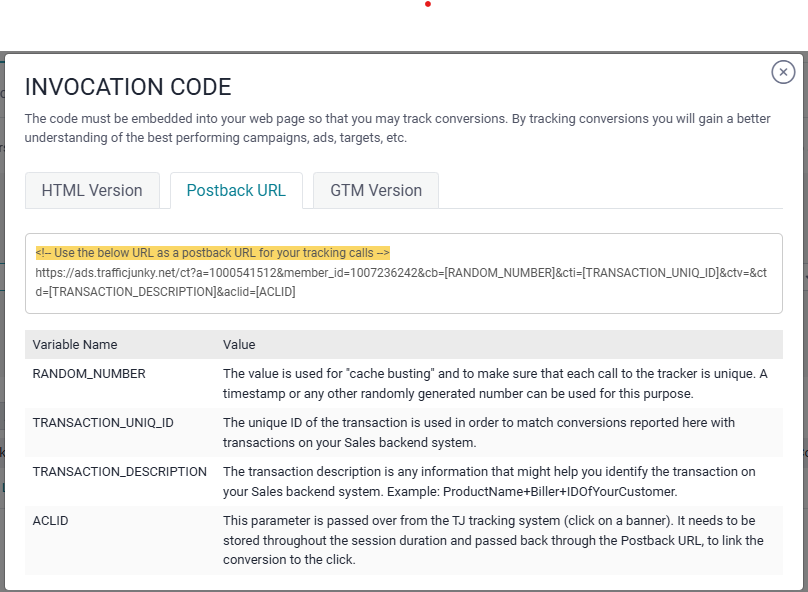
- After creating the tracker, open its Invocation Code for details
- TrafficJunky will show you the full Postback URL and available tokens. Keep this screen open for the next step.
3. How to set up the Postback URL in CPV Lab for TrafficJunky
In order to send conversions into TrafficJunky platform, you need to setup the Postback URL from TrafficJunky as the Traffic Source Postback URL in the Campaign setup page from CPV Lab Pro.
The Postback URL should contain the CPV Lab Pro macro
{!tscode!}(for Unique Click ID).- Go to your CPV Lab account
- Go to Sources -> Traffic Sources and edit "TrafficJunky" traffic source (the one added at step 1 above)
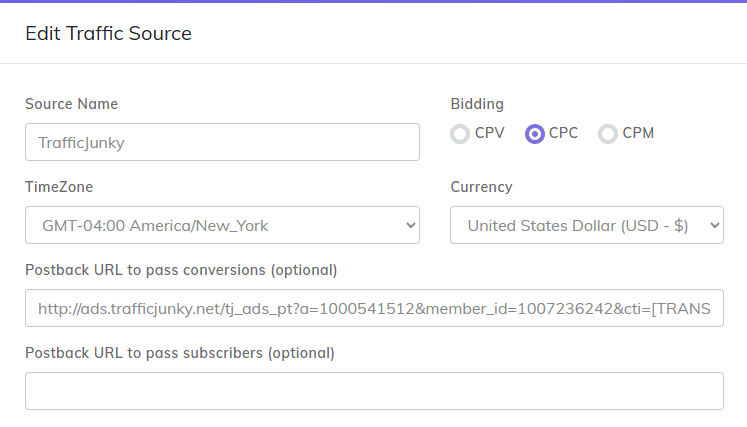
- Update the information from the "Postback URL" field with the parameters from Invocation Code in TrafficJunky (step 2 above)
- Simply, copy the values for the parameters "a"* and "member_id" and paste them in CPV Lab in the Postback URL field.
- The Traffic Source Postback URL will be automatically filled for the selected Traffic Source in the Campaign Setup page.

Postback URL Template (example)
Below is an example of Postback URL format for TrafficJunky. You need to replace a=XXXXXXXX and member_id=YYYYY with values from your TrafficJunky account (TrafficJunky supplies these in the Invocation Code):
http://ads.trafficjunky.net/tj_ads_pt?a=XXXXXXXX&member_id=YYYYY&cti=[TRANSACTION_UNIQ_ID]&ctv={!revenue!}&ctd=[TRANSACTION_DESCRIPTION]&aclid={!tscode!}
- a=XXXXXXXX → TrafficJunky account parameter (provided by TrafficJunky).
- member_id=YYYYY → your TrafficJunky member id.
- cti / ctv / ctd → TrafficJunky tokens for transaction id, value, description (used for revenue reporting).
- aclid={!tscode!} → very important:
{!tscode!}is the CPV Lab macro for the unique click id; CPV Lab will send it back so TrafficJunky can match conversions to clicks.
TIP
The Postback URL (opens new window) is not mandatory to be used, but it is recommended to get better traffic.
4. How to create a campaign in CPV Lab with TrafficJunky as the traffic source
Before creating a campaign, you need to make sure you have your landing pages and offers added in CPV Lab. Once you define your landing pages and offers, you can then use them for your campaigns.
- To add Landing pages go to LPs&Offers -> LPs Management menu
- add a landing page name that you remember and the URL for it
- To add new offers go to: LPs&Offers -> Offer Management menu
- add an offer name, choose the source for it and the URL.
Steps to create a campaign in CPV Lab | CPV One
- In CPV Lab / CPV One, go to Campaigns → Create New Campaign.
- Fill campaign details: name, custom tracking domain, data options,engagement rate, etc
- For Traffic Source, choose TrafficJunky.
- Select which tokens you want CPV Lab to capture (e.g., aclid, country, browser, device, carrier, subid1). These tokens will be added automatically to the Campaign URL.
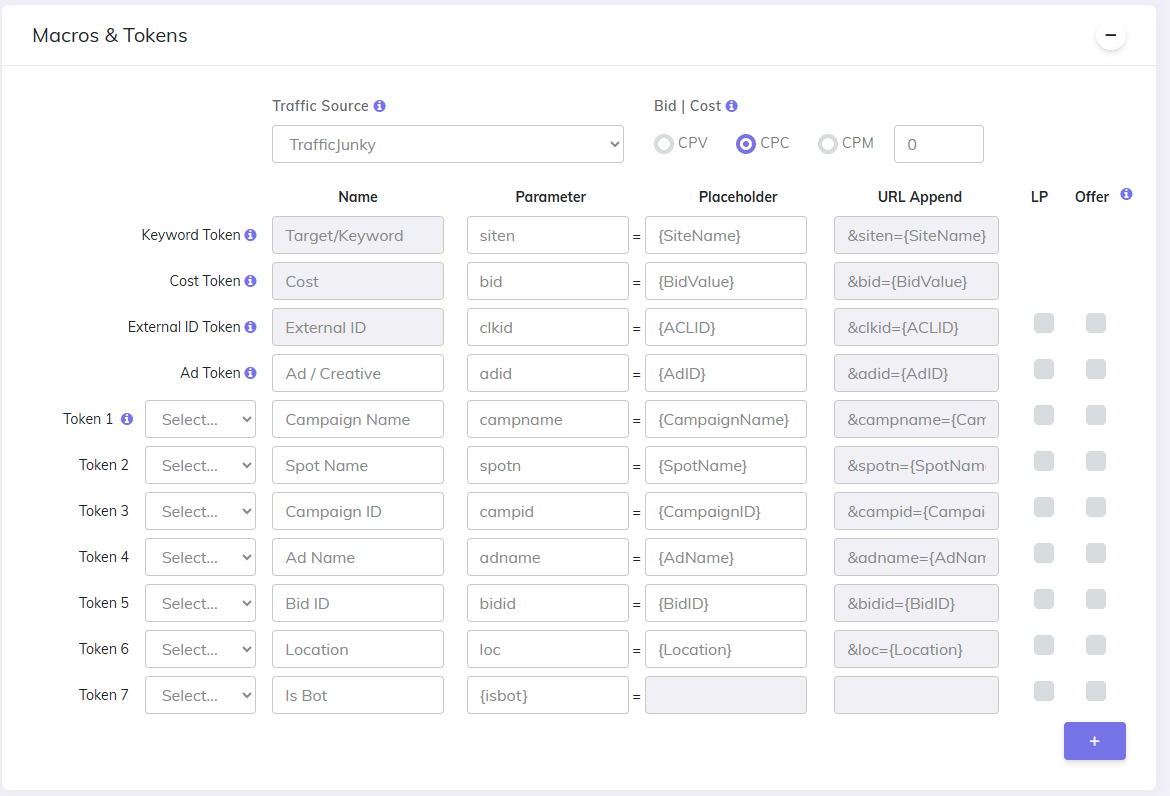
- For Landing Pages, choose one of the landing pages added before
- You can split test multiple landing pages by having different "shares" for each
- The "Shares %" value represent the percentage of traffic that the landing page will get
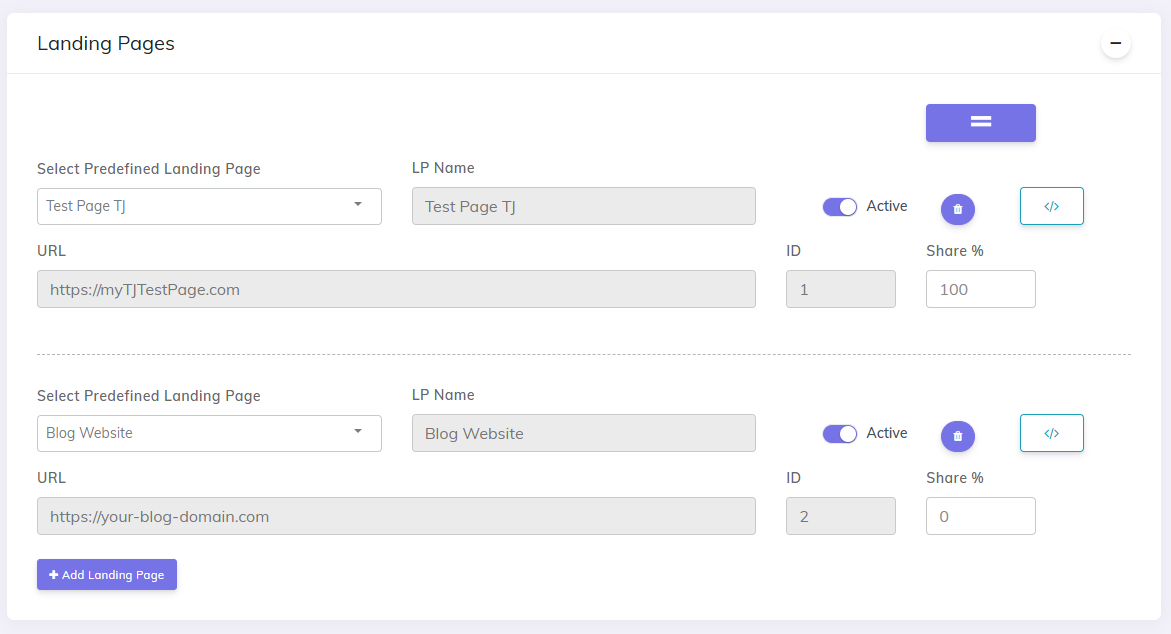
- For Offers, choose one from the ones added above
- You can split test multiple offers by changing the "Shares %" for each.
- Save the campaign.
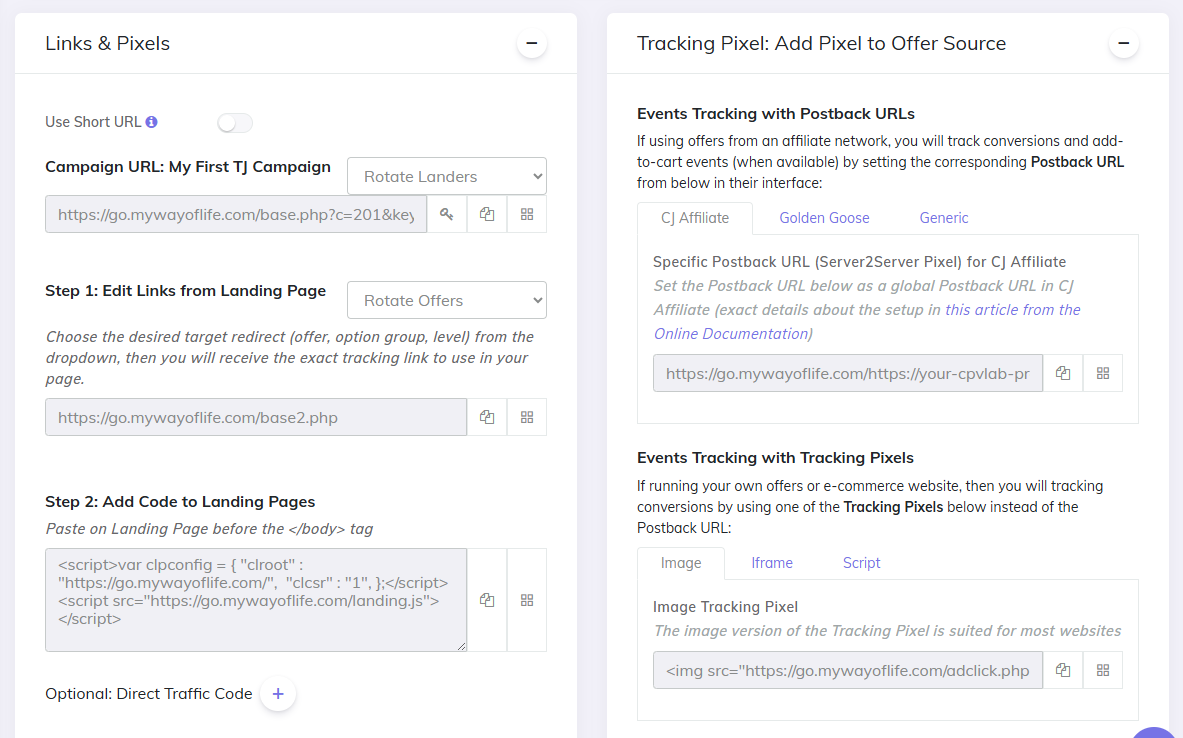
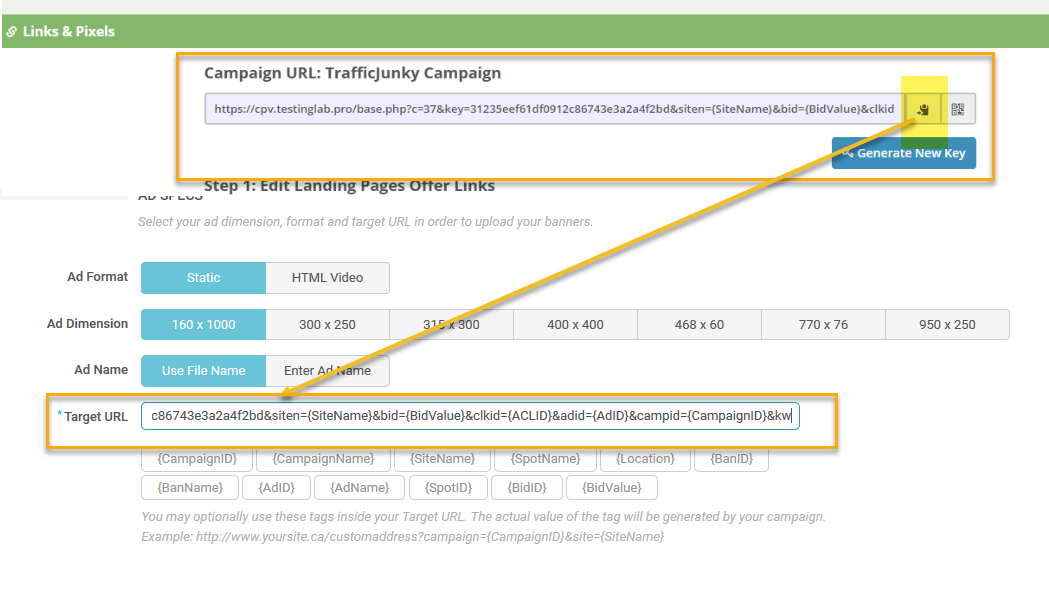
- In Links & Pixels, copy the Campaign URL (this is your CPV Lab tracking URL).
- The Campaign URL will contain tokens and the base.php link that accepts the aclid (unique click id).
- You will use the Campaign URL in TrafficJunky as your Target URL.
Step 5: How to create a campaign in TrafficJunky and add the CPV Lab tracking link
- Log into TrafficJunky and create a new campaign (go to Campaigns -> New Campaign)
- In the TrafficJunky campaign setup
- On "Step3: Tracking, sources & Rules" - select CPV Lab as the tracker
- Fill all the other fields, schedule and budget
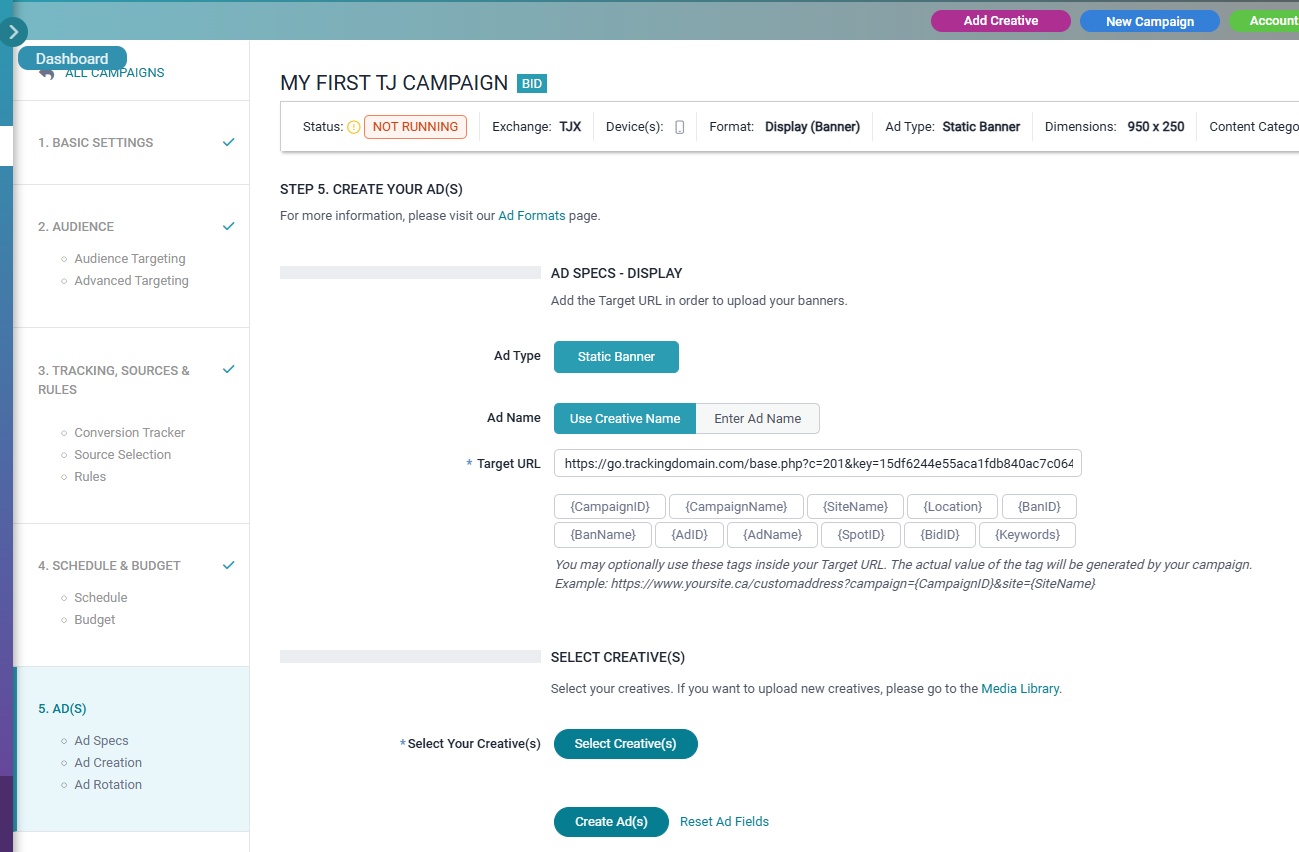
- On "Step 5: AD(s)" - paste the Campaign URL you copied from CPV Lab (Links & Pixels → Campaign URL) when asked for Target URL (or Destination URL)
- The Campaign URL already includes tokens like {aclid} and any other tokens you selected in CPV Lab.
![]()
- Finish TrafficJunky campaign setup
- Launch the campaign.
- Check your campaign performance in CPV Lab Stats.
Quick test & troubleshooting
Test a click: Before launching the campaign you can test. Copy the Campaign URL from CPV Lab and load it in the browser
Check CPV Lab clicks: In CPV Lab, open the campaign stats and verify that clicks are being recorded and that the aclid (or tscode) field is populated.
Test a conversion: Trigger a test conversion (complete the offer flow or manually add one from manage conversions page).
Verify the Postback URL is correct and contains {!tscode!}.