Campaigns Dashboard
The campaigns list page is the second dashboard or home page.
From here you can filter the view of campaigns, see a quick Earning breakdown and also View all Campaigns separated for each campaign type.
Video on how to use the Campaigns Dashboard page
Video Tutorial on how to use the Campaigns List dashboard page in CPV Lab/CPV One (opens new window)
Navigation: Campaigns

Page fields and details
1. Earnings Breakdown
- A quick view of the Total Visitors and Revenue Earned for Today, Yesterday, This Week and This Month.

2. Filters section
There are multiple filters available to filter the data of the campaigns list page.

- Status filter
- Groups filter
- Campaign Types filter
- Users filter
- Traffic Source filter
- Date range
Status Filter
Select if you want to see Active, Inactive or All campaigns.

Groups Filter
With the Groups filter you can select to see the campaigns from a specific groups or from all groups. By default it is ALL selected.

Campaign types Filter
The Campaign Types filter allow to filter the campaigns based on their campaign type:
- direct link and landing page
- landing page sequence
- lead capture & optin
- multiple paths
- multiple opions
- email followup

Users Filter
The users filter is used to filter the campaigns for your team members (the ones defined in users account page)
Traffic Source Filter
Select the traffic sources you want to check your campaigns for. This filter allows to filter the campaigns by traffic source

Date Range filter
With the date range filter you can select the time frame for which you want to see data in your report.
- Today - showing visitors and metrics for your campaigns for today's traffic
- Last Week - showing results for the traffic in the last week
- Last Month - Showing results for your campaigns in the last month
- All Time - showing results for your campaigns since you started tracking them

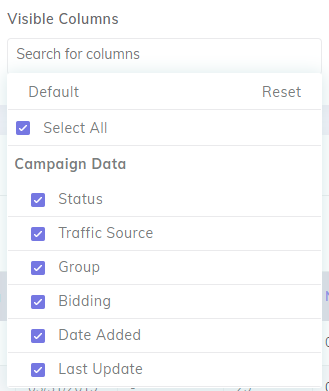
3. Visible Columns
- Select the Data Columns to be displayed.
- Choose from Stats, Traffic Source, Group, Bidding, Date Added and Last Update (Last Report Created)
- Once you finish to select/unselect the columns to be displayed, the page will be refreshed based on your filter
- The Default Data Columns are:
- ID - Campaign ID
- Name - Campaign Name
- Views/Visitors - The Total Traffic the Campaign has received
- New - The number of visitors since the last login to CPV Lab Pro
- P/L - Profit Loss of the Total Campaign
- New - Profit Loss for the Campaign since the last login to CPV Lab Pro
- ROI - Total Campaign ROI based on Stats
4. Data Table
Check the campaigns results based on the filter criteria you selected in the filter section. Here is a breakdown of all your campaigns, showing the most important metrics for each of them.
Search in the table
- Each data table has a "Search" option which allows to easily find information
- Use the Search function if you want to find a specific campaign or a specific value. It works to search in all the fields from the data table

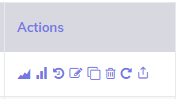
Campaign Actions
- Stats - Links directly to the Campaign Stats for the selected campaign.
- Reports - Links directly to the Campaign Reports for the selected campaign.
- Trends - Links directly to the Time & Day Trends for the selected campaign.
- Edit - Links directly to the Edit Campaign Page for the selected campaign.
- Clone - TIME SAVER! Create a duplicate of the selected campaign with all the data from the Cloned campaign entered. This is a real-time saver when you have a successful campaign you want to expand to other Traffic Sources.
- Delete - Removes the selected campaign from CPV Lab Pro.
- Reset - This resets and clears all the stats for a specific campaign.
- Export CSV - Creates a CSV File of the Campaign Setup : Settings, Pages and Offers.
- Copy Campaign URL - copy to clipboard the campaign URL to use it when you create the campaign with the ad network
Clone Campaign As a different Campaign Type
- You can clone your campaign in any type you want.
- Click the Clone button from the Actions section
- Select the campaign type you want to create the new Campaign
- Click Clone
- For example, if you have a Direct Link campaign and you want to create another one, with the same settings but as a Multiple Option Campaign, you can do it with a click.
We recommend you to Go and Check the new campaign settings after creating a Clone
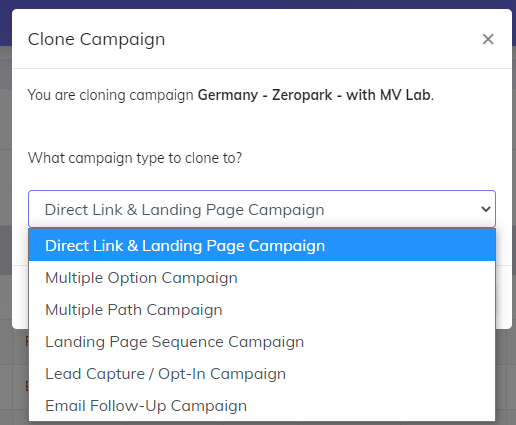
- The Clone Campaign feature will also clone all the existing redirect profiles from the initial campaign. This will save time because you won’t have to re-enter those redirect profiles in the cloned campaign.
- In case you don’t want to use the redirect profiles in the cloned campaign, then you can easily set them as inactive or remove them from the Redirect Profiles section at the bottom of the Campaign Setup page.
Contextual Menu
- For each campaign on this page, you can "right click" on the campaign name and the contextual menu will show up.
- This is a contextual menu from the Campaigns page:
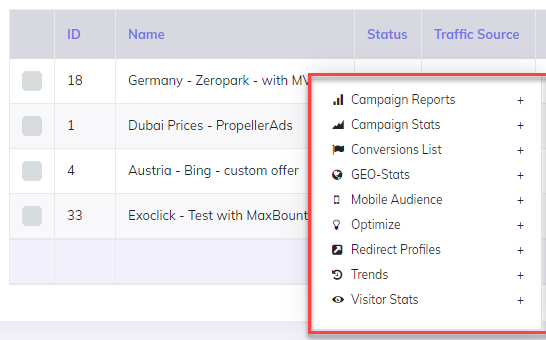
- Each menu item can open the corresponding page in 2 ways:
- in the same browser tab by clicking on the menu item text
- in a new browser tab by clicking on the “+” sign from the right of the menu item
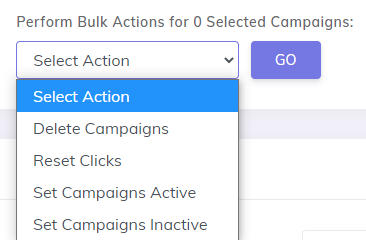
5. Perform Bulk Actions
- Apply Actions (Delete, Reset Clicks, Set Inactive/Active) to Multiple Campaigns at one time.
- Just “Check” the Campaigns (there is a checkbox in front of each campaign)
- Then Select the Action and Click “GO”
You may also find useful: